Bathtub Reglazing {Mandy’s blue bathtub is now white!}
Before I share about the tub, I wanted to tell you that Eli is guest posting
at
The Lettered Cottage today!
Not kiddin’!

He shares with Layla and Kevin his own decorating ideas for a kid’s room and also has his singing debut.
Click on the button to check it out!
Now to my post…
DISCLAIMER: This is NOT my bathroom. We are re-doing my friend, Mandy’s, blue bathroom for her.
Here’s a before picture of Mandy’s blue tub.

This blue bathtub is very typical of homes built in the 70’s.
To save some money for Mandy’s re-do, we decided to re-glaze the tub DIY style.
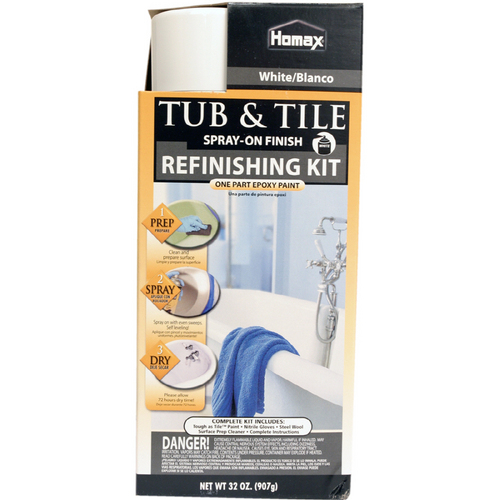
Cy bought this kit from Lowe’s…(about $40)

If you are going to use this, we suggest the spray-on version over the roll/brush on version. You will get a better finish, and it will last longer.
Here’s something you need to know…reglazing a tub is not for sissies!
This is about a 6 hour job. If you want it to turn out well and last, you have to follow the directions to a T. The worst part is prepping/cleaning the tub. You have to clean it very well with a special cleaner to help the new glaze adhere to the tub.
I wasn’t around when Cy cleaned the tub, but he said it wasn’t pretty. :)
I was there the day he sprayed the tub, and he had carefully taped off all the floors and walls to make sure they didn’t get any overspray on them.

If you plan on doing this project, you MUST wear a mask. Not a little paper mask, but a heavy duty one like this…

Cy wore a 3M Paint Spray Respirator that he got at Lowe’s for about 20 bucks.
We taped off the door so the spray wouldn’t travel out into the hallway…

This stuff is STIN-KAY! I’m sure Mandy and her husband were smelling it for quite a while!
The glaze sprays on just like spray paint. Follow the directions on the box of how to spray on the glaze.

Okay, ladies…stop staring at my hubby’s tush!
Here’s the first coat of spray on…

You want the first coat to dry a little bit before applying the second coat. I think it was about 10 or 15 minutes, but check the directions to make sure.
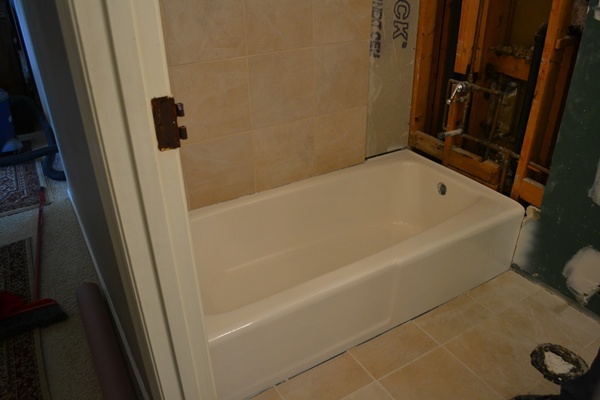
The second coat made the tub look like brand new!

It’s hard to believe that tub used to be blue!

Mandy is thrilled with the results!
Now we have to finish the tile around the tub and add the new oil rubbed bronze fixtures.

The tile in the above picture had not been cleaned off from when Cy has applied the grout, so there was still a layer of film on it. It looks much better now that it is cleaned off.
Can’t wait to show you the new counter and sink!
Have a wonderful day!
Linking this project to…


That is truly an amazing difference! I never realized you could change the color of a tub like that. I will definitely be giving this link to a friend of mine who also has that awesome blue tub. Personally I love it, but she’s not feeling the blue tub love!
wow! and the tile is looking nice too!
Wow, how awesome!!
Make sure no abrasive cleaners are used on that tub. No more Comet etc. Looks fantastic! I may just have to do that to my tub!
Looks great guys! Can’t wait to see what the sink and counter are going to look like!
Oh me oh my you have the most adorable little boy! I too have a 4 year old who L.O.V.E.S to sing that exact Justin Bieber song and loves to sing it OUT LOUD in public! Lovely! Makes the same face as little Eli when saying the oooooo at the end too :)
Have a blessed day! Thanks for sharing!
AWESOME!!! At our family cabin we have a 50 year old tub in a nice avocado green with a toilet to match. I have been thinking of refinishing that bathroom but didn’t feel up to replacing the tub. This is the prefect solution! I would love to hear more about the cleaning process though.
Well 1st… Fabulous interview with Eli…he has some good points & a great singing voice to boot….. : )
& the tub looks wonderful!! We recently bought a cottage, a foreclosure that needs a complete re-do….. I have wondered about & hoped you would post about the re-glazing from your mention in a previous post. The new place has an olive color tub in one bath & a peach colored one in the other.
We really don’t want to spend the money on 2 new tubs…. this is a perfect solution for us.
Thanks for sharing the “How-to”…. I will be sharing this post with my husband…. : )
Wow!! What an AMAZING difference!! LOVED LOVED LOVED Eli over at Layla’s!!! Too stinkin cute!!! Wonder where he gets his cute little personality & great design ideas from…hmm?! ha ha!!
WOW,Cy did a great job reglazing that tub. $40 sure beats buying a new tub.
Traci I LOVE how it turned out!! Y’all did a GREAT job!! Just curious – how long does that finish last?
WOW..I never knew you could do that..Unbelievable..Looks so nice..
Janet
No way! Can’t believe it’s a DIY project. My tub was refinished once when our builder scratched it up prior to us moving in. I wonder if I can reglaze over glaze. Worth checking into.
Wow! That turned out fabulous!! Looks like a brand new tub!! Heading over to the Lettered Cottage to see Mr. Eli!!
Any idea of the longevity of this product? I’d love to resurface one on my bathtubs but am holding back because I’m not sure how long it will last.
WOW! I can’t believe that is the same tub! Cy did a great job!. Went over and checked out the Eli video —– Layla, Layla, Layla – ooooooooooohh
Traci – HE IS JUST PRECIOUS!
Marilyn C,
This TOTALLY reminds me of the hubs and I acid washing and repainting our pool last year: http://momsrevolution.blogspot.com/2010/09/my-week-as-inexperienced-pool.html
The key is in the respirator!
This has inspired me to to possible, quite maybe, repaint me tub. I will hand it to Cy though for using those chemicals in a small space.
Loved the interview at the Lettered Cottage and especially the song – he could definitely give Justin a run for his money! Such a cutie. Great job on the bathtub also!
The tub looks great! I may have to try this considering my tub in my master bath is pink!!
I did not know you could buy a kit and do this yourself! We’ve had ours professionally reglazed twice — two different companies, two different so-so results and each cost us about 300.00! I think while this appears to be a lot of work, it would be worth the savings!
I didn’t know you could even do that… that is neat… Now I know so what was the total cost to do that?
Angie
Very NICE!
We had our claw foot tub reglazed, but I paid a hefty price to have someone else do it!
So worth it though!!!
I never knew you could do that! That would have been handy to know when we were doing Project Major Home Additon/Remodel. The kids’ bathroom {also from the 70’s} has a pink-ish tub. Thankfully when we added the brown tile surround, it makes the tub look somewhat tan in nature. Better than the pink, but still not what I would ideally have in there.
That is awesome! I didn’t even know you could paint a tub :)
I had no idea you could change the color on a tub. What a great money saver!
That was our bathroom when we moved into our house eight years ago. the tub & sink were a dark peach & the tiles were grey trimmed with black! I am sure they are glad for the white tub. You did a great job!
WOW! That’s awesome. I haven’t been that impressed by a DIY for awhile! I can’t wait to see the finished bathroom!
holy moly! I am impressed!!!!
about the tub AND eli’s interview. He is TOOOOOOO cute.
Thanks for the link! I’m so glad to see the process. I wondered how it was done. I think I can do this. Happy Monday! ☺ Congrats to your little guy and his guest blogging. ☺
Great Job! This is not a fun job. I did the same for my parent’s pink tub last year. I have pictures of that I am going to blog about, some day.
Interesting. I knew you could hire people to reglaze a tub; I didn’t know you could DIY. It turned out great.
Wow it looks incredible!!!! Can this stuff be used on tiles as well???
Hello… I am looking to do this project and I was just wondering if you have an update on this. It has been a couple of years since you posted this and I was just wondering if this has stood up to the test of time and use. That is our main concern with this project. I would really appreciate an update. We have found a lot of stories that seem to have great results, but that is all right after it is finished. We have also read a lot of horror stories about what happens after a couple of months.
Looking forward to hearing from you!
Ronni
This looks awesome!! I am doing a similar project, but the reviews for this product are horrible! Has the paint chipped over time? How does it look now?
— Lindsay
Hi Lindsay,
We haven’t been using this tub yet, but we reglazed a tub in a previous home we lived in and it helped up beautifully the two years we lived there. It definitely isn’t made to last 10 years, but is an inexpensive, temporary fix for tubs. My husband said that most of the time it doesn’t work because people do not follow the directions correctly. You need to make sure to apply it correctly to get the best results. Hope that helps! :)
This is a great idea! I always wanted to change the color of my tub. I don’t like how my blue tub (blue seemed like a good idea at the time) stands out from my all white bathroom. I’d like to give it a try, but I’m afraid I might mess it up. I guess I will have to ask help from professionals for this.