
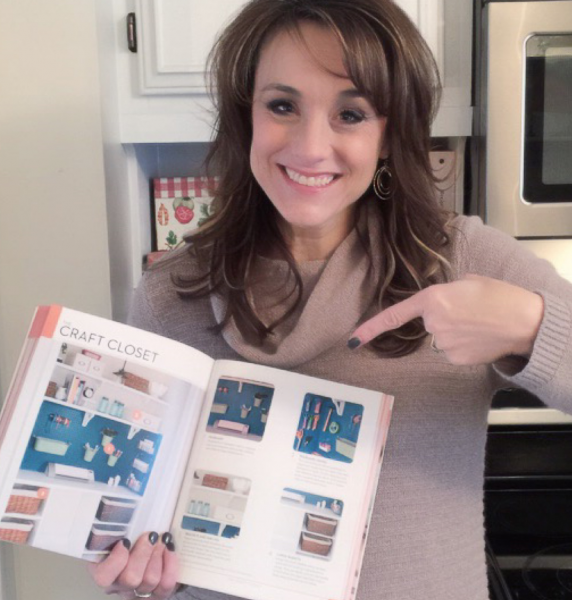
Craft Closet Makeover
Today for my “Throwback Thursday” post, I am going to share one of my most popular posts on my blog. It’s also the project on my blog that was featured in Organize Your Life.
This closet organization post was original posted on March 13, 2103.
*********************************
I have finally finished my craft closet makeover! Woo to the hoo!
Thanks to Lowe’s I was able to get the materials I needed to get it finished. I am so excited to be a part of the Lowe’s Creative Ideas Creators and Influencers network!
Here is what my closet looked like less than two weeks ago…

And here it is now!…

So much bettter!

It all started with taking everything out of the closet and removing the header.

Cy helped me with this part. I wanted to open up the closet so it was easier to reach the top shelf and so it wouldn’t look so much like, well…. a closet. ![]()

Eventually, we are going to pull up all of the old carpet in this room, so we decided to go ahead and remove the carpet from our closet before we built our shelves.
Eli helped with the clean up.

Next, I painted the closet the same color as the rest of the room. It is called Natural Choice by Sherwin Williams, but I always have them color match it at Lowe’s and use Valspar.

We went to Lowe’s to buy some shelving pieces and decided to use these…

We decided to build shelves to hold some baskets on each side of the closet. When we nailed these pieces together, we made sure that we used wood glue as well in between the pieces to make sure that the hold was strong.

We bought some pegboard from Lowe’s and covered the back and side walls with it.

Then we were able to place the first shelf right on top of the pegboard and 1×2’s.

I wanted to go a little out of my comfort zone and pick a bright color to paint the pegboard. I will with Caribbean Holiday by Olympic.
I LOVE this color!

I bought 6 corbels from Lowe’s and painted them white using my favorite Valspar paint in Satin White.

To make the shelves look a little more custom, we added trim work to the front of them.

After a lot of filling nail holes, caulking, and painting, the closet was ready to be organized and decorated.
To help me organize my craft supplies, I bought the following pegboard organizer kit from Lowe’s…
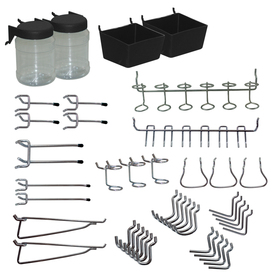
Blue Hawk Metal Pegboard Organizer Kit
It is so nice to have all of my supplies out in the open.

Now I don’t have to waste time searching for supplies when working on a project. It is all within plain view. ![]()

I really like the decorative touch that the corbels I bought at Lowe’s give to the shelves.

I wanted to be sure to add a cute pendant light to my closet, so I bought this Edison Light from Lowe’s.

Here is the link to this light…
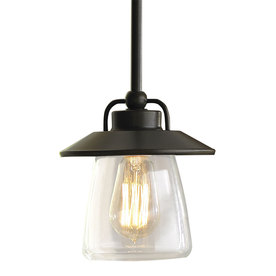
Allen + Roth 6-7/8-in W Edison Style
Mission Bronze Mini Pendant Light
Oh, we also painted the subfloor with white paint. I am planning on painting the wood floor in the rest of the room as well {eventually.}
I am also wanting to put a stool in the space in the middle of the closet. However, I have yet to find the type of stool I am wanting to use.

But for now, I am thrilled with my new craft closet!! There’s nothing better than feeling more organized!
Let’s check out the before and after again!

Want some more DIY inspiration? Check out Lowe’s Creative Ideas for free ideas and plans:
![]()
Disclaimer: I was provided with a Lowe’s gift card to purchase the supplies for this project. The idea of this project was my own, as well as the manner in which I shared it.
.*******************
I got really impressed. The way you organized everything in such a small space. I need to try it on my home. For sure.
Thank you, Erika!
Awesome craft space!
WOW, fantastic…
Love it!
Love the makeover. Can you tell me something about the wire baskets hanging on the sides of the closet with the paints in them? Love them
Thanks, Karen. I got those wire baskets from IKEA. They are in the kitchen section, I believe.
It’s lovely! Where did you find the little racks you used for your stencil paints?
Wow , I loved everything. It’s amazing how doing this can achieve a great space.
Awesome ideas to gain space in the house, one in particular burning taste, I hope to do with melamine, keep it up this page is interesting.