Parade of Homes (and Master Bedroom Reveal!)

April 25, 2010 AT 11:52 pm 79 Comments

I am so excited to be participating in a blog Parade of Homes sponsored by Poppies at Play!

parade2

For those of you who are visiting my blog for the very first time, let me introduce myself.

My name is Traci, and I am a stay-at-home mom of four boys. I am married to a wonderful man who loves the same things in life that I do. We love sharing in this adventure called “life.”

IMG_6157

I was an elementary teacher for 6 years before my first son was born, and it is hard to believe I have been at home with my boys for the past ten years. What a blessing!

I started my blog in March of last year after my mom kept encouraging me to. I am so glad she did. It has been a huge blessing in my life! My blog is dedicated to my mom who passed away in September of last year after a short battle with gastric cancer. Her love and her faith in God has changed my life forever. (You can read about her story by clicking on “mom” in my sidebar.)

Over the past year, I have been fixing up my house one room at a time. I just recently finished our master bedroom, and I am so excited to reveal it today!

I am not an interior decorator. I have no degree in design. I have just used the inspiration I have found in blogland this past year to decorate my home. :)

So welcome everyone to my

ol’ Kentucky home!

IMG_2996

I like to call my home the “House of Thrifty Finds.” Almost everything in my house is from Goodwill, garage sales, or hand-me-downs. I will point my thrifty treasures out to you throughout the tour.

As you enter our home, you will see this vinyl saying that my Mom helped me put up last August.

IMG_2946

Directly down the foyer is our kitchen and eating area.

I purchased the hutch for $75.00 at a garage sale and painted it black. You can read about that project HERE.

image

image

The white buffet on the left side of the picture below is a $55.00 find at Goodwill that I painted. You can read about that project HERE.

IMG_3084

I love this view of my curtains through the mirror. I made the curtains from drop cloths, and I absolutely love the way they turned out. If you want to see how I made them, just click on “drop cloth projects” in my sidebar.

image

Our biggest renovation in our home has been the kitchen. Last fall, we tore out the soffit above our cabinets and created new, taller cabinets. You can see the complete DIY renovation by clicking HERE.

image

I love the glass cabinet doors and the open shelving my husband created above the microwave.

image

The bead board cabinet doors added to the cottage style I was striving for.

image

We also installed recessed lighting inside the glass cabinets and underneath the cabinets. You can never have enough light in the kitchen!

image

On the right side of the kitchen, I made some cafe shelves like the ones I saw in Ballard Designs catalog. You can see the tutorial of how to make them for yourself HERE.

image

Our master bedroom is
right off of our kitchen. I have been working on our bedroom for a couple of months now, and I am so excited to finally share the finished product.

I renovated our entire bedroom for less than $700.00, and I will be sharing a ton of Before and After photos, plus the break down of my budget, tomorrow. You won’t believe the difference, so be sure to stop back by and check it out!

Here is the view as you enter the room…

IMG_6325

The bed was my parents, and I painted it black. I made the brown bedskirt from burlap, and I think it turned out beautifully.

IMG_6380

IMG_6348

I was so excited when I found this little vanity for only $25.oo! It fits perfectly beside my bed. It just needed a little TLC which you can read about HERE.

IMG_6316

I have enjoyed accessorizing with items that are special to me, like the picture of my mom and me when I was a little girl and a decorative bird that was my mom’s.

IMG_6314

The chandelier was my “splurge” for my room. I got it at Lowe’s and I love the way it adds a little romance to the room.

IMG_6328

IMG_6374

This black dresser was purchased at an antique mall, and I painted it black as well. (Can you tell I like that color?) :)

IMG_6340

Here’s the view of the other side of the room.

I got the armoire for $40.00 at a habitat store! It needed a little work (like it was missing a back), but it works perfectly for our room now. Our tv hides in there! Click HERE to see that project.

IMG_6362

Our master bath is really small, but can you believe it was actually smaller?! We renovated it a couple of years ago by knocking out a wall and making it a little bigger.

My husband did all the work in our bathroom. He is quite the DIY man!

IMG_2982

IMG_2985

IMG_2961

One of my favorite “rooms” in our home is our covered back patio.

IMG_2388

IMG_2391

I love watching my boys play in the back yard and enjoying lots of cookouts with friends and family out here. Those are some of life’s sweetest moments!

See that red door in the background of the below picture?

That door leads to the guest house we built over our detached garage.

IMG_2384

My husband built our guest house, and I got to decorate it. A winning combination!

We didn’t really have any money to decorate the guest house, so I had a ball shopping at Goodwill and garage sales. I am one of those people who think it is FUN to decorate with thrifty finds!

image

My hubby built me these amazing cabinets! If you want to see how he made them, click on “cottage cabinets” in my side bar labels.

image

image

I got this cute little coffee table at Goodwill for $6.50 and painted it white. It fits perfectly with the room. I also got the chair for $6.50 at Goodwill and covered it with burlap.

image

If you would like a complete tour of our guest house including the bedroom and bathroom, click HERE.

Well, that concludes my tour!

Thank you so much for stopping by, and I hope you enjoyed your visit.

The next house on the Parade of Homes tour is Beth from Stories from A to Z. Her house is beautiful and so is she…inside and out!

Just click on the #3 button below, and it will take you there.

3

Enjoy the Parade!

Have a blessed day!

Traci


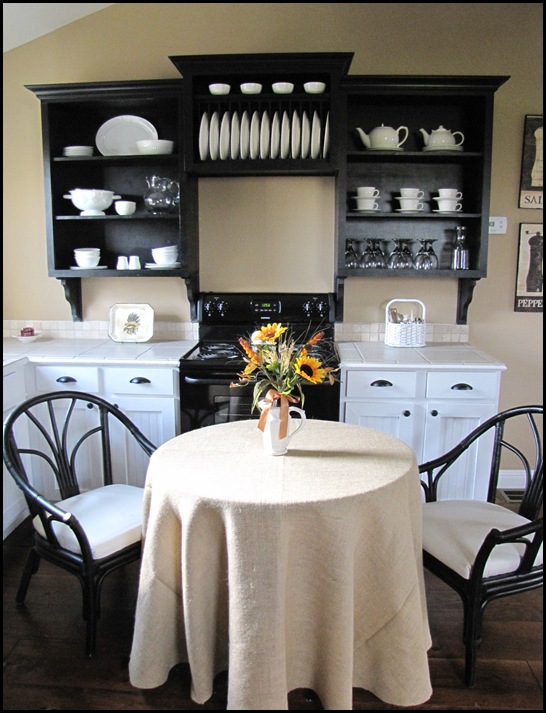
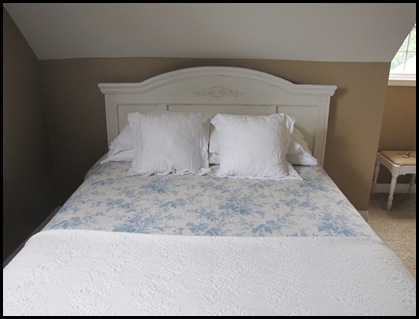
Cottage Guest House Tour

January 24, 2010 AT 10:54 pm 119 Comments


I wanted to share with you how far we have come on our guest house. I am still not finished with some of the decorating details, like curtains and such, but we’ve come a long way, baby!

I have also added to this post 6 links to some of my favorite DIY projects that I completed for the guest house. Be sure to check those out as well.

This is our detached garage that we built about 4 years ago. We built it with the intentions of turning the top part into a guest house.

ice storm 09-ebay 005

The red door takes you into the garage. Directly inside you will see our black “school house” door that leads to the guest house. We got this door at a Habitat store for ten bucks! It was solid wood and had a glass pane missing. So my husband installed a new piece of glass, painted it black, and added hardware. I love it.

IMG_5347 The picture below is a “before” shot of the steps. We used pine for the stair treads and white bead board for the stair risers. We stained the steps a “Provencial” stain from Minwax.

work 015

Here’s the “after” shot of the steps…

We used some tile we had left over from the guest house bathroom to make the entry way.

IMG_5348

The next two pictures show the “before” picture of the hard wood floors. The floors are made of 9 inch New England pine, tongue and groove, wood planks from Lumber Liquidators. We used the “Provencial” stain from Minwax again. My wonderful father-in-law helped my husband build this beautiful black bannister and also installed our hard wood floors. Thanks, Pop!

work 005

The right side of the room is where we planned to put the den.

work 006

Here’s the “after”…

IMG_5037

This is the left side of the room where we wanted to install the kitchen.

work 007

My husband built some cottage style open cabinets…

work 036

He also made me a plate rack which I love! Then we painted the whole thing black.

cabinets 002

We added corbels underneath the black cabinets. The white cabinets on the bottom were old cabinets we had leftover from our old kitchen island in our house.

cabinets 010

I wanted some shelves on the side of the sink for baskets, so my handy hubby built some.

cabinets 017

cabinets 018

The picture below shows the baskets we added to the shelves and the cottage style doors that my husband made as well. We got the sink at a Habitat store for $7.00! It’s perfect!

IMG_2296

My husband also tiled the countertop. It turned out fabulous! The backsplash is travertine tile that we got at the Habitat Store for a few dollars. The larger tile we got at The Tile Shop. The black hardware is from Lowe’s.

chairs 008

Then I added my white dishes that I got mostly from Goodwill.

The chairs for the kitchen table were a Goodwill re-do too. You can read about them HERE.

And I made the burlap tablecloth, and you can read about the tutorial HERE.

IMG_3992

The light we added in the kitchen is from Lowe’s. We purchased a the black fan without a light because we couldn’t find a black fan that I liked. I wanted the old school house look. We found a light kit at Lowe’s with the old school house globe that we attached to it. It’s exactly what I wanted!

IMG_3995

The picture below is the “before shot” of the opposite side of the room.

work 013

Here it is now…

IMG_5362

I got the little chair from Goodwill for $6.50 and recovered it in burlap. You can read about that project HERE.

The white coffee table was also purchased at Goodwill for $6.50, and I painted it white. You can read about that HERE.

IMG_5353

The couch still needs to be slipcovered. I am working on that! :) I got it at Goodwill for only 25 dollars. Right now I just have it covered with a white matelesse.

The next picture shows the door leading into our guest bedroom. We got that door from my sweet sister-in-law when she was re-doing her home. It was a green color, so we painted it white and added a oil-rubbed bronze door knob.

IMG_5355

The next picture is a “before” shot of the guest bedroom. (We still had the kitchen cabinets in the room at this point.)

work 009

Here it is now…

IMG_5358

I am hoping I can find a cute little desk to put under that window. I would like to paint it black and distress it.

The furniture in this room used to be natural wood, and I painted it white. You can read about that project HERE.

The white dust ruffle was a $2.50 purchase from where else but GW.

The chandelier was given to me by my mom. It used to be silver, and I painted it black.

IMG_5360

Here is the “before” picture of the bathroom…

work 010

I haven’t done much in this room except to make a unique headboard towel holder. You can read about that project HERE.

IMG_5139

This is the armoire that I painted white. It sits right outside the bathroom and stores towels and blankets. I got the wire locker basket at a yard sale for $5.00. I am on the look out for some more!

IMG_5143

Well, that’s it!

I didn’t show you the laundry room because I still have a lot to do in there.

My goals for the guest house are:

1) Make shelf for laundry room.

2) Make shower curtain for bathroom.

3) Find mirror for bathroom.

4) Create curtains for each window.

5) Slipcover couch.

I am taking my time on the above list because I have some pressing projects that I need to get done over in our house!

Thanks for taking my little “Guest House Tour”. I hope you enjoyed it!

I will be linking this post to:

Metamorphosis Monday at Between Naps on the Porch,

Make it for Monday at Cottage Instincts

Mak
e Your Monday at Twice Remembered

DIY Day at A Soft Place to Land

Get Your Craft On at Today’s Creative Blog

Show and Tell Wednesday at Blue Cricket Design

Transformation Thursday at The Shabby Chic Cottage

Saturday Night Live at Funky Junk Interiors

Have a Blessed Week!


This might be my favorite project ever!

January 7, 2010 AT 12:24 pm 101 Comments

Hey, ya’ll! This might be my favorite project ever because it is like nothing I have made before!


I showed you this picture on Tuesday as a little “tease”.

IMG_4989

I found these at Goodwill. Aren’t they gorgeous? I feel in love with them and had to get them. It is a headboard/footboard set for a twin bed. There were no rails to go with it, but that was okay because I didn’t need them….I had other plans.

I happily paid $25.00 for the set and went home.

I have been trying to come up with a creative towel rack for my guest house bathroom. My guest house is a little more cottage-y, so I like to decorate with more of a vintage feel.

I was blog-surfing the night before I found these beauties, and I saw a post that got my wheels a turnin’.

Jenn, at Livin’ the Simple Life made a coat rack out of a headboard. She also made the bench below it. The girl is crazy crafty and you must visit her blog!

projects 055

I just loved her coat rack and thought it was super creative.

When I saw the headboard and footboard at Goodwill the next day, I knew it must be fate!

One of those babies were destined to become my towel rack for my bathroom.

So here’s what I did…

After holding both the headboard and footboard up against my bathroom wall to see which one “fit” best, I decided to go with the headboard.

My bathroom in the guest house is not very big, but this headboard was going to make a big statement!

First I had to cut the legs off the headboard, so I used my hubby’s Skil Saw.

IMG_5053

She’s lookin’ good already!

IMG_5056

Now some of you may think I am crazy for painting this beauty. I know some of you would have left her alone. But I’m not sentimental like that. I needed her to be white, so white she would be!

Now I needed to prepare the surface to paint. Instead of sanding it with sandpaper, I used a liquid deglosser to do the trick. It is soooo easy. Just pour it on a cloth and wipe it all over the wood surface!

IMG_5000I let that dry, and then I began painting. My paint of choice is this little quart of Valspar paint. It can be found over by the spray paint cans at Lowes. There is a sign above it that says something like “high performance” or “extremely durable” paint. The workers at Lowes suggested we use this on our kitchen cabinets and we did. We love it!

So I used a brush to paint in any of the grooves.

IMG_5058

IMG_5059

Then I used my roll brush to paint the smooth surfaces. (No I am not left-handed, I just needed my right hand to take the picture!)

IMG_5060

Here she is after 3 or 4 coats…ahhhhh….

IMG_5063

Here’s the hardest part of the process…

let it dry.

It’s very important to let it dry REAL good before sanding.

Luckily, I got something in the mail to distract me.

I have a special bloggy friend, Kim at My Domestic Bliss, who sent me this HUGE block of Hershey’s chocolate. She’s precious!

IMG_5064

It was sooooo good!

(I know I’m looking a little rough in this picture, but give me a break girls, I’m in the middle of a project!)

That thing was bigger than my head!

IMG_5068

The boys got into the action as well. Oh yeah, baby!

IMG_5070

Let’s re-focus, shall we? After the paint was good and dry, I used my sanding sponge to sand the edges of the headboard.

IMG_5071

There’s no rhyme or reason to this step. Just sand as little or as much as you’d like to get the look you are after.

IMG_5072

When I cut the bottom of the headboard off with my Skil Saw, it left a raw edge that needed a little work. I needed to fill an obvious groove in with some wood filler.

IMG_5074

I just pushed the wood filler into the groove with my finger and the let it dry.

IMG_5076

Then I used my sanding sponge to sand it to a smooth finish, and it was ready to paint.

IMG_5080

To get a more “aged” look, I like to cover my white paint with my favorite glaze, Valspar “Mocha”.

IMG_5001

I used a paper towel to cover the headboard with the glaze.

IMG_5077

Then I used a damp paper towel to wipe it right back off. (See left side of headboard.) I love the way the glaze got in the “groves” on the headboard and brought out so many of the details.

IMG_5078

Now I needed to attach my hooks. I found these cute little hooks at Hobby Lobby for half off. I bought 3 hooks for $1.50 a piece. Total=$4.50! I also got these wood screws at Lowe’s for a buck or two.

IMG_5081

I attached the hooks with the wood screws.

IMG_5089

It’s getting pretty late in the evening at this point and well….

IMG_5088

Yep! I did it. There goes my New Year’s resolutions to eat healthier! Thanks, Kim! ;)

Oh well. It was worth it.

As you can see, the silver screw does not look very good with my black hook, so I got a little black paint and dabbed it on the screw.

IMG_5091

Perfect!

IMG_5093

I bought some heavy duty mirror hangers at Lowes to mount the headboard on the wall. They were a dollar a piece.

IMG_5083

Now I did make the headboard by myself, but my hubby helped me hang it on the wall. It was very heavy (like a large mirror).

When you are hanging something this heavy, you need to make sure that you hammer the nails into the studs in the wall.

My husband insisted he help me with this part, which was fine by me.

We found the
studs in the wall and measured the distance between them. Then we attached the hangers on the back of the headboard the same distance apart.

IMG_5095 We hung it on the wall and I feel in love.

It’s exactly what I wanted.

But I am bummed at how my pictures turned out. There is no window in the bathroom, so I had no natural sunlight in which to take the pictures.

Notice the beautiful natural light right outside the bathroom.

IMG_5143

This is a piece of the bedroom furniture that I painted this summer. I’m storing the towels and blankets in there. I found the adorable locker room basket at a yard sale for $5.00. It’s perfect for storing the little wash cloths. My sweet mother-in-law bought me these new white towels for our guest house.

IMG_5144

Now into bathroom…

IMG_5141

I love the way it turned out. (Though I don’t think these pictures show it’s true beauty. My walls are a pretty tan, not mustard yellow!))

IMG_5140

And now for a parade of pictures…

IMG_5138

IMG_5136 IMG_5124

IMG_5135

IMG_5132

IMG_5120

I loved this project because it was a little “out of the box” for me, which made it tons of fun. And it brings the uniqueness I was looking for in a towel rack.

Now I still have the footboard…hmmm….

I will also be linking this post to

Transformation Thursday at Shabby Chic Cottage,

Furniture Feature Friday at Miss Mustard Seed’s Creative Blog,

Saturday Nite Special at Funky Junk Interiors, and

A Home Accents Party at The DIY Showoff,

Blessings!


Easy Coffee Table Re-do

January 5, 2010 AT 4:13 pm 56 Comments

I got this little coffee table this summer at my favorite shopping place (Goodwill) for only $6.50.

I liked it because it was simple, low, and had a shelf underneath that I could place books or magazines. And hey, for $6.50, what do you expect?

It’s for my guest house and will go in front of my couch that I still need to make a slipcover for…let’s not go there.

Here’s the before…

(I thought I had a better shot of it from this summer, but I couldn’t find it in my files. The black paint on the top of the table is from another project I did this summer. If something sits too long in my garage, it becomes a “work table”.)

IMG_4997

If you are painting something, you need to sand it lightly with a sanding sponge, or use a “liquid sandpaper”. I use Klean-Strip Easy Liquid Sander Deglosser. It prepares the surface of the wood to be painted. You pretty much just pour it on a clean cloth and wipe it all over the table. The instructions are on the back of the bottle. Let the deglosser dry before painting.

IMG_5000

Many of you have asked me what paint I use on my projects. My favorite is this Valspar paint that I get from Lowe’s. It comes in a quart size and is extremely durable. We used it on our kitchen cabinets and love it.

First, you want to get a brush and paint all of the corners, trim pieces, or any part of the table that has grooves in it.

IMG_5003

Here’s what it looks like after I painted the edges.

IMG_5005

Then I used a roll brush for the smooth areas. I forgot to take a picture of that brush…sorry.

IMG_5006

I had to do three coats of paint on the smooth parts. Here is what it looked like when I was done.

IMG_5008

I used a sanding sponge to sand the edges. Make sure your paint is completely dry before sanding or it will take off big chunks of your paint. (Yes, I have experience in that area!)

IMG_5009

I love distressing the edges!

IMG_5013

IMG_5012

Now for the magic….a little Valspar Mocha Glaze.

Now I know that each of us bloggers have our favorite glazes. The Shanty 2 Chic sisters love ‘em some Ralph Lauren. I haven’t tried that product, but I am sure I would love it. I have had this container of glaze all summer and it’s still half full. I have used it on many other projects as well.

I LOVE IT!

IMG_5001

Okay, you can tell I am the mother of four boys because this next picture makes me laugh. If my boys saw this picture they would think it looks like poo_…okay, I’m digressing.

Back to the project!

I have NO IDEA if this is the correct way to glaze, but it works for me!

First, put a little glaze on a paper towel.

IMG_5014

Spread a layer of the glaze all over table. I work in sections. I did the top of the table first.

IMG_5015

I let it dry for a few minutes and then get a damp paper towel and wipe it back off. You can wipe it as much or as little as you want to get the “look” your after.

IMG_5016

I like mine to look like a “dirty” white. Is that a color?

IMG_5017

I am sorry about the poor quality of these photos. I have to work indoors because it is sooooo cold out in the garage. Plus, I have to wait for the boys to go to bed to work on this, so these pictures were taken at nighttime. I don’t like to use a flash, so this is as good as quality as I could get.

I have to confess that I skipped a step to post this today. I didn’t put polyurethane on it, but I plan to. I don’t use it on all my projects, but since a coffee table will see a little more “wear and tear” than other pieces of furniture, I will be adding some poly to it in the future.

IMG_5018

The reason I am posting this kind of late is that I wanted to get a good shot of the table in the guest house in the daylight. I teach music at a Mom’s Day Out program on Tuesdays and Thursdays, so I had to take pictures when I got home this afternoon.

I thought the table looked a little bland when I saw it in the kitchen this morning. But when I put it in the guest house with a few accessories…it’s perfect! (See how much better pictures turn out in the daylight?)

IMG_5047

The couch in the background is the one I am hoping to slipcover in a couple of weeks. Emphasis on “hoping”. Right now I have it covered with a matelesse.

IMG_5041

Didn’t she turn out cute? She’s the perfect size! I love the wicker tray on the bottom. I got that at Goodwill for $4.50! It’s extremely durable and I love the black iron accents.

IMG_5042

Here is a wider shot of the guest house. Remember…it’s a work in progress. (I need to make a shade for my floor lamp, slipcover the couch, and make some window treatments….) I will share it all with you as I go along!

IMG_5037

Even though I am posting late, I am still linking up to all of these parties this week…

Met Monday at Between Naps on the Porch,

Before and After Party at Thrifty Decor Chick,

Get Your Craft On at Today’s Creative Blog,

DIY Day at A Soft Place to Land,

Show and Tell at Blue Cricket Designs (Wednesday),

and Transformation Thursday at The Shabby Chic Cottage,

Furniture Feature Friday at Miss Mustard Seed’s Creative Blog,

and Saturday Nite Special at Funky Junk Interiors,

And look at my next project…

IMG_4989

I have an idea that I am so excited about. I just hope it turns out like I want it to. I will share it on Thursday!

See you tomorrow for Wednesdays with Wanda!


My Burlap Beauty

November 30, 2009 AT 12:13 am 51 Comments

(I posted this as a guest blogger over at Shanty 2 Chic a couple of weeks ago, but I wanted to share it with you again in case you missed it!)

Check this out!

IMG_3128

I got this chair at Goodwill for $6.50. I know “she” looks a little rough, but all she needed was a second chance.

So here’s what I did:
First of all, I decided to paint the chair black. I used Valspar spray paint in satin from Lowe’s.
Then I used a fine grit sandpaper to sand down the edges a bit.
As you can tell by the picture below, I left the chair in my garage too long without supervision.
One of my boys thought it would be fun to tear the material off the chair, thus the result…

IMG_3908

Oh my, she’s looking really bad now!
But I didn’t let that stop me. I still had my vision…
She just needed a little more cushion, so I used my staple gun to apply some extra batting to the seat and back of the chair.

IMG_3909

Now she was ready to cover with my material.
Of course, I chose burlap. My current obsession!
I started with the seat, using my staple gun to secure the burlap.

IMG_3910

I cut the fabric around the arms of the chair, folded it under, and then stapled it down. (This part was not easy, and it did not turn out perfectly, but it still looks good to me!)

IMG_3911

IMG_3912

When I saw the extra burlap hanging below the staples, it looked like a cute little ruffled skirt. That’s when I decided that I wanted to add a skirt to the chair. (The above pictures were taken at night in my garage, so the burlap looks darker.)
Next, I covered the back of the chair using the same process as I did on the seat.

IMG_3943

Then I stapled and trimmed the burlap on the back of the chair.

IMG_3947


Next, I stapled on a piece of burlap to cover the back of the chair.

IMG_3948

Now for the skirt…
I placed the cording in the middle of the burlap, folded the material over, and sewed it up using my zipper foot. Then I trimmed the excess material.

IMG_3913

Notice I didn’t even use pins when I sewed. I’m dangerous like that!

IMG_3914

I made a long piece of burlap that measured 5 inches wide and sewed a small hem. Then I pinned some ruffles in the material. I didn’t even measure them the same length apart. I just eyeballed it. That’s how I roll.

IMG_3926

I attached the cording to the skirt, and sewed them together.

IMG_3927

IMG_3928

I made some double cording and hot glued it over the staples on the back. I got that idea from an upholstery book. (I will be explaining how to make the double cording in a future post on my blog.)
IMG_4071

Then I attached the skirt with my staple gun.

IMG_4072

IMG_4073

IMG_4079

I bought this chair for $6.50.
I bought about 4 yards of burlap from Hobby Lobby when it was on sale for $1.99 a yard. That’s $8.00, and I have some left over.
I already had the black spray paint, cording, and staples. So this whole transformation cost me about $15.00!
I’m lovi
ng that!
Every lady needs some cute accessories, so I made her a little pillow.
This picture was taken in our master bedroom, but I made the chair to go in our guest house.

IMG_4165

Here it is in our guest house…

IMG_4142

IMG_4150

IMG_4152

Well, there you have it!

My sad-looking seat is now a Burlap Beauty!
IMG_3128 IMG_4150

I am linking this post to…
Visit thecsiproject.com

Metamorphosis Monday at Between Naps on the Porch,

Make it for Monday at Cottage Instincts, and

DIY day at A Soft Place to Land.

Have a blessed day!


Easy Burlap Tablecloth

October 30, 2009 AT 10:04 pm 75 Comments


I’ve been needing a kitchen table for my guest house for a looooooooong time now.

But I wasn’t sure what I wanted.

At first, I was thinking my husband could make me an island with some bar stools to use as my eating area in the guest house.

But I placed a large buffet table in the middle of the room, to get an idea of what an island would look like, and I didn’t like it.

It took away from the detail of the cabinets.

So then I started thinking I wanted a small table with two chairs.

But what kind of table did I want?

Well, I found what I wanted in my favorite inspiration spot…Ballard Designs magazine. (If you don’t get this magazine in the mail, visit their website and sign up to get it FREE in the mail.)

It is a burlap tablecloth with jute trim and sells for $85.00.

Of course I said, “Why buy it, when I can make it?”

So I went to Hobby Lobby and got 4 1/2 yards of burlap. I like their burlap because it is a softer, smoother material, and it doesn’t stink like most burlap. :)

Their burlap was on sale for $1.99 a yard, so it cost me only $9.00.

IMG_3740

And here is the table I was going to use. It was a small patio table that Mom and Dad had on their back porch. Since I was covering it with a tablecloth, it didn’t matter what it looked like underneath! And it was the perfect size. (And price…FREE!)

Here’s how I measured it:

IMG_4014

(Do not laugh at my drawing! I just really thought you would need to see this part if you wanted to make your own tablecloth. You would just use the measurements of the table you were using, not mine, of course.)

That is a total length of 94 inches.

My burlap was 45 inches wide. So I folded it over lengthwise 47 inches (half of the 94 inches I needed.)

I did that TWICE, so I would have two identical pieces.

IMG_3931

Then I took one of those pieces and cut it right down the middle.

IMG_3932

I laid the two smaller pieces on both sides of the larger piece. I unfolded them to show you what it would look like.

IMG_3933

Then I sewed each of the two smaller pieces to each side of the whole piece. Ladies, I didn’t even pin the pieces together! I just held the pieces together on the sewing machine and sewed a straight stitch all the way down. The burlap did well this way. I wouldn’t be able to do that with every fabric. And I wasn’t worried if the ends matched up perfectly because I knew I would be trimming it and adding fringe.

IMG_3934

(The reason you add two smaller pieces to the side is so that you don’t have a seam running down the middle of the top of your table. Doing it this way keeps the seams on the sides of the table.)

Now, we are almost finished.

You need to fold this entire piece in half (from top to bottom).

IMG_3936

Then fold it in half again, just like folding a piece of paper (from side to side).

IMG_3937

Since the total length of my tablecloth was 94 inches, I needed to take half that amount to measure where I was going to cut the material, which was 47 inches.

Since I couldn’t find my sewing tape measure, I used my husband’s metal tape measure to cut a string 47 inches long.

My oldest son helped me with this part.

He held the string at the top corner of the material, as I measured.

IMG_3949

Then I drew a line from one side to the other to show where to cut.

IMG_3950


IMG_3952

(My son told me I should leave the scissors on the material to show you guys that I cut it with them. How cute is that?)

The angle at which I took this picture makes the right side look long than the other side, but they are both 47 inches long.

Then I put it on the table to see if it worked. (I was doubting myself a little at this point.)

But it DID!

IMG_3954

Now I need to add some fringe at the bottom. I found some at Hobby Lobby that I loved, but even with the 40% off coupon, it is still pretty pricey.

So I am on the hunt for a bargain, or a homemade version.

I will post about that when I get it finished.

I could just sew a hem on the bottom, but I was really wanting some cute fringe.

But for now, I am very pleased with the results.

IMG_3990

And now our guests have a place to eat!

IMG_3984

I will be getting some glass to put on top of the table to protect the burlap.

The two black chairs on each side of the table were purchased at Goodwill for $30.00.

They looked like this when I bought them…

March 2009 162

And after I re-did them, they looked like this…

chairs 019

You can read about that project HERE.

I thought I would be using them by the couch in the “living” area of the guest house. But now I think they are perfect for the kitchen table.

I still have some more projects for the guest house that I am working on, and I will share them as soon as they are finished.

But for now, thanks for letting me share this project with you!

IMG_3929

Blessings,

I am linking this post to Funky Junk Interiors’ Saturday Nite Special.


I am also linking up to Metamorphosis Monday at Between Naps on the Porch.
Visit thecsiproject.com


Be sure to go check out the Before and After Party at Thrifty Decor Chick!


Old furniture-New look

June 28, 2009 AT 5:53 pm 65 Comments

*This post has been edited to add to Furniture Feature Friday at Mustard Seed Creations. This is a wonderful blog with many inspiring ideas, so go check it out!


Furniture Feature Fridays
When I graduated college and got my first teaching job, I decided to buy something with my big fat teacher’s paychecks. ;)

My mom suggested that I buy a bedroom suite with my money. She said it would be a good investment and I could use it for many years.

So taking her advice, like I usually do, I made my first big purchase and bought a bedroom suite. It had three pieces, a queen-sized bed, dresser, and armoire.

I used it until I got married…. after I got married….. and I am using it now. Thanks mom, you were right…again!

Here’s what it looked like in our guest bedroom at our last house five years ago. (I actually made the bed skirt and pillow shams!)

121 pheasant run house 009

121 pheasant run house 008

121 pheasant run house 011

121 pheasant run house 012

You may have noticed that the dresser was missing. That’s because I painted it red and used it in my boys’ room.

121 pheasant run house 023

121 pheasant run house 019

This piece is now in my son, Adam’s room.

Then, when we moved into my current house over four years ago, the other two pieces went into storage because we didn’t have a guest room.

But now that we’ve built our guest house, it was time to get them back out. We couldn’t afford new furniture, so I was going to try to be creative.

IMG_1700

I didn’t like the look of the furniture as it was. And I wanted to give it more of a cottage-y feel.

IMG_1701

So I bought some white paint, sand paper, and some Valspar mocha glaze.

First, I painted everything white. It took about two or three coats. I would like to say that I waited to full amount of time needed for the paint to dry real good, but that would be a complete lie, so I won’t say it.

IMG_1974

I think it’s looking better already!

Then I sanded down all the edges and roughed it up a little bit. It felt a little weird to start sanding off all the paint that took me so long to put on in the first place! I also wasn’t sure if it would give me the “look” I wanted since I had never tried this before!

IMG_1962

IMG_1961

I thought it was turning out good, but the furniture still didn’t have that “old” look that I was looking for. I had heard about people using a “glaze” on their furniture or kitchen cabinets, but I had no idea what it was or how to use it.

But after a few days of looking at my furniture, I knew I had try it.

I bought some Valspar mocha glaze at Lowe’s. (Doesn’t that just sound delicious?)

I really had no idea how to “glaze”, but I sort of remembered reading a post about someone glazing their
kitchen cabinets. And I remembered they said they used a lot of paper towels.

So I started applying the glaze with a sponge brush, and then wiping it off with paper towels. And I was liking it…

IMG_1972

IMG_1973

It was a subtle difference, but it was definitely what I was looking for. My husband was even impressed!

Now, I am still not finished with the bedding, but I wanted to share it with you anyway. I need to get a bed skirt, probably white. (That’s why I didn’t take a picture of the bottom of the bed…hee, hee.) And I think I want to get a big “puffy” white comforter to fold up on the bottom of the bed instead of the matelasse. And of course, some more pillows…maybe some tan linen or burlap, oh, I don’t know! I’ll know it when I see it! :)

IMG_2355

IMG_2356

IMG_2361

IMG_2362

IMG_2364

Like I said, the glaze on the white paint is very subtle, but that is exactly what I wanted. It just “toned down” the white.

IMG_2358

I am not at ALL done with decorating the top of the armoire, but for these pictures I just put a cute little antique fan that I got at a yard sale for $2.00, an antique Hershey Kisses tin from GW, and a sign from Hobby Lobby that I want to use somewhere in this room. I love the scripture on the sign!

IMG_2360

If you would like to see more pictures of our guest house that we have been working on, you can click on my “guest house” posts in my sidebar.

NOW I will officially end my “longest post ever”!!!!!

Blessings to you all,

Traci


Cookbook holder

June 23, 2009 AT 4:45 pm 6 Comments

I have been looking for things to decorate the countertops in our guest house with.

I found this plate holder at Goodwill for $2.50.

IMG_1991

The color is okay, but I was looking for black accents in the guest house kitchen, so I got out my trusty can of black spray paint and went to town.

When my husband heard me shaking the paint can he said, “Uh oh, what are you going to paint now?”

The joke in our family is that if something stands still long enough in our house, my husband will “caulk it” and I’ll “spray paint it black”! (My husband is quite the handyman!)

IMG_2310

I placed one of my favorite recipe books in the holder. It was a gift from my mom and is full of Kentucky recipes.

IMG_2282

I know the book is a little bit bigger than the holder, but I like it and it gets the job done!

I also LOVE the colors of this cookbook. I am trying to decorate with these colors in the guest house. I love the combo of blue, tan, green, red, and black.

IMG_2283

IMG_2284

I also wanted to share that I FINALLY found some baskets that fit in the cabinets that my husband made.

IMG_2291

I lost track of how many sets of baskets I bought before I finally found these! Some were too wide, some were too short, some were too contemporary, some were the wrong colors, and some were just plain u-g-l-y!

I found these at Homegoods on my 128th visit, and I think they will work just fine.

IMG_2293

Sorry for the glare in the picture, the sun was shining extra bright today!

IMG_2296

AND, I have started filling my black cabinets with some white dishes. I’ll share more pictures and details in a future post. Not quite finished…

IMG_2298

Thanks for stopping by!

Traci


Salt,Pepper and some Glaze (No, this is not a recipe.)

May 28, 2009 AT 2:04 pm 2 Comments

I have been looking for something to put on the walls at our guest house, and I think I have found it. I saw these salt and pepper wooden signs at Hobby Lobby a couple of weeks ago, and I fell in love with them. But I didn’t get them because I wasn’t sure if they would look good in the guest house , and they weren’t on sale.

However, I went back to HL this past week and the pictures were still there, and they were calling my name. Plus, they were on sale! 50% off! What’s a girl supposed to do?

So, they made their way home with me and on my wall, and I think I like them. What do you think?

IMG_1964

IMG_1965 IMG_1966

IMG_1968

Yes, my husband still has one more drawer to make in the kitchen. And I am still looking for white dishes to fill my shelves.

BUT, I have made progress on our guest house bedroom furniture. I actually used glaze for the first time. I am going to show the whole process on a later post, but I’ll give you a glimpse…

NEWNAME_055

NEWNAME_056

This was a bedroom suite I bought over 15 years ago (when I was single), that we used when we first got married. It’s been in storage for a while now, and I knew if I used it again that I would definitely be painting it. It was natural wood color, and I thought I would paint it black. But I decided to paint it white for the guest house, and then I decided to try my hand at glazing. The complete project coming soon…:)

Thanks for stopping by,

Traci


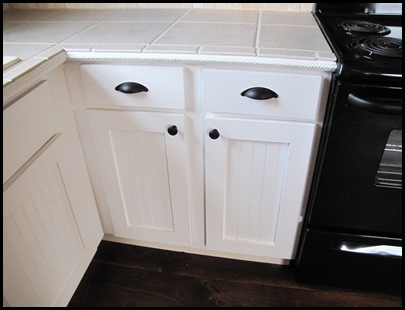
Cottage-style Cabinets

May 17, 2009 AT 7:31 pm 22 Comments

I participated in Metamorphosis Monday for the first time last week. I had so much fun reading all the comments that were left on my post, that I decided to do it again! Last week, I shared my Goodwill chairs that I painted and covered for a completely different look for our guest house. Click here if you would like to see them.

This week, I want to share with you the old cabinets from our kitchen makeover that we re-used for our guest house.

Here they are…

cabinets 002

They used to have ugly doors on them like this…

March 2009 097

I wanted to have a cottage feel to our guest house, so I asked my husband to make me some new doors. And this is what he made…

21

He used bead board for the middle and poplar wood for the trim. I wish I could show you pictures of the steps he took to make them, but he made them before I could get out to the garage to take pictures.

He used hidden hinges to attach them to the old cabinets and then painted them white.

cabinets 003

Then he hand-made some drawers out of 1/2 inch birch plywood and bought the drawer kit (you know, the metal bar that the drawer rolls on) at Lowe’s for about $7.00 each.

Then we added the black hardware and wha-la!

chairs 010

Now, you may notice the beautiful tile countertop my husband installed, and you can see more pictures of it here.

If you would like to see other amazing transformations, click on the picture below.

Hosted by Susan at Between Naps on the Porch.

Have a great Monday,

Traci


content and images copyright © 2009 - traci, beneath my heart

Designed by Chena Designs Development and Hosting by Evenpar Solutions
Web Hosting By RFE Hosting
Counter
Free Counter