
How to Install and Stain New Wood Front Doors
*This post is sponsored by Lowe’s. All opinions and ideas are 100% mine.
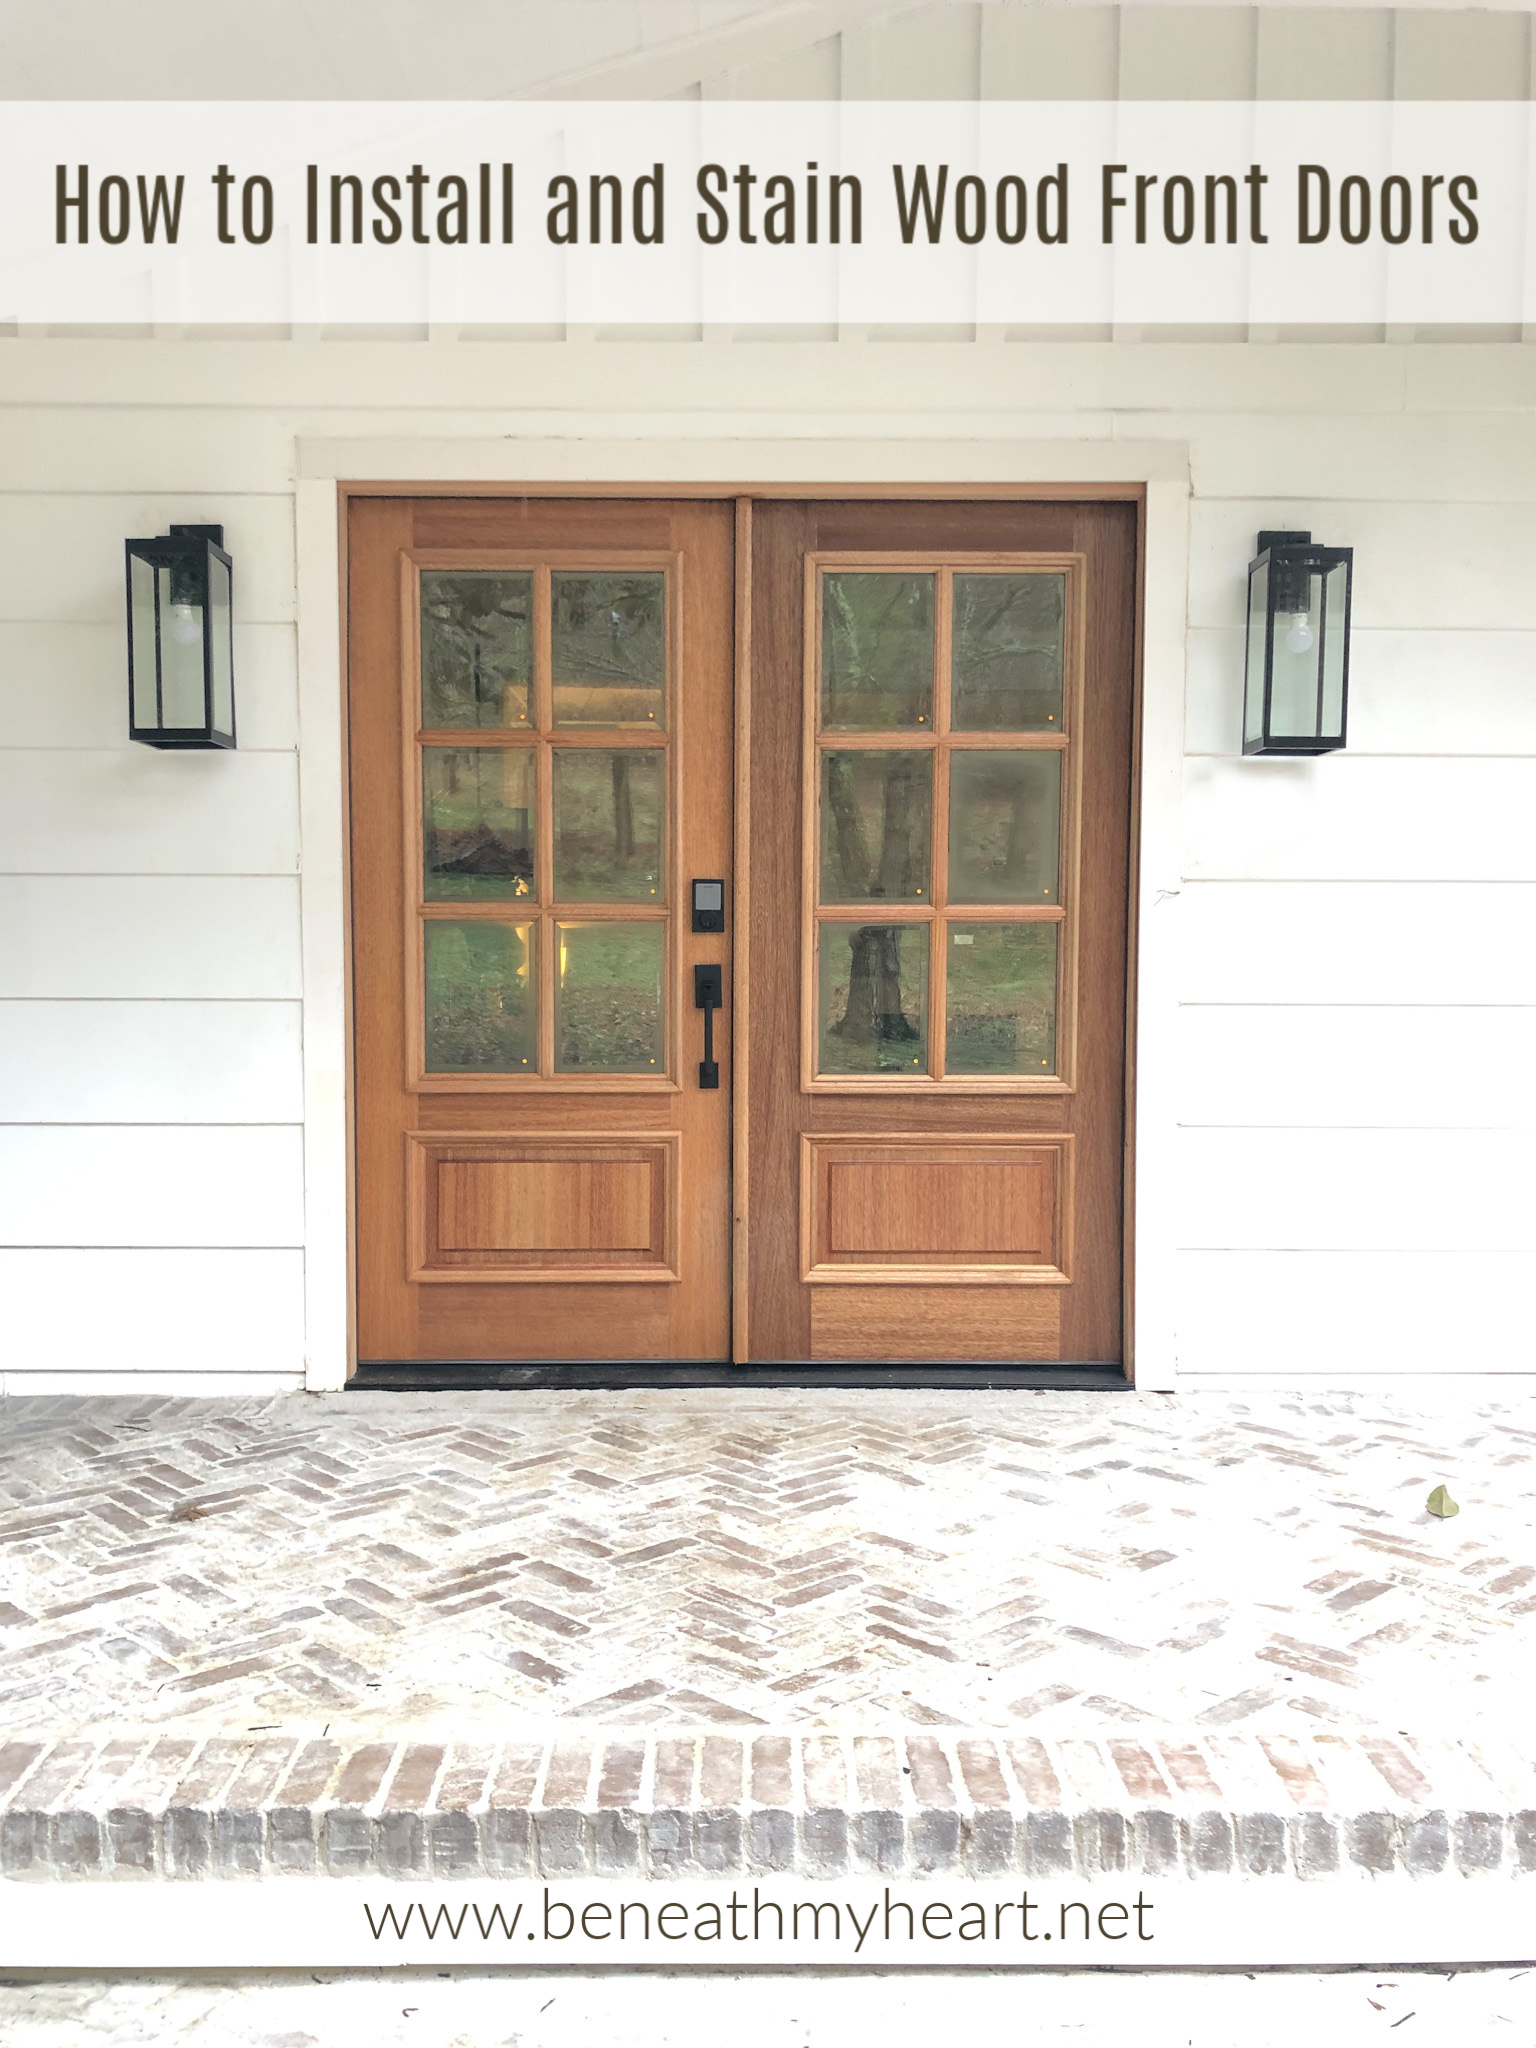
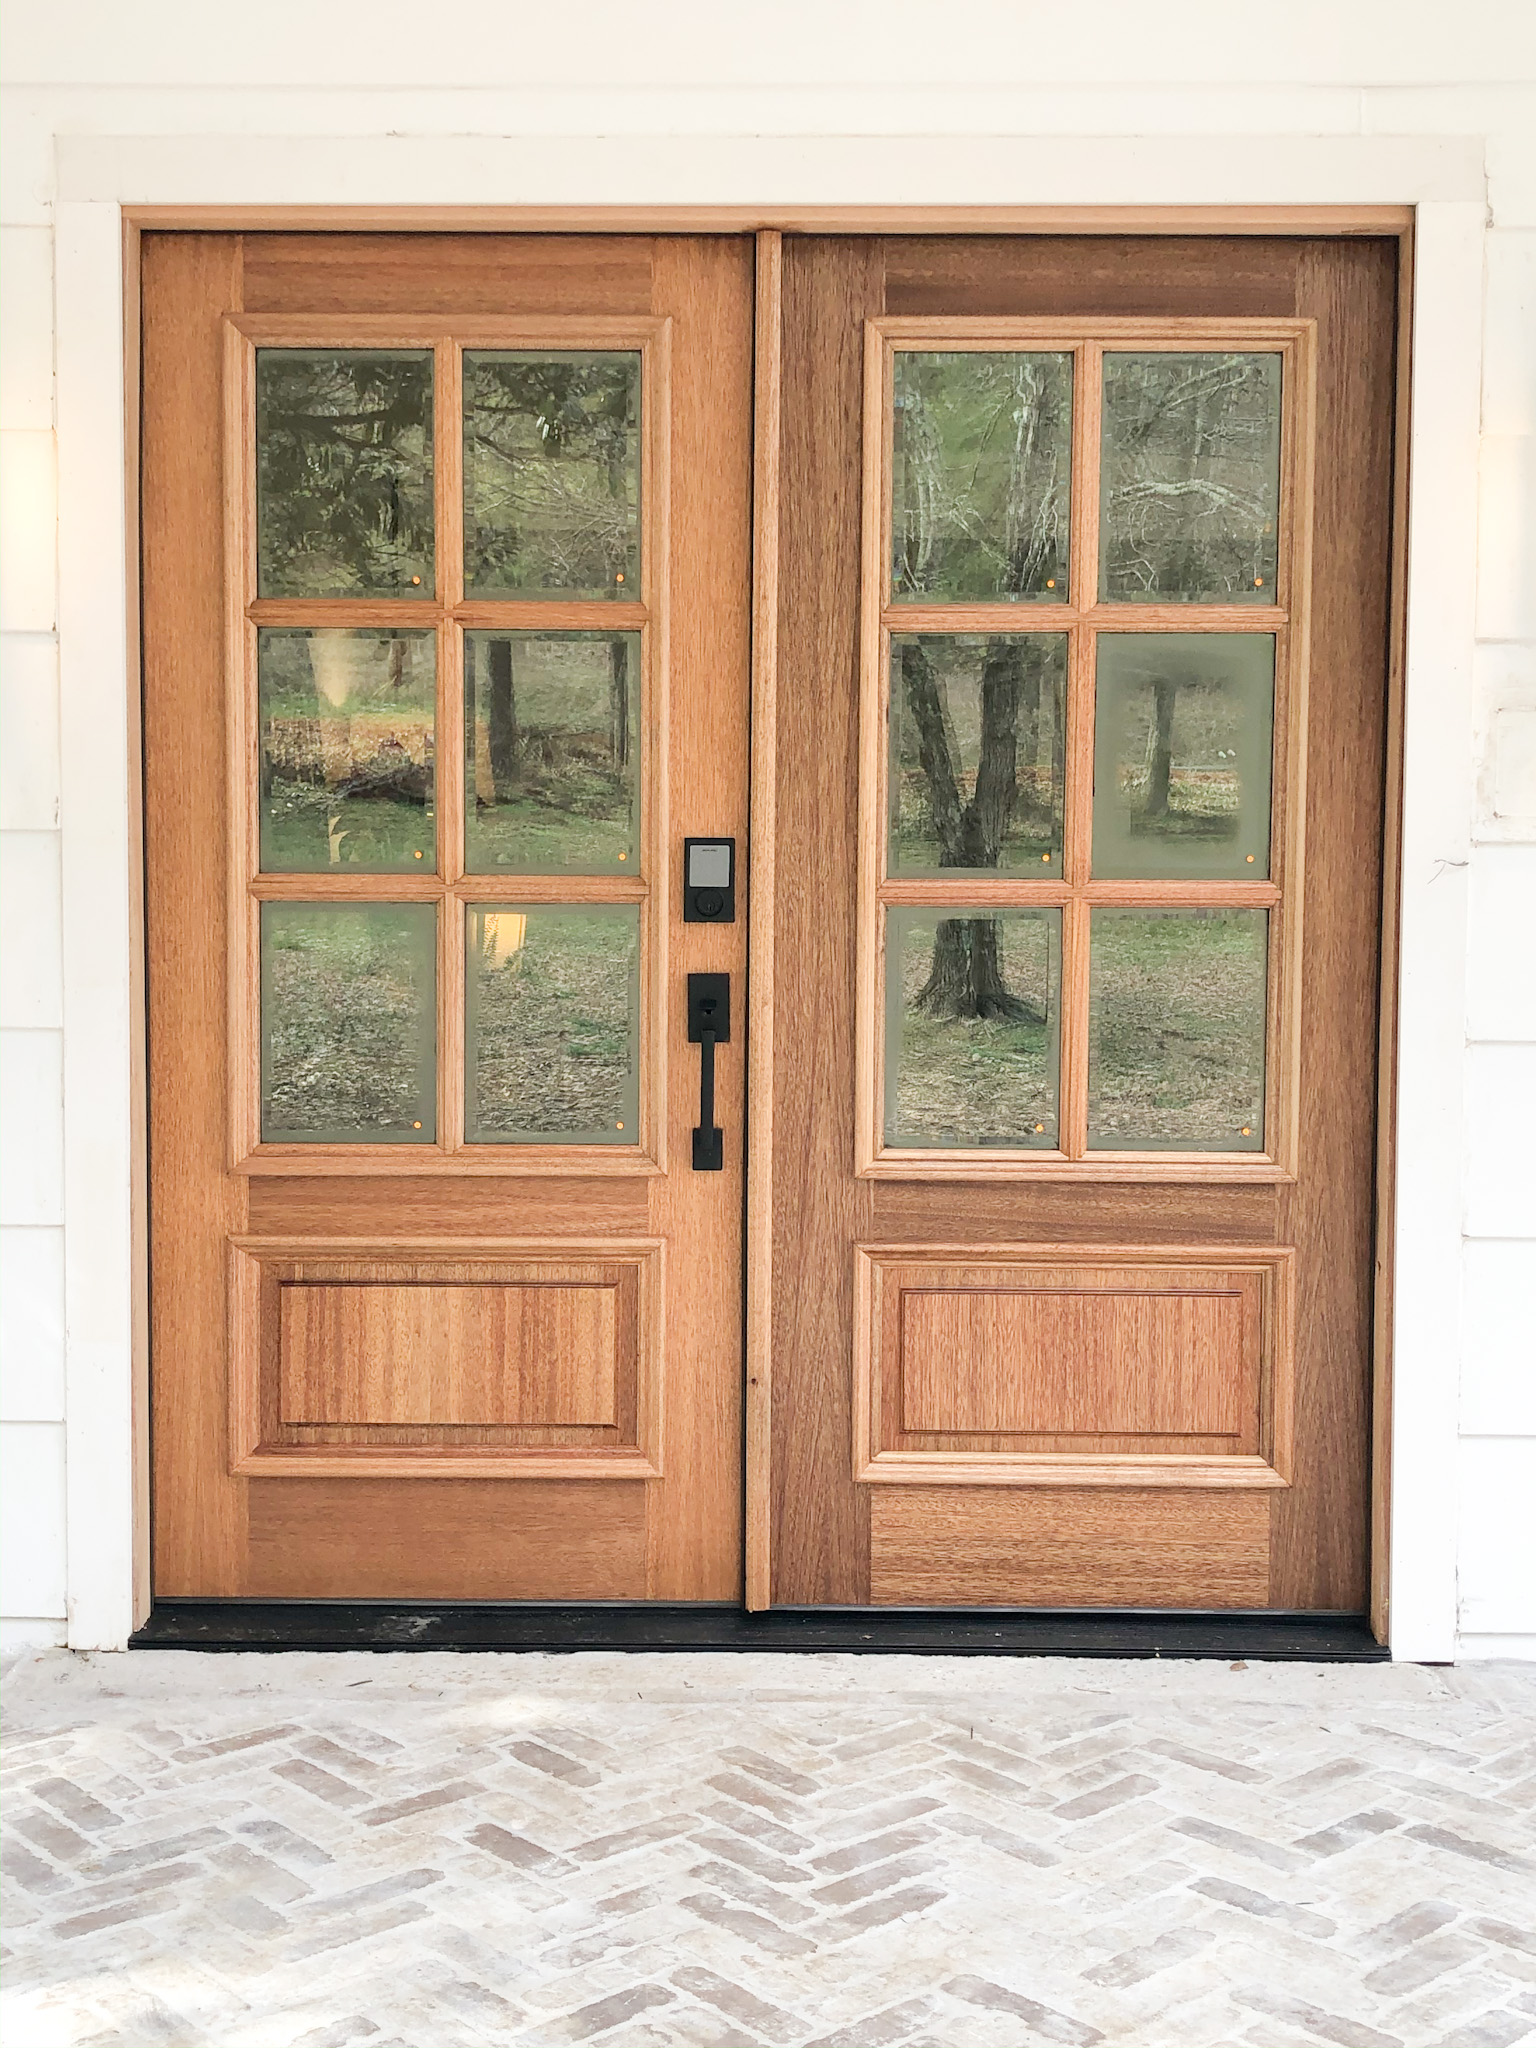
Our exterior makeover is almost finished, and one of the last steps we had left was to install the front doors. We bought some beautiful Pella wood doors from Lowe’s, and we were so excited when they were delivered to our home!
Today, we are going to share with you the steps we took to install and stain our new wood front doors.
STEPS TO INSTALLING NEW WOOD FRONT DOORS
Step 1 – Measure Door Opening
The first step is to measure the size of the doors you will need. We purchased pre-hung double doors. Prehung doors consists of a complete unit with doors already hung with hinges to the jamb frame.
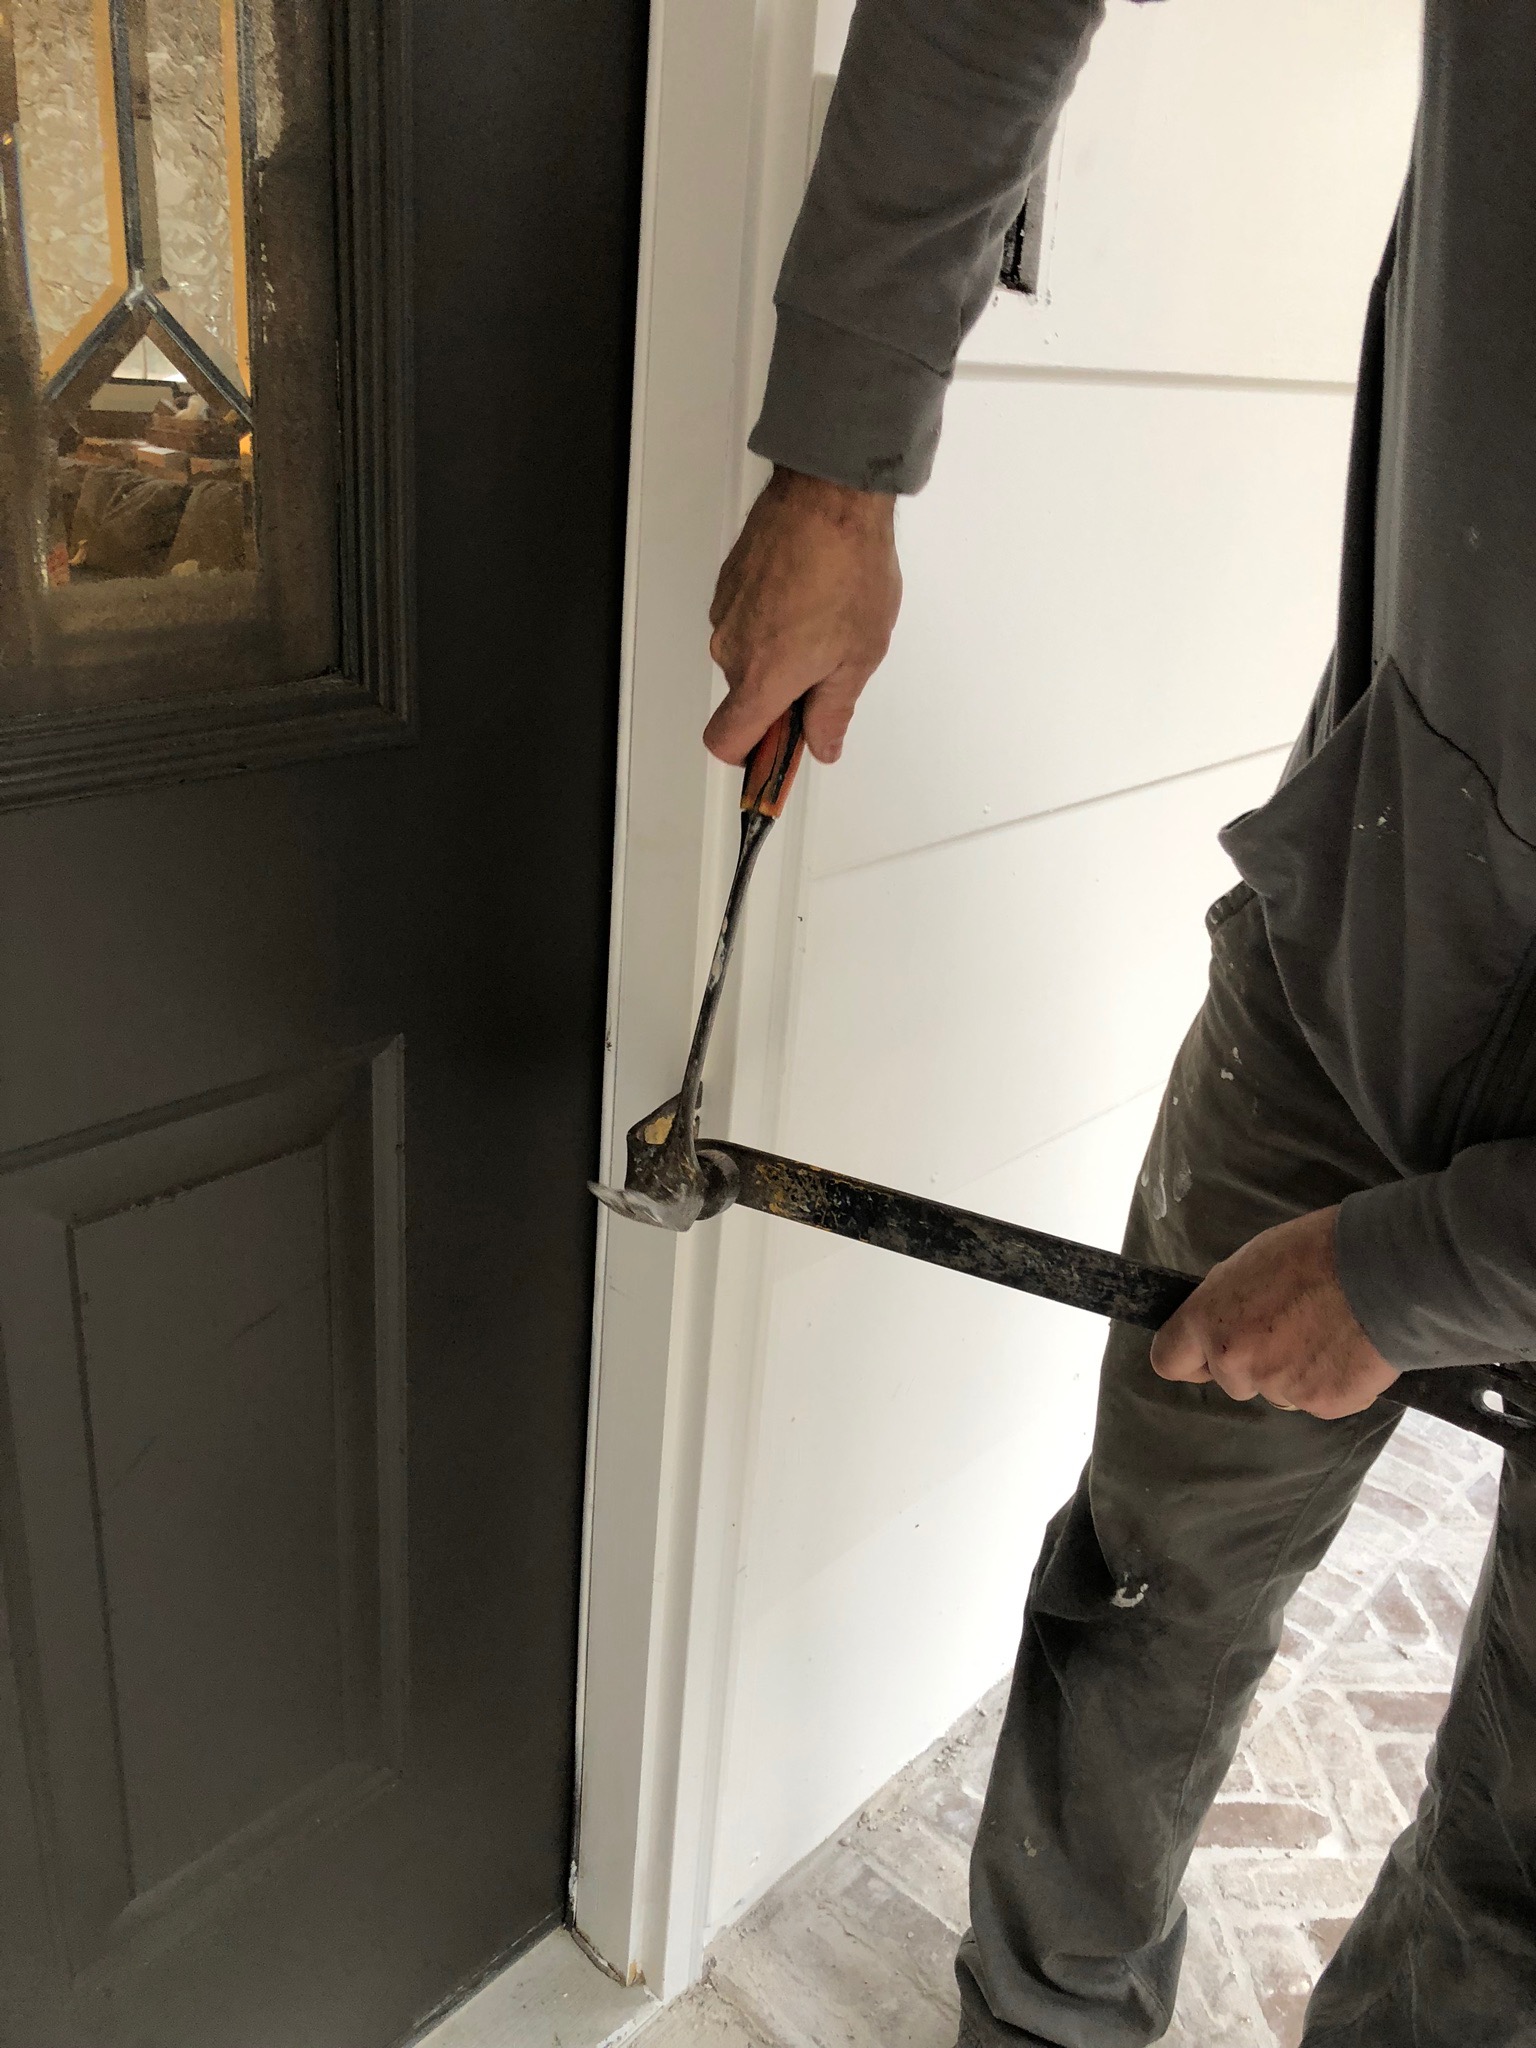
When replacing an existing door unit, remove the casing (trim) on the sides of the frame using a flat pry bar and hammer.
With a measuring tape, measure the width of the door frame at the top, middle, and bottom, from the outside of the jamb on one side to the outside of the jamb on the other side, and use the smallest measurement. Measure the height of the door frame in three places from the bottom of the threshold to the top edge of the top jamb, and use the smallest measurement. You will also want to measure the width of the side jamb from the interior edge to exterior edge. This measurement should equal the total thickness of the wall, minus the trim or siding.
Take these measurements, including the direction you want your door to swing, with you when you order your doors.
Step 2 – Order Doors
We took our door measurements to Lowe’s, and ordered beautiful wood doors from Pella.
Our doors were custom ordered, so I cannot link directly to it online, but they are basically oak doors with six window panes in each door. You can work with your Lowe’s rep to pick out the exact style of doors you are looking for.
CLICK HERE to view many door options at Lowe’s.
Step 3 – Remove Old Doors
Since we had already removed the trim to get measurements for our new doors in Step One, we were ready to install our new doors when they arrived. If you removed the trim carefully, you will be able to re-use it after installing your new front doors. We knew were were going to install new trim around our new doors, so we were not terribly concerned if the trim was damaged in the process.

Before removing the existing doors, you will need to use a reciprocating saw to go around the perimeter of the door frame to cut any screws or nails holding the door in place.
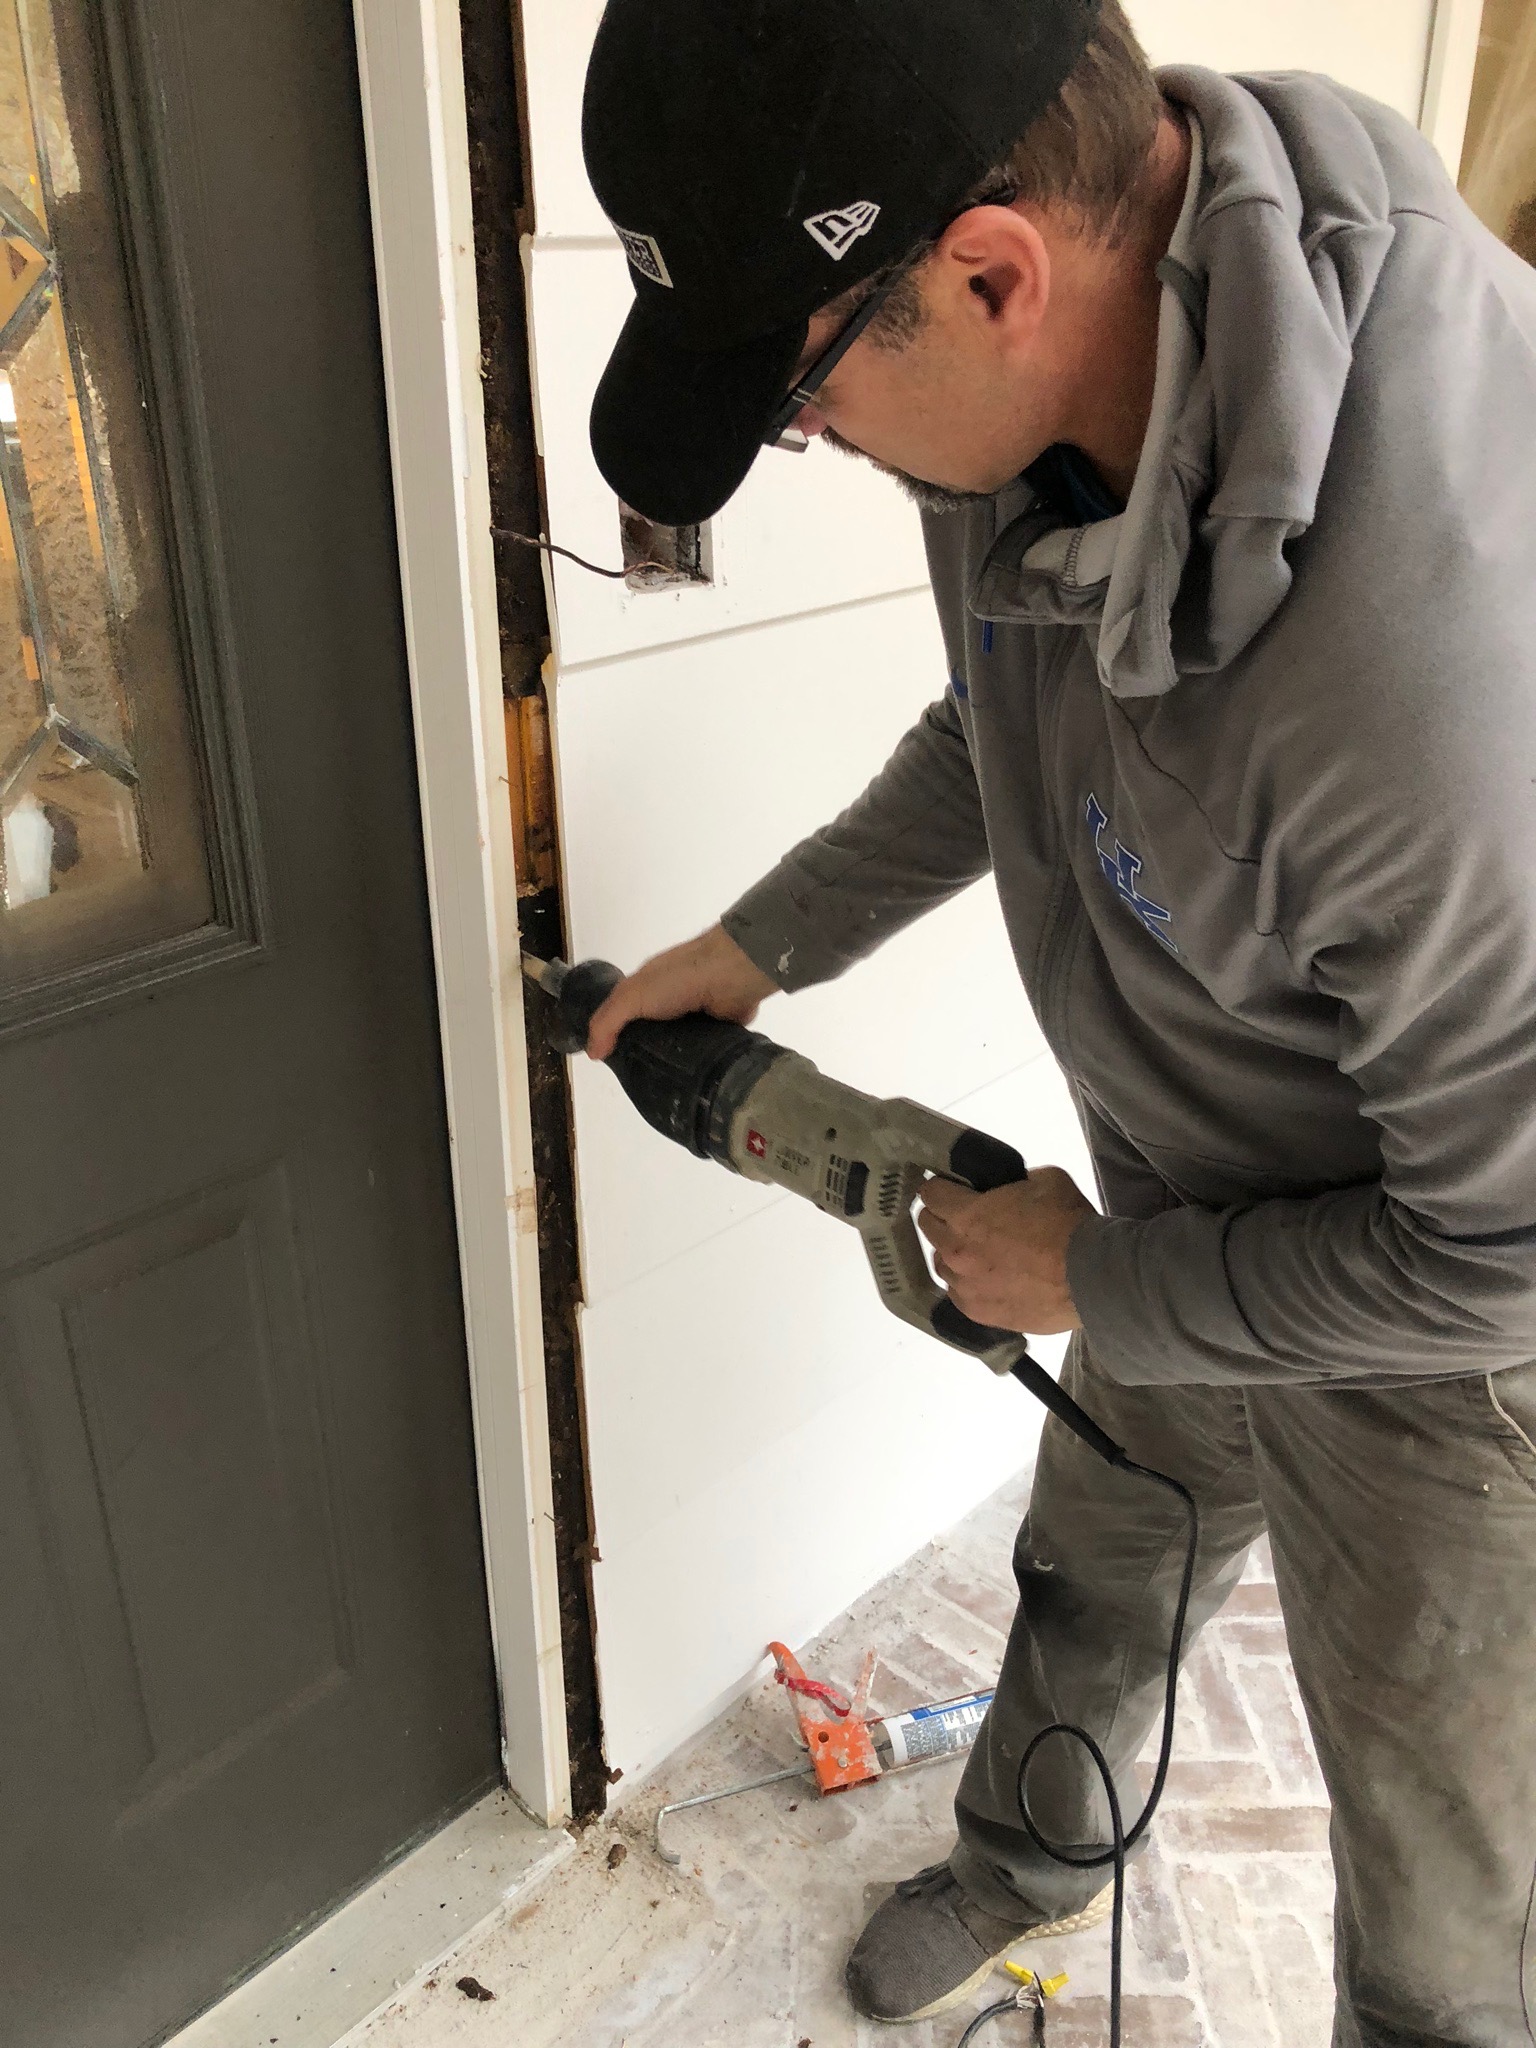
When you finish cutting any nails or screws in the door frame, you can carefully remove your old doors. If your old doors are still in good shape, we suggest donating them to your local Habitat ReStore or selling them on Facebook marketplace. We sold ours on Facebook marketplace, and someone came and picked the up.
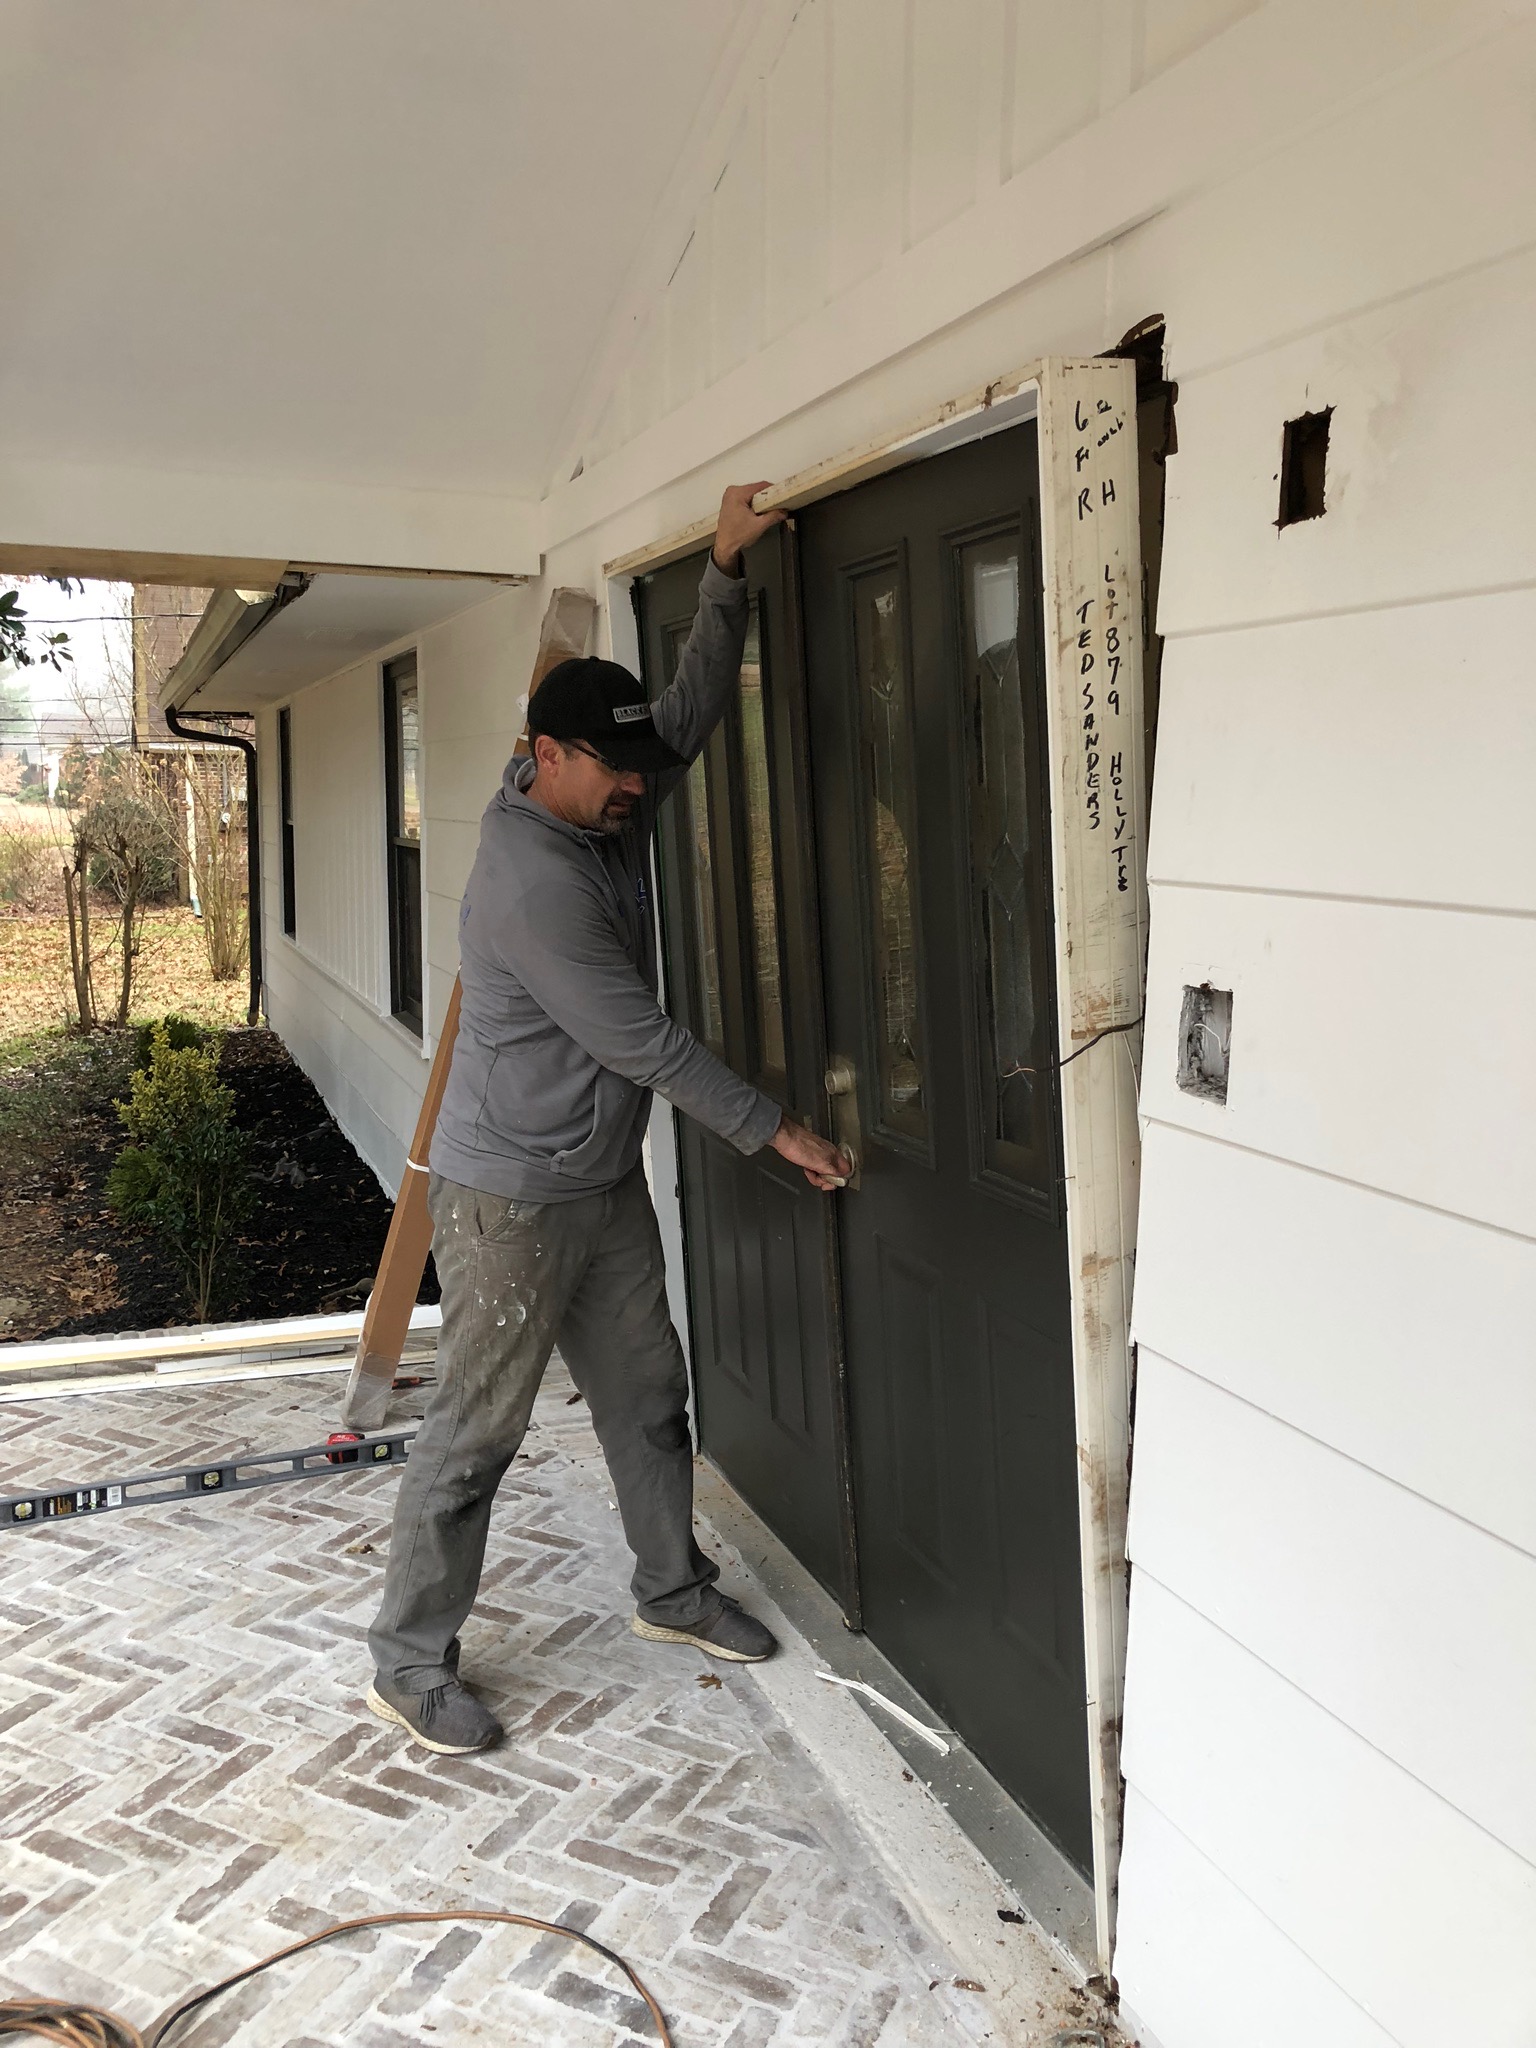
Step 4 – Hang Door
Remove the packaging from your new doors, being sure to keep any hardware that comes with them. Then carefully place the new doors in the existing door opening. This may be a two person job, especially when installing double doors.

When installing your pre-hung door, it is very important to make sure it is plumb and square. 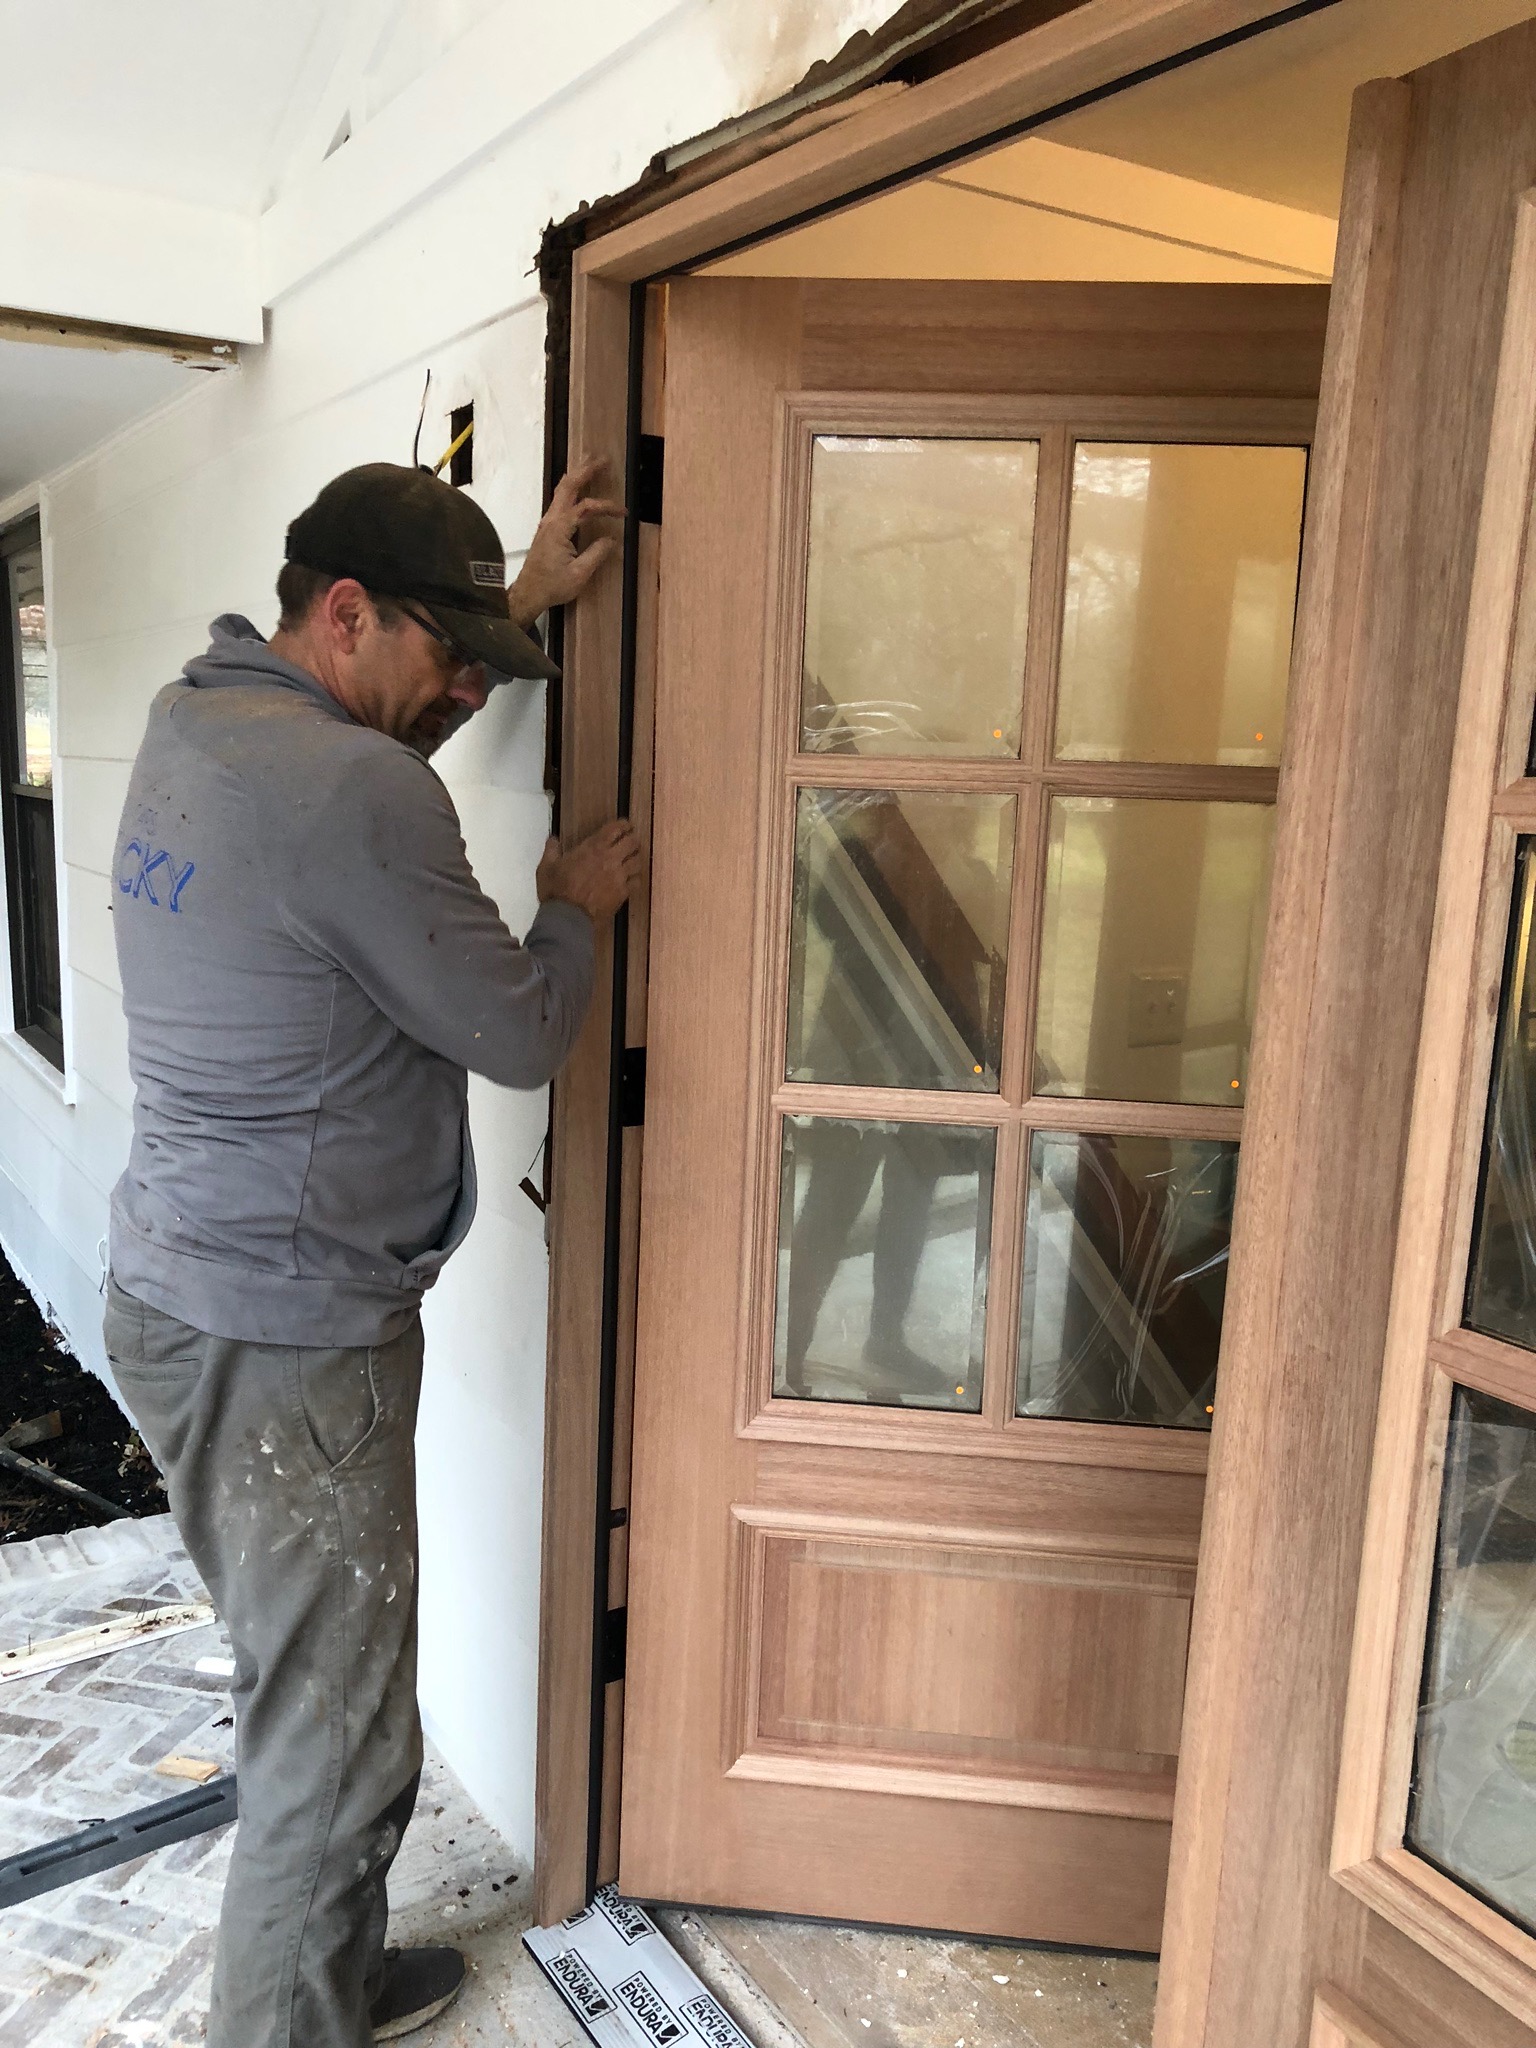
Place your level on the side of the frame to make sure it is plumb as your screw it in place.
You will notice that one screw will be missing in the hinges that hold the door jamb to the frame. You will install the final screw, (it will be a longer screw that comes with the door,) in that empty hinge hole to attach the door jamb to the rough opening.
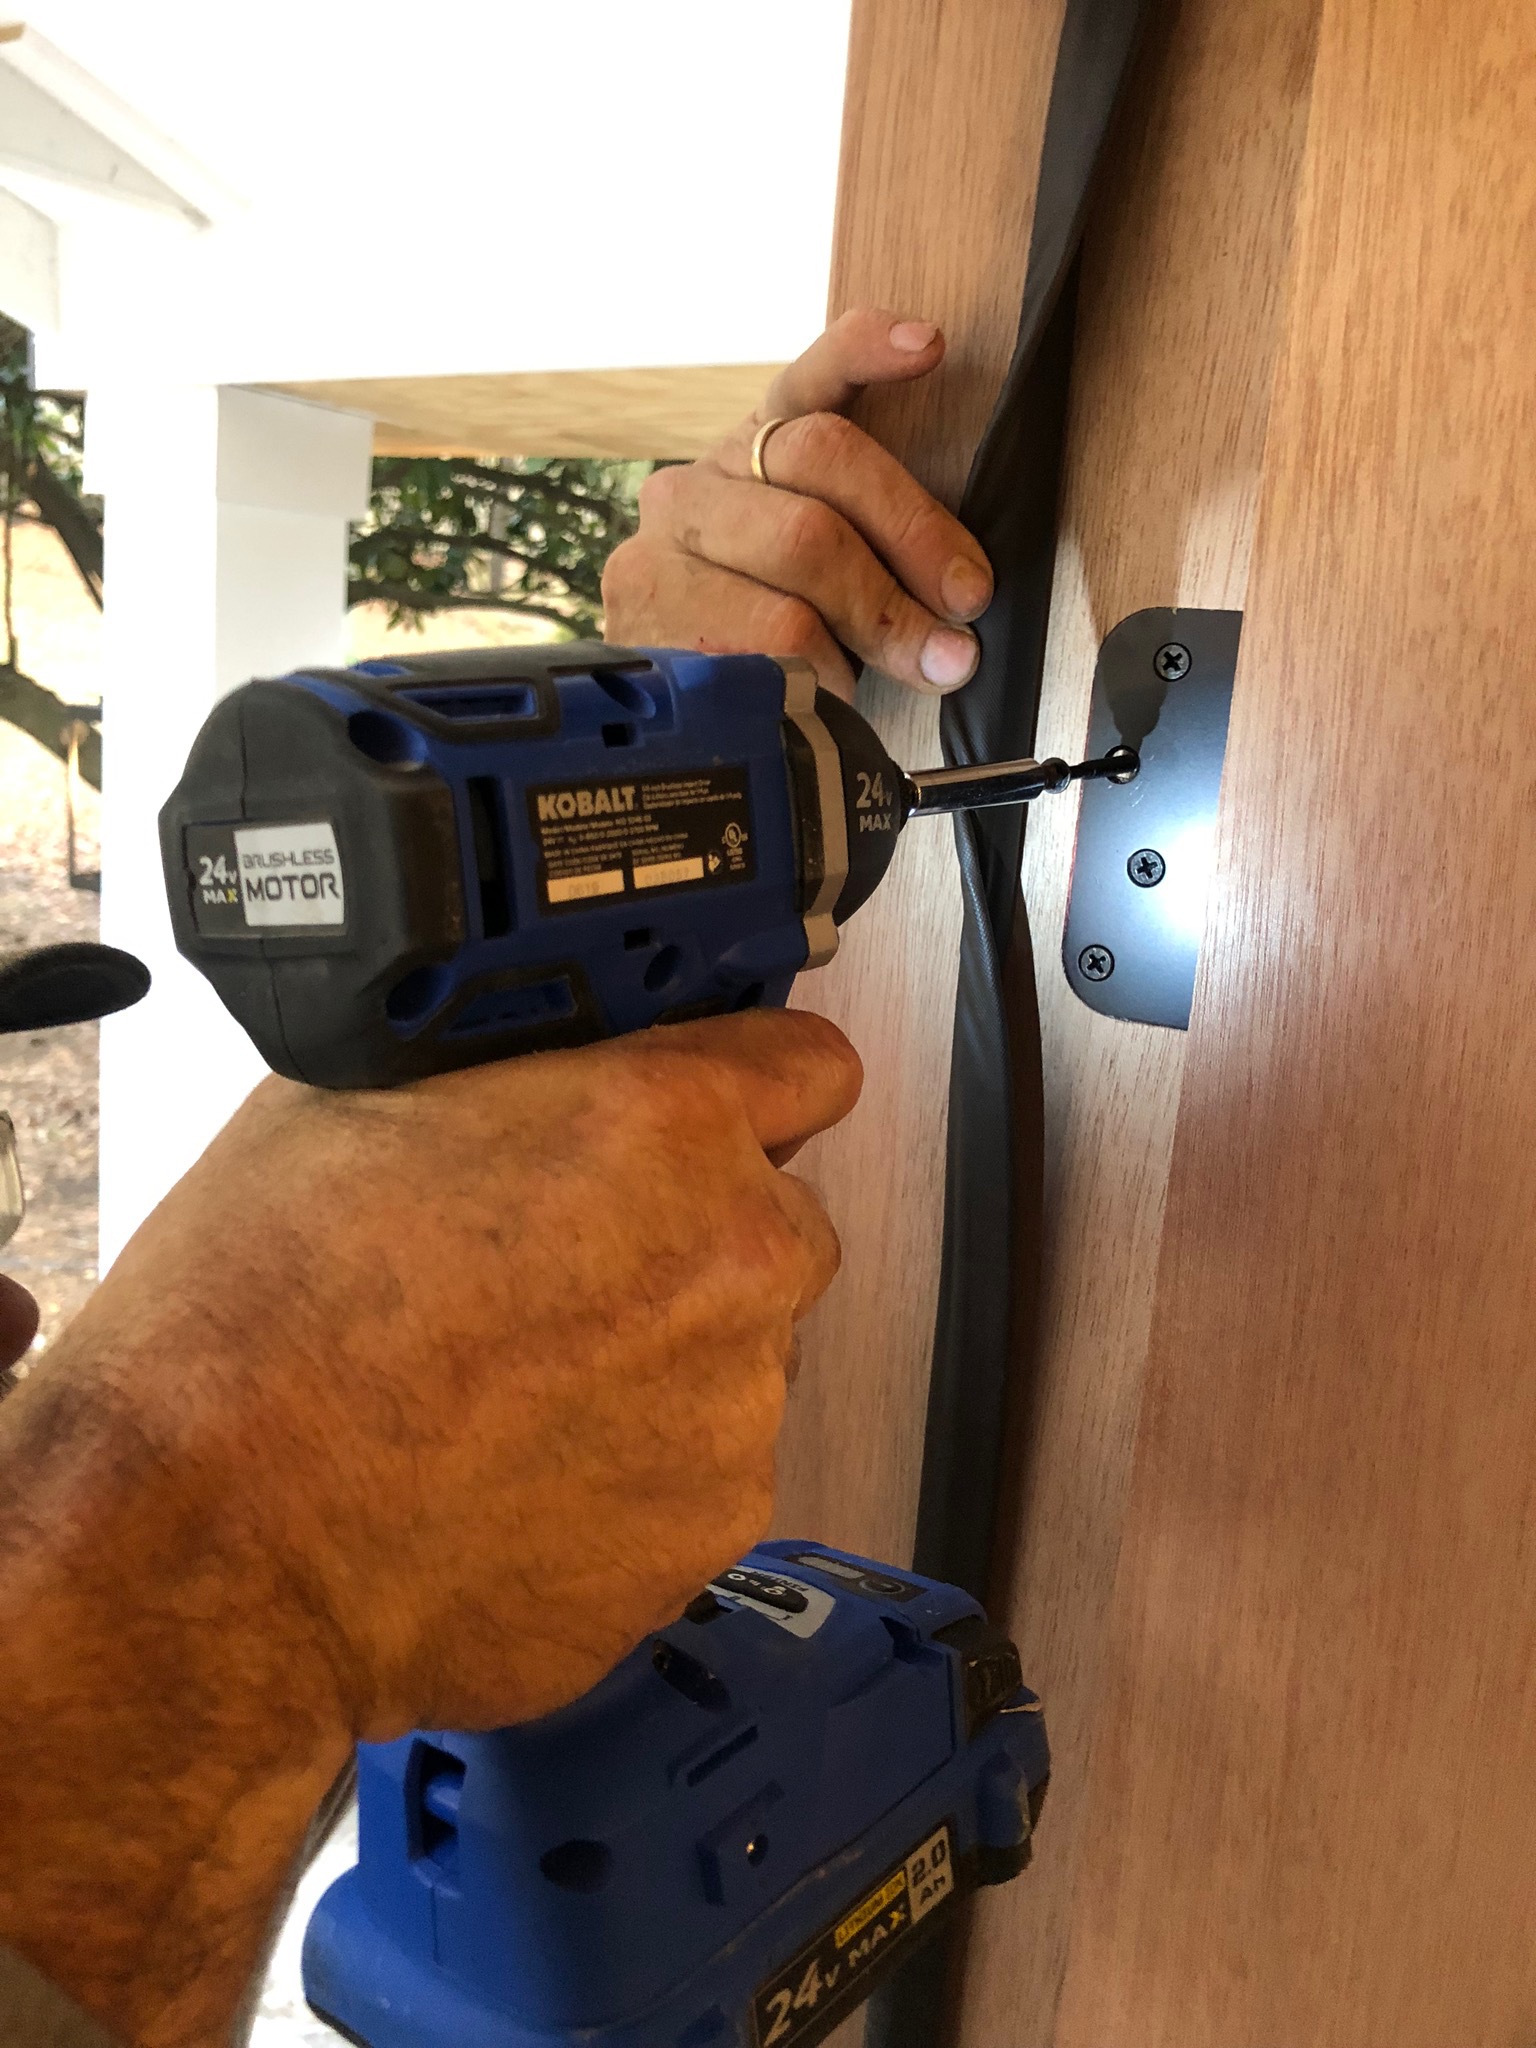
If needed, this is the point where you would use wood shims behind the door jamb to insure that the door fits securing in the opening.
Once our doors were completely installed, it was time to pick out supplies to stain and seal them.
STEPS TO STAINING THE DOOR
Materials:
- Rubber gloves
- sanding sponge (220 grit)
- lint free cloth
- tack cloth
- wood conditioner
- stain pad
- purdy brush
- stain
- spar urethane
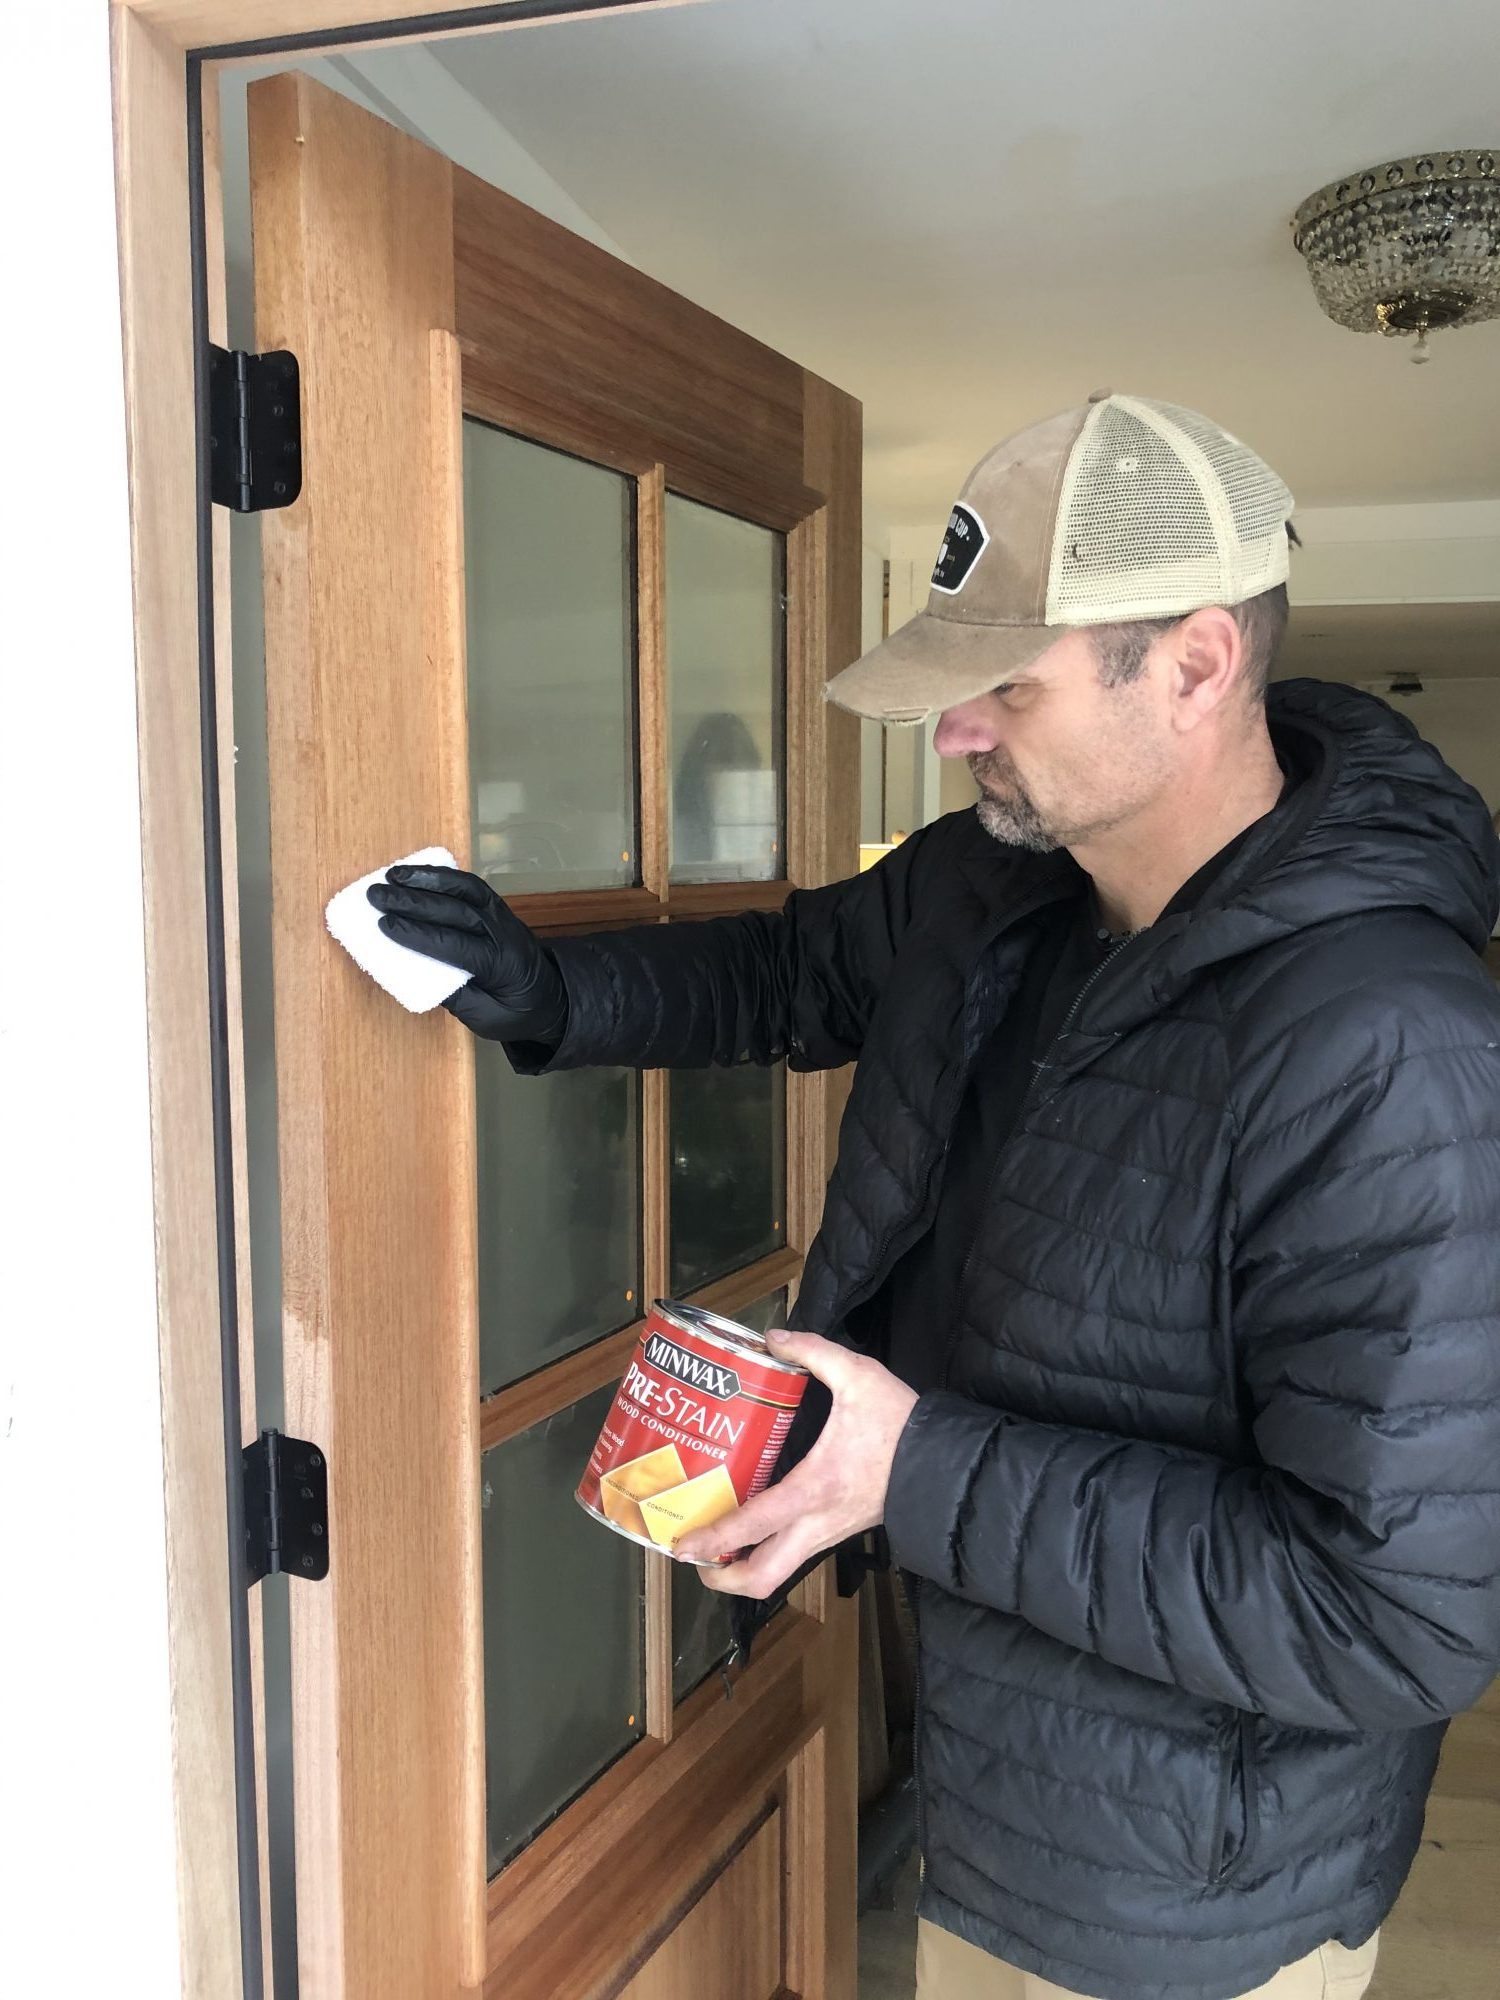
Step 1: Prepping the Door
Lightly sand the door with your sanding sponge, and clean the door of any dust or debris with your tack cloth.
Prepare the wood for stain by applying Minwax wood conditioner with a stain pad. This clear conditioner is specifically designed to use before staining to help prevent streaking and blotching and help ensure a beautiful, even stain.
Step 2: Stain the Door
Use a lint free cloth or stain pad to apply a coat of stain. Depending on the how dark you want your stain, you may apply more than one coat. Be sure while off any excess stain drips or runs with a lint free cloth.
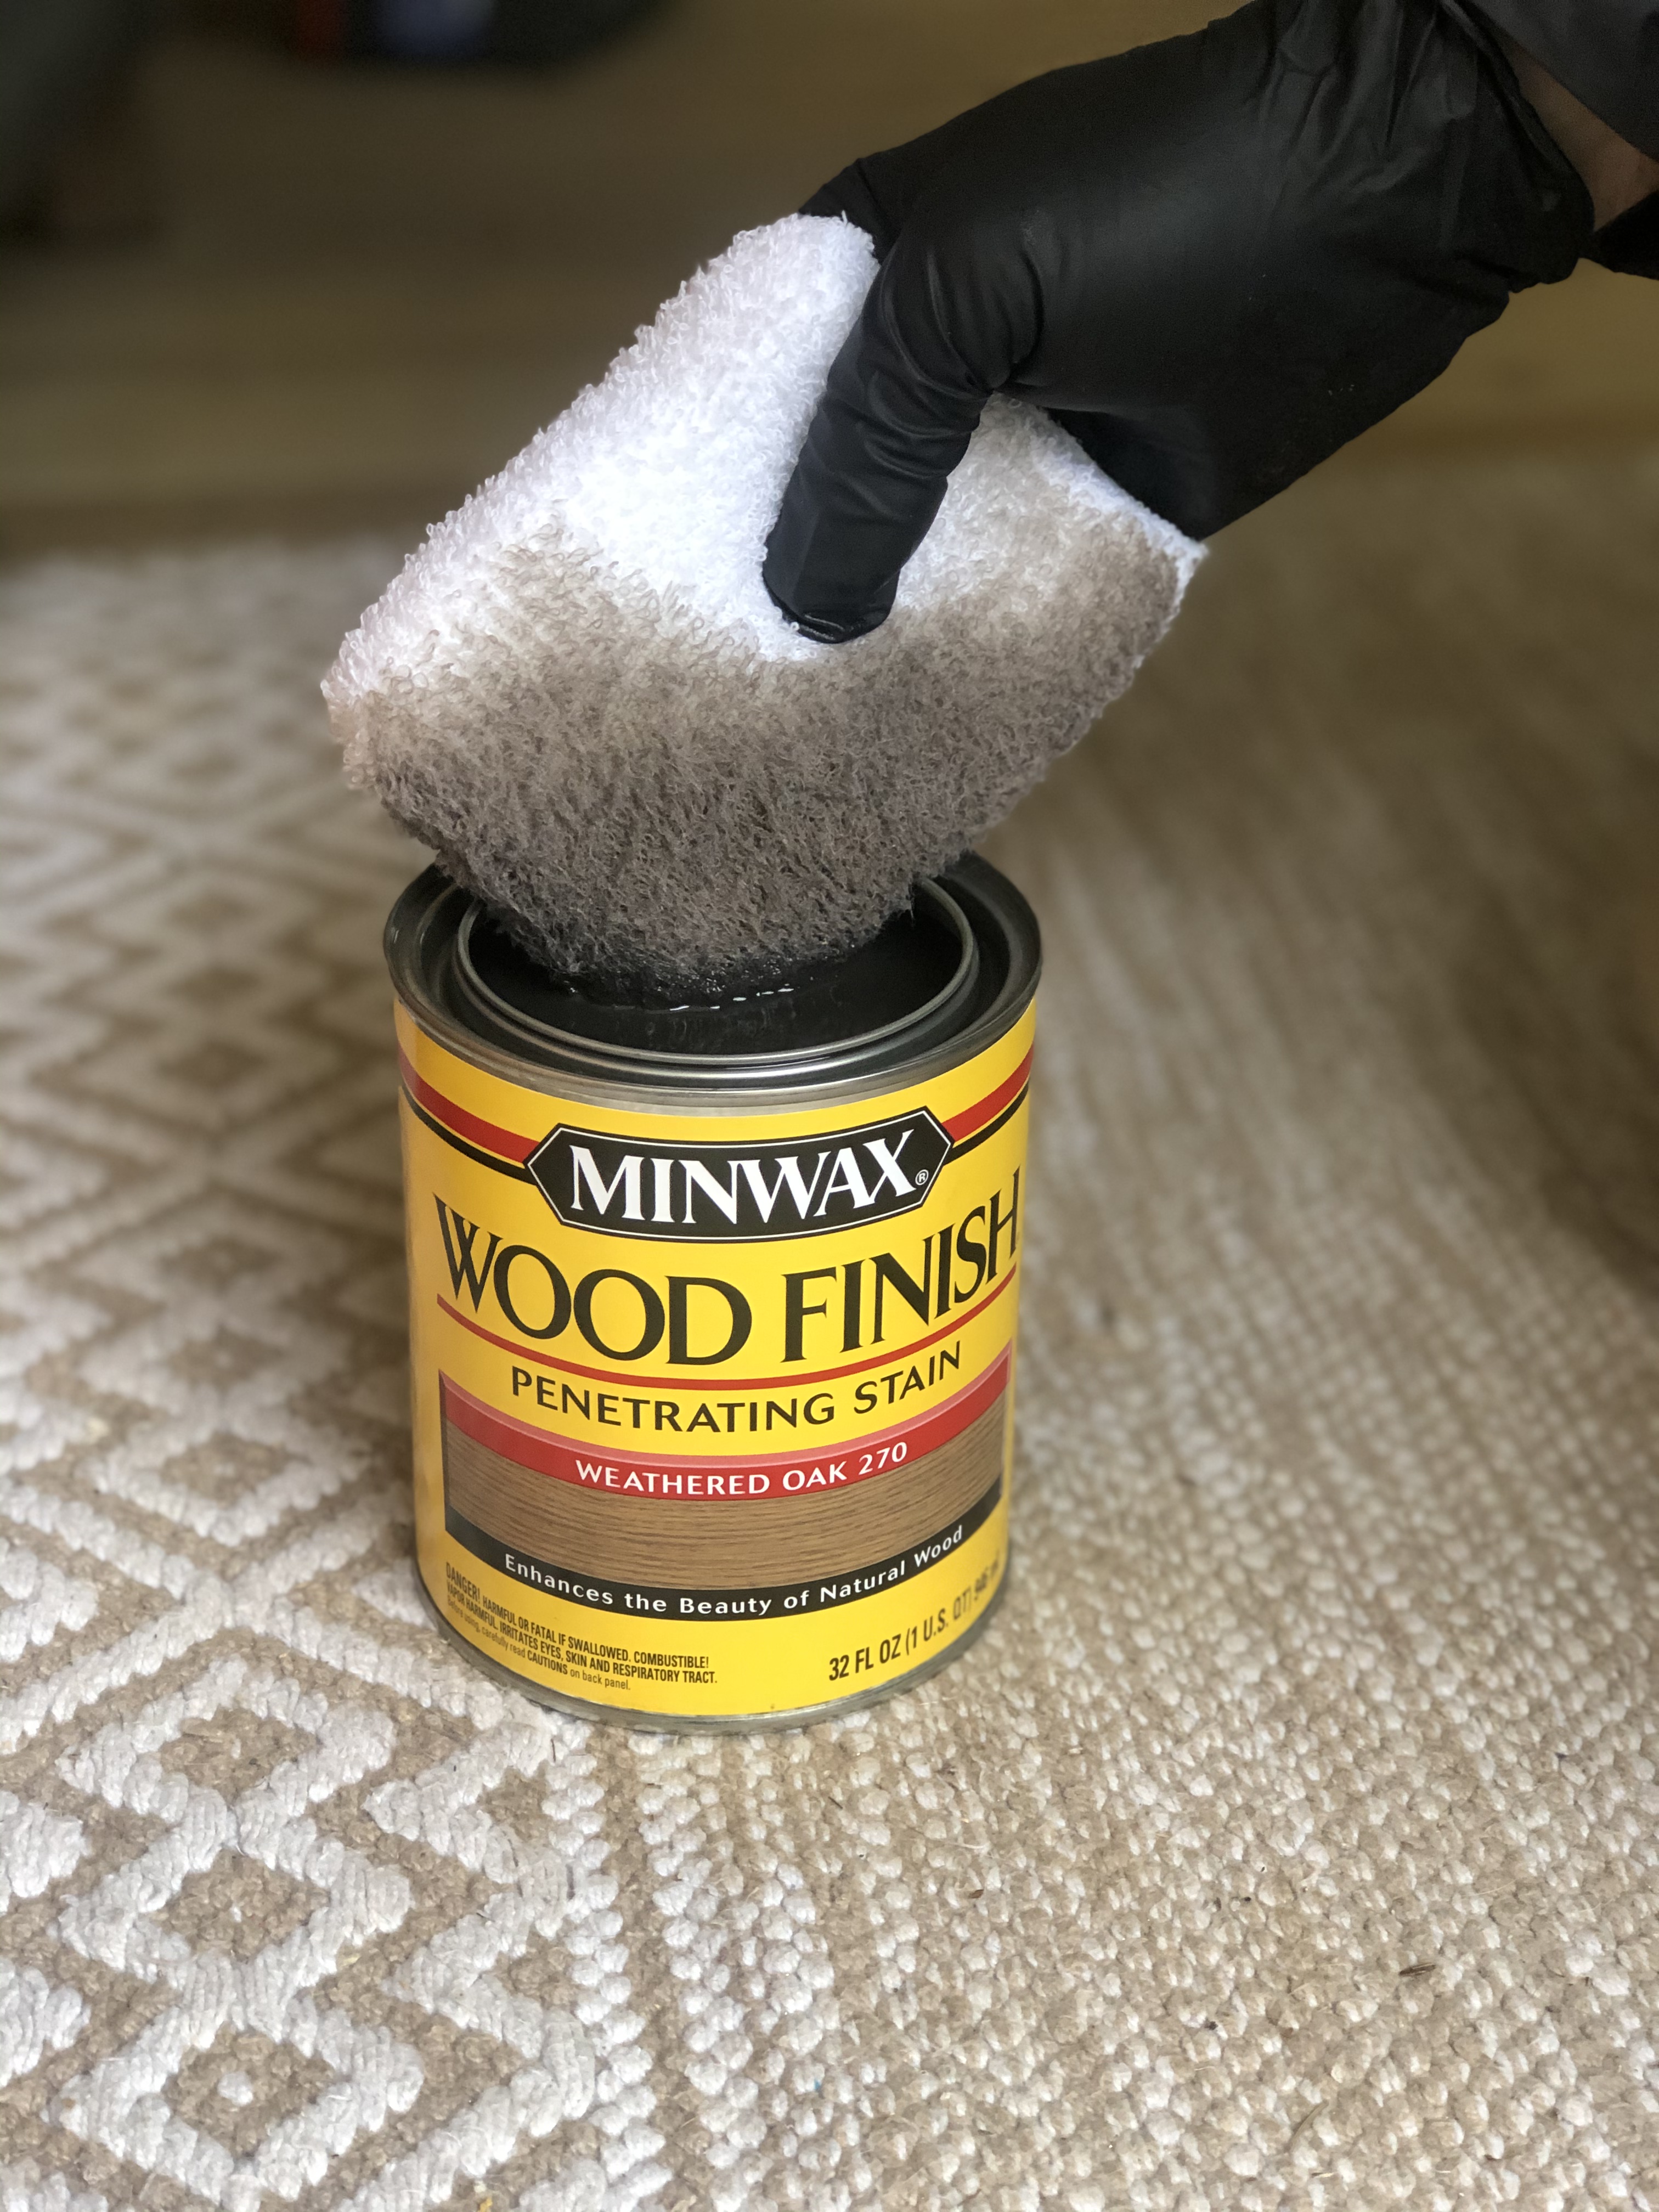
Let that stain dry for about 8 hours.
Step 3: Apply Urenthane
In the past, we have sealed our doors with a polyurethane, but discovered that “spar” urethane was a better choice for our exterior door.
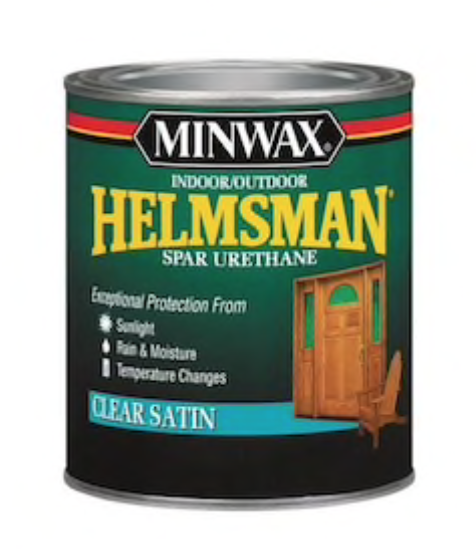
- Minwax® Helmsman® Spar Urethane is specially formulated as a protective clear finish for exterior or interior wood exposed to sunlight, water, or temperature changes
- Special oils allow the finish to expand and contract with the wood as seasons and temperatures change
- Forms a protective barrier against rain, moisture, and UV blockers reduce the sun’s graying and fading effects
- Ideal for use on interior or exterior wood sufaces to include doors, windows, trim, bathroom cabinets, bar tops, kitchen countertops, and outdoor furniture
- Not recommended for use on floors, decks, or fences
- Recoat after 4 hours
- Cleans up easily with mineral spirits
- Easy application with a high-quality natural bristle brush
- Also available in an aersol can.
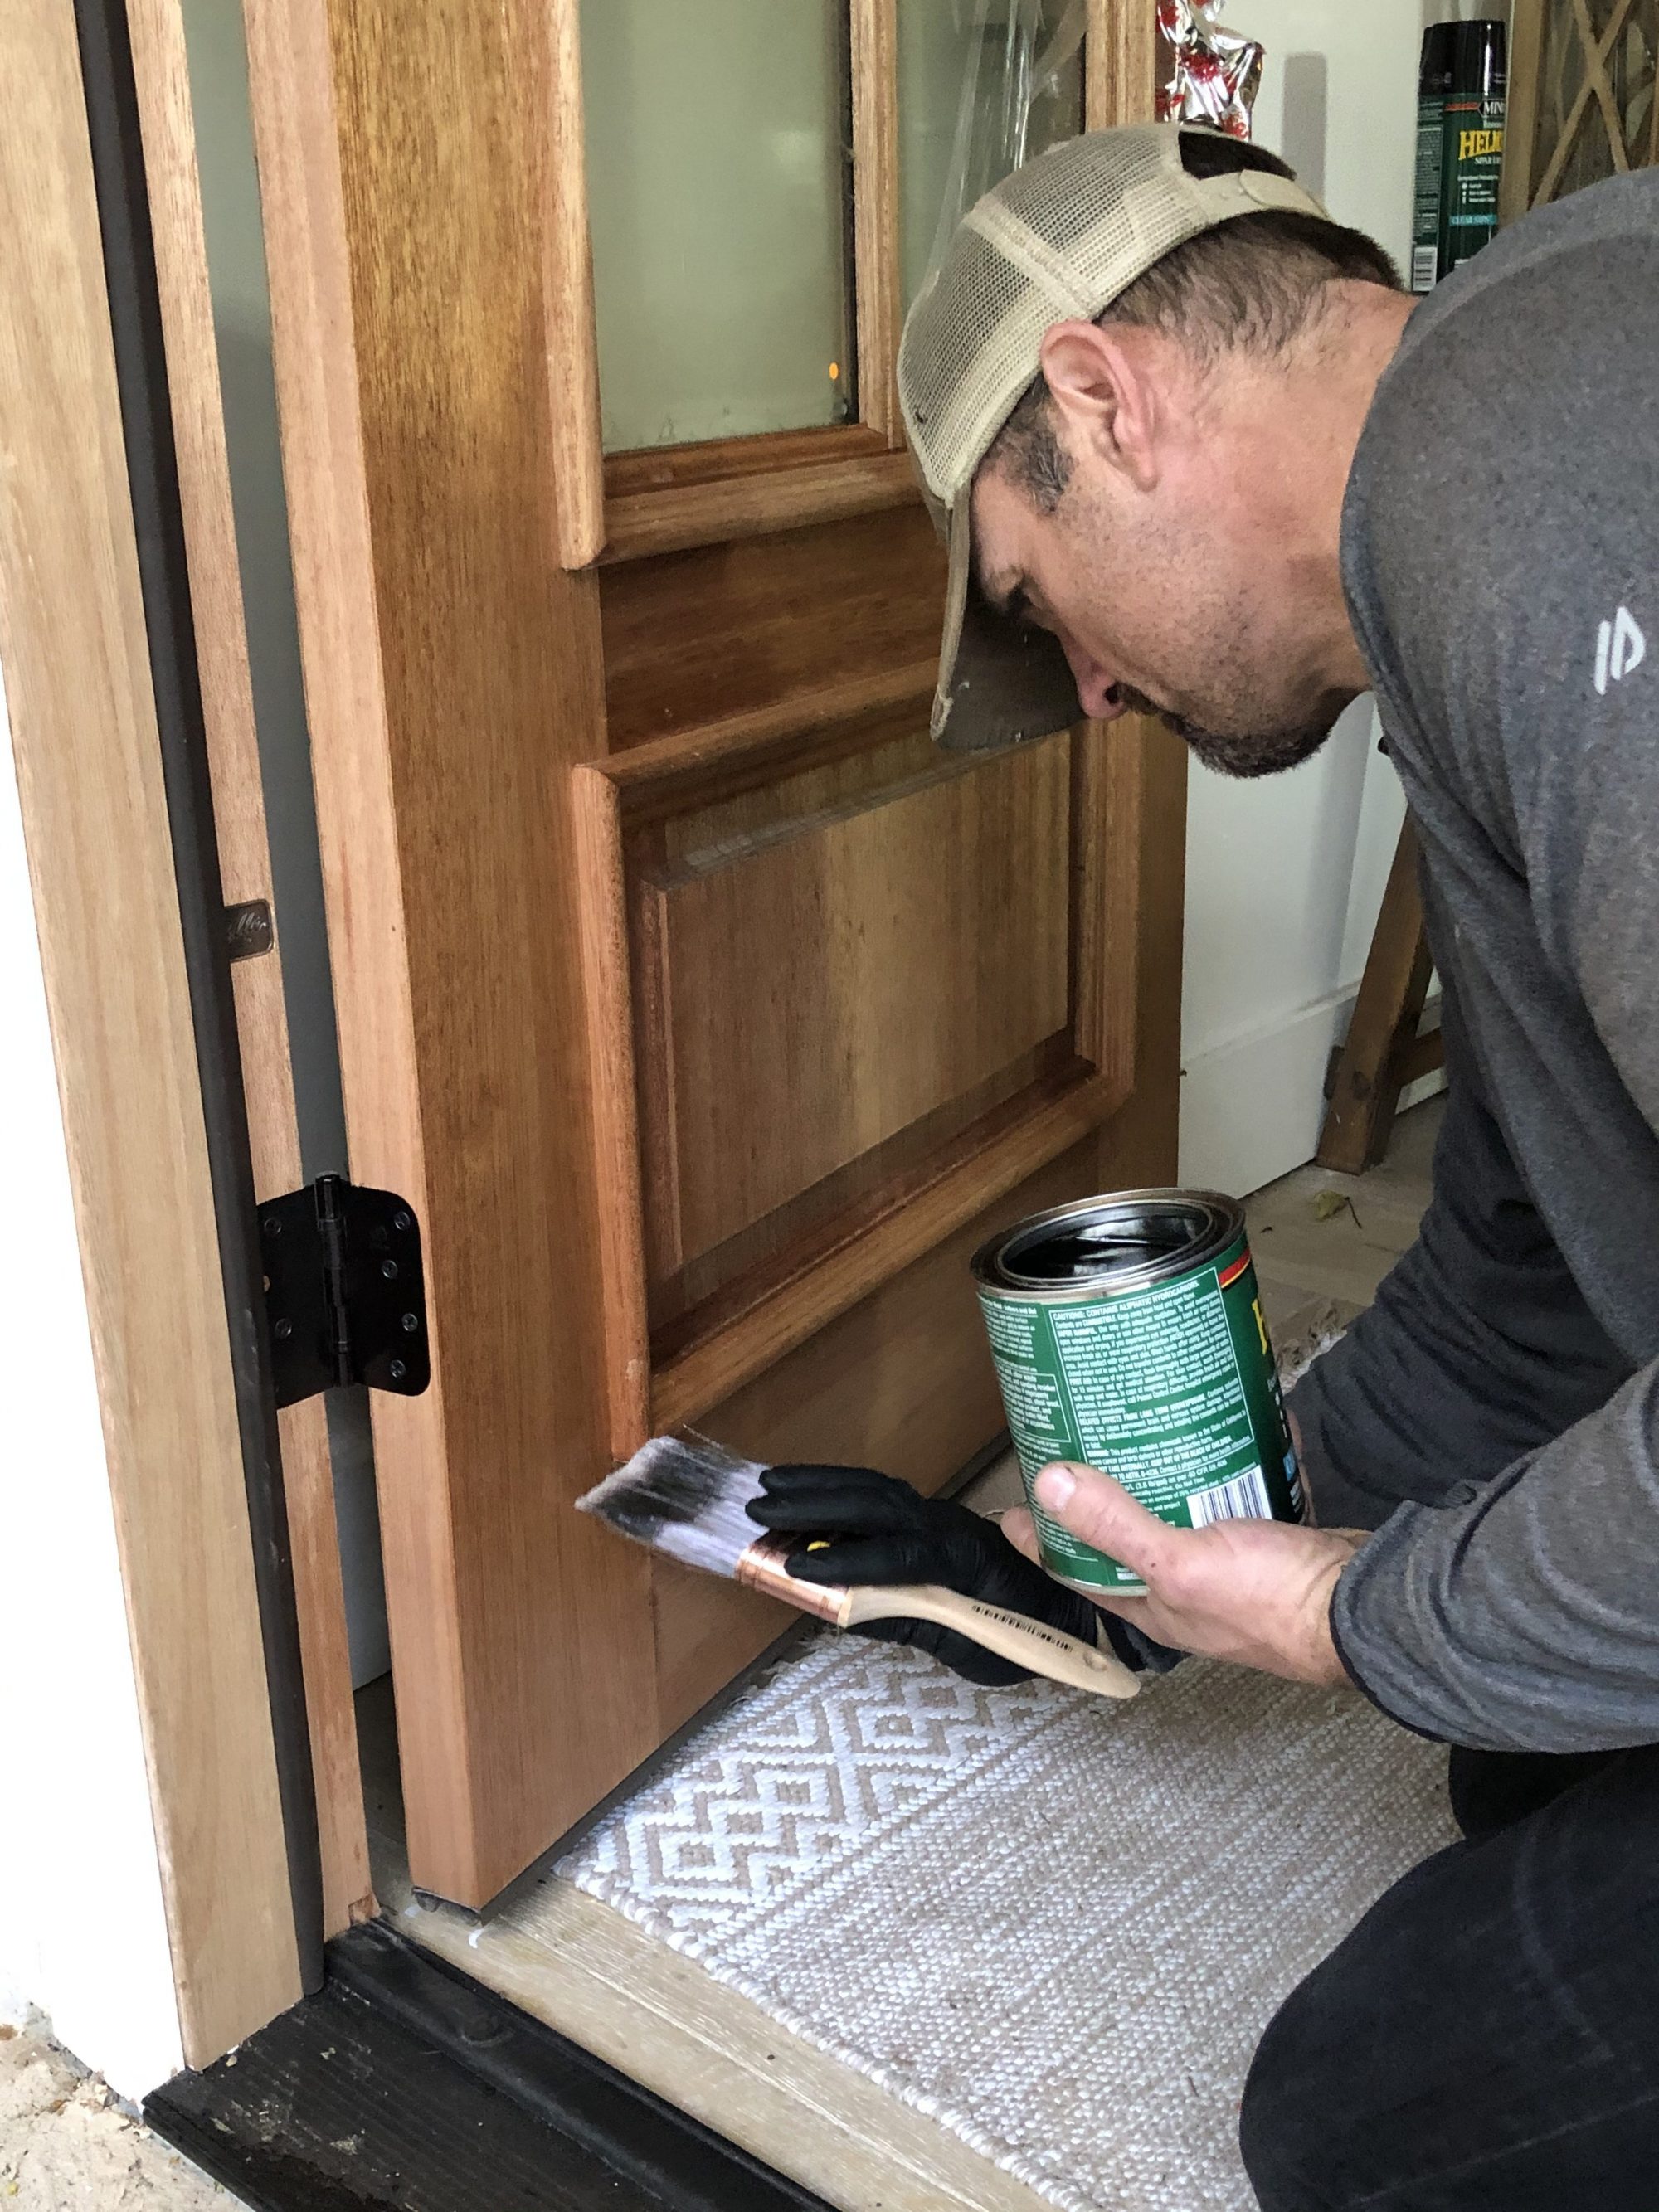
Apply the urethane with a nylon/polyester brush. Let dry the time indicated on the can. Between coats, be sure to use your 220 grit sanding sponge to lightly sand off any bubbles left on the surface and then wipe off your doors with a tack cloth. You will want to apply 2 to 3 coats of urethane.
Step 4: Replace trim around doors.
Once your doors are installed, you can put the previous trim back on, or use a different trim if preferred.
Step 5: Enjoy your beautiful new doors!
Hi Traci!!
So sorry your not feeling well but glad your on the mend!!
The doors are absolutely beautiful!! I love them!! Cy does amazing work!! My husband and I are as always doing new projects around our home. Lowe’s is our second home! LOLOL!
It’s so wonderful to have husbands who are handy. I love following this home makeover of yours. The video last week was so funny and very good!!!
Take care
Donna from PA
I absolutely love your new doors and the stain color is beautiful. Cy just does a fabulous job on all projects he does! I’m sure your neighbors are very jealous since your house looks fantastic.
If this comment shows up twice its because it didn’t post in the beginning! lol
I love the new front doors and the stain shade is fantastic. Cy just does a fabulous job with all the projects he does! I know your neighbors are jealous since your house looks sooo good now. lol
Gorgeous, Traci! This is a very helpful tutorial. It has given me product ideas for my existing door!
Love, love, love the new doors! I cannot wait to see a photo of the front of the house with everything finished and landscaped! Hope you feel better soon. God bless you and your family. You are such an inspiration to so many!
Love, love, love the new doors! I cannot wait to see a photo of the front of the house with everything finished and landscaped! Hope you feel better soon. God bless you and your family. You are such an inspiration to so many!
Thank you, Terri!
Love your new doors! Absolutely beautiful!
Thank you, Angela!
These doors are stunning! I love all the windows and the color of the stain.
The front of your home has had such a transformation! Well done!
Thank you so much, Nicole!
Beautiful, beautiful doors!
Thank you!
Beautiful doors. I have a question, my son made a butcher block island back in 1976 and nothing had been done with it. I am now using it as an island. What kind of finish should I put on it? Some places it is pulling apart just a little. It is beautiful and I want to use it but I don’t want to mess it up. Thank you!
Beautiful! What color stain did you use?
It is mentioned in the post, right below the picture of the stain can.
What type of wood is this door? Is it Douglas fir? Thank you!