Best DIY Projects of March {linky party}

March 30, 2011 AT 9:00 pm 14 Comments

Welcome!

Thank  you for coming to my party!

I cannot wait to see your BEST DIY project of March!

I love the weekly linky parties, but sometimes I am unable to visit them all.

So I wanted to host a party where the best DIY projects of the month are highlighted in case I missed them.


Here is how my party is different…

1.  You are only allowed to link up ONE project.

And it needs to be your best DIY project of the current month.

(It may be the project your readers liked the best, or the project you think turned out the best that month.)

2.  Your project must be a DIY (do it yourself) project related to home decor or home improvement.

(no recipes, clothing, etc.)

I want those who participate in the party or visit our party to know that they will be finding DIY projects related to home decor or home improvement, and that it will be the BEST of what each blogger did that month!

3.  My party is monthly, on the last day of the month.

Here is how my party is the same…

1.  I ask that all participants link back to my blog through my button or a text link.

Best DIY Projects of March


2. I encourage you to visit other bloggers and leave them some comment love.

3.  And , it’s a lot of fun!!!


March Madness in my Home!

March 30, 2011 AT 7:34 am 15 Comments

Wow!

March has been a crazy month.

When we started our staircase makeover, (which can be a big mess), we had no idea that the bathroom pipes in our kitchen ceiling were going to bust and cause another mess!


IMG_9574

We spent one night ripping off all the damp sheetrock from our ceiling.

Jonathan go into the action as well.   There was so much dust that we wore masks.

IMG_9572

To say that my home has been a wreck this month is a complete understatement!

There is dust and grime on everything!

I went on an all out cleaning frenzy yesterday afternoon because I was starting to go nuts!

There was dust in places that I didn’t even know dust could reach!  Ugh!

So our staircase makeover is definitely on hold.

We’ve had to let our kitchen ceiling dry out, and we are hoping to get the sheetrock back up this weekend. 

Despite the setbacks, I will say that I was able to get a lot done in March.

We started the staircase makeover with a little help from my sanding crew.

sanding-crew1-521x600

I painted a new mirror for my guest house.

IMG_9311


The highlight of the month was going shopping with my homegirl Sarah!

me and sarah


My favorite project in March was my little table makeover with my new favorite paint color.

bluetable

Eli’s enjoying the little tote bag I made him with my Silhouette machine.

IMG_9620

I announced a fabulous giveaway from Lisa Leonard’s Decor Line!

heartbanner12_hand-stamped-jewelry1

There’s still time to enter, click HERE.


And I spent a day over at 320 Sycamore sharing a Goodwill chair makeover I just completed.

Click the button to check it out.

blogbuttonnew


Whew!  What a great month!

I can handle that kind of madness any day!

Thanks for joining me this month.

And don’t forget my monthly linky party tomorrow!

best250_0000s_0004_best-DIY-projects-of-March


Spending the Day at 320 Sycamore!

March 29, 2011 AT 8:50 am 2 Comments

Hey Guys!

I am guest posting today at 320 Sycamore!


So exciting!!!


I would love for you to come over and see my Goodwill chair makeover.

Here’s the before:

IMG_9441


If you are visiting me from Melissa’s fabulous blog, I want to say “Welcome!”

If you want to get a quick overview of my blog, you may want to read these two posts:

BENEATH MY HEART 2010 HIGHLIGHTS

BENEATH MY HEART 2009 HIGHLIGHTS

You can also browse around by clicking the tabs at the very top of my page, above the header.

And while you are here, you may want to enter this amazing giveaway…

heartbanner12_hand-stamped-jewelry1

A Heart Banner from Lisa Leonard’s new decor line!

Click HERE to enter.


Have a blessed day!!


Fantabulous Giveaway from Lisa Leonard’s New Decor Line!!!

March 28, 2011 AT 8:21 am

I am so stinkin’ excited to share this giveaway with you!!

If you have been in blogland for any time at all, you have heard of Lisa Leonard Designs.

And you probably know her for her fabulous jewelry.

I have several of her necklaces that I absolutely love!

But did you know that Lisa now has a new decor line?

Yep, she does!

She now makes these adorable personalized magnets…


CustomMagnets1

These would looked great on your refrigerator or favorite magnet board.


CustomMagnets4

Lisa also has this simple, elegant keepsake bowl…

(the rings are not included)  :)

KeepsakeBowl2

You can personalize it with any message you would like.


KeepsakeBowl3


There are many more adorable pieces in her new decor line…


lisa2

lisa1


but my personal favorite is the Heart Banner…

HeartBanner4

Can you say, “Oh my goodness!?”

Is that not the most precious thing you have ever seen?!


HeartBanner3

If I had a daughter, this would SO be on her bed!

I told Lisa it was my favorite, and guess what she said?


HeartBanner5

“Let’s give a heart banner away to your readers!”

Yep.

She did.

How awesome is that?!!!

The winner can create a banner up to 7 hearts long (a $73.00 value), and it can be personalized with anything you want.

You also have a choice in the color of ribbon…

RibbonColors

Are you excited?!!

Here’s how you can enter:

1. Leave a comment letting me know what your banner might say if you won.

2.  Tweet this comment: A Great giveaway from Lisa Leonard’s new DECOR line  http://www.beneathmyheart.net/?p=2880 @beneathmyheart @lisaleonard

and come back and tell me in a separate comment.

3.  Follow or subscribe to my blog, and tell me in a comment.  (If you already follow me, just let me know.)

4.  Share this giveaway on Facebook and tell me in a separate comment.


The giveaway will end on Thursday, March 31st, at midnight EST.

I will announce the winner on Friday, April 1st!

(no foolin’!)

Goodluck!


+


I Did It!!! {And I still can’t believe it!}

March 26, 2011 AT 10:58 pm 48 Comments

Okay, ladies.

I just had to share with you a huge accomplishment!  Because you are my girls!

I cannot believe I am even saying this, but I ran in the Papa Johns’ 10 Miler in Louisville, KY today!

That is insane!

There were over 9,000 participants.  Such an exciting atmosphere!

It was only 42 degrees out, so we had to dress warmly.

After the first couple of miles, I felt fine.


Me and My Hubby after the race.


We stayed at a hotel on Friday night, and my sister kept the boys for us.  (Thanks, Lou!)

We stayed up until midnight rooting on our Cats who beat #1 seed Ohio State…GO BIG BLUE!!!

Then we got up at 5:00 am for the race.  I was seriously thinking I had lost my mind at that point.

Cy finished in an hour and 24 minutes, and I finished in an hour and 47 minutes.  I was just hoping for around 2 hours, so I beat my goal.  Yeah!!

This was such a huge accomplishment for me because I am not a runner.

If you missed the post from last summer where I wrote about how much I hate to run, you need to read it.

I’m still not crazy about running, but there  is something satisfying about it.

The best part of running for me has been doing something I never thought I could do.

I’ve pushed myself beyond my expectations, and it feels so good.

If you had asked me last year if I would ever run a 10 miler, I would have immediately said, “Heck no!”

Cause I didn’t think I could.

But I can.

And I did!

If I can do it, anyone can do it.

Now I might even consider doing a half-marathon.  I know…I’m crazy!

Well,that’s it.  I just had to share this with you because I was so excited.

*********************

I’ve got a great giveaway on Monday that I am so excited about, so be sure to stop back by.

Have a blessed Sunday, friends!


Decorating with Tulips {And Dear Lillie Blog}

March 24, 2011 AT 11:45 pm 17 Comments

The best part of Spring is flowers.

Flowers make me happy.

They make me smile.

They give me hope that warmer weather is around the corner.

If you were following my blog last year, you know my love for buttercups.


work 017_thumb[1]

Buttercups are very sentimental to me because they symbolize a special bond between my mom and I.

They will always be my favorite spring flower.

My second favorite spring flower is the tulip.

I am in love with the fabulous colors of tulips.

goodhousekeeping2

(goodhousekeeping)

You can place a single tulip in a glass jar and have a breathtaking centerpiece.

I bought some tulips to display on my table makeover.

IMG_9520


I loved the combination of the orangey-red tulips with the blue in my table.


IMG_9534

A bundle of tulips at Walmart are only $5.00.

These lasted over a week in our home, and they were worth every penny.

I even got some tulips discounted for $2.00 to put in our guest house when we had company this past weekend.


IMG_9595


I put them in the pitcher I got at the Ballard Designs Outlet on my shopping trip with Sarah.


IMG_9591

I started falling in love with tulips when I stumbled upon a blog called Dear Lillie.


Manic Mother 

It’s one of my new favorite blogs.

Jennifer’s decorating skills are breathtaking.  It seriously makes me drool.

She uses a lot of tulips in her decor that are just beautiful.

Here is a whole lot of eye candy from Dear Lillie…

ENJOY!

bDSC_0122


hDSC_0022


Master Bedroom…

bDSC_0115mb

bDSC_0337


The new nursery…

aDSC_0076


aDSC_0047


Party decor…

oDSC_0010


oDSC_0147


The Kitchen…

eDSC_0171


Bathroom…

gDSC_0078


These pictures are just a sampling of all the beautiful pictures on her blog.

If you never have visited Dear Lillie before,  you are going to love me for introducing you to it!
:)

Jennifer also has an amazing Etsy shop full of lots of goodness.

il_170x135.225882409 il_170x135.229245559

il_170x135.226157377il_170x135.207461899

Go check it out and have a fabulous Friday!!!


cp.022411.S19.50.off_.250x250


How to Link up Your Project to a Linky Party {Tutorial}

March 23, 2011 AT 6:46 pm 9 Comments

Hey Ladies!

Since I am so excited about my linky party next week (March 31st), I wanted to make sure that everyone knows how to link up their projects.


best250_0000s_0004_best-DIY-projects-of-March


I’ve had a few people email me to ask me how to do it.

So if you do not know, here is the post for you.

(And I want to share a Party Etiquette Rule too.)

:)

Step One:

After publishing the post you want to link up to the party, you will want to copy the POST ADDRESS (not your blog address).

For example:

My blog address:  http://www.beneathmyheart.net

My post address that I want to link up:  http://www.beneathmyheart.net/2011/03/diy-kids-beach-tote-bag/

See the difference?  The post address has the title of my post in it.

Here’s how to get your post address:

1.  You can right click on the post title and click “copy link location” like in the picture below…


2.  Or you can click on the title of the post, wait for the page to reload, and then copy the address that appears at the top of the page…


Now that you have copied your post address, you are ready to link it up to the party.

Let’s say I wanted to link up to my friend, Beth’s, Tutorials and Tips Tuesday Party.

I would open up a new window on my computer and go to Beth’s Linky Party.


Then I would scroll down to the end of the post and find the linky tool…


Then you will see three little blank fields show up (usually).

1. You want to paste your POST ADDRESS in the first blank field.


2. In the second blank field,  you will want to put the title of your post, or the title of your blog.  This is what shows up below your picture.  I usually put the title of my post.  Sometimes I have to shorten it.  Each linky party is different, so sometimes you can use a lot of characters and sometimes not.  For my post, I wrote the name, “Kids Tote Bag”.

3. Add your email address.


4. Click “next step”.

(Some linky tools will ask you where to chose your picture from, if so, click “WEB”.)

Then it takes you to a page that looks like this…


(Some linky tools have one more step that lets you crop the picture.)

Chose the picture you want to show up at the party, and hit “select”.

Your picture will show up like this…


Voila!

But you are not finished yet!!! You need to do one more thing!

It is really poor party etiquette not to link back to the party host in your post.

You can link back to the party in two ways:

1.  Use the Party Button.

or

2.  Link back in a text link.


To use the party button, you need to highlight the code in the box below the party button.

Make sure to scroll as you highlight so you get the whole code.  Then copy the code.


Then you want to go to your post and paste the button HTML code in your HTML view.


When I click on my “visual” tab, Beth’s button will show up in my post.

Here it is in blogger:


(You can also save the button as a picture, upload it in the post, and then hyperlink it to the host.)

Here’s how to HYPERLINK:

2.  You can also add a text link that looks something like this:

To add a text link, you highlight the text you want to hyperlink back to the host blog.


Then you add the Host Blog Post Address


Click “add link”, and you are finished!

The hyperlink button in Blogger looks like this:


Adding a link back to the Party host is great party etiquette.

It’s a way to say “thank you” to the host, and it hopefully leads your readers to visit the host blog as well!

If I do not have time to link back to the host, then I do not link up at all.

:)

So hopefully this tutorial was a little helpful.

Hopefully, I have not confused you even more.

If you still have questions, ask me in the comment section, and I will try my best to answer them.


I will be posting the linky tool for my party one week from tonight, March 30th, at 9:00 pm EST.

I cannot wait to see everyone’s BEST DIY project that they completed in March.

(Remember only one per person.)

Be sure to read the Party Rules if you missed them.


If you do not have a project to link up, you are still invited to the party!

Stop by on March 31st and check out the BEST DIY Projects of March!


The Return Of…Best DIY Projects Of March Linky Party {and more!}

March 22, 2011 AT 6:12 pm 3 Comments


I am so excited to get my linky party up and running again!


best250_0000s_0004_best-DIY-projects-of-March

3-31-11

For those of you who are new to my blog, last year I hosted a monthly linky party featuring the very BEST DIY projects in blogland.

When I started working full time in June, I couldn’t keep my blog running as usual, so I was unable to host my parties.

But now that I am home again, I am ready to PAR-TAY!!!

ARE YOU WITH ME?

Here’s the low-down on my party:

I love the weekly linky parties, but sometimes I am unable to visit them all.

So I wanted to host a party where the best DIY projects of the month are highlighted in case I missed them.


Here is how my party is different…

1.  You are only allowed to link up ONE project.

And it needs to be your best DIY project of the current month.

(It may be the project your readers liked the best, or the project you think turned out the best that month.)

2.  Your project must be a DIY (do it yourself) project related to home decor or home improvement.

(no recipes, clothing, etc.)

I want those who participate in the party or visit our party to know that they will be finding DIY projects related to home decor or home improvement, and that it will be the BEST of what each blogger did that month!

3.  My party is monthly, on the last day of the month.

Here is how my party is the same…

1.  I ask that all participates link back to my blog through my button or a text link.

2.  I encourage you to visit other bloggers and leave them some comment love.

3.  And, it’s a lot of fun!!!!

:)

So start thinking now what you  might link up.  You may have already completed the project, or you may get it done in the next week.  Either way, I cannot wait to see it!

I will be highlighting some of the projects on my blog the following week.

I will have Mr. Linky up by 9:00 pm on March 3oth.

If you have any questions, just let me know!


As a side note, I just wanted to show you one of my sponsor’s new designs that I absolutely LOVE.

Leen, The Graphics Queen, tweeted about this design today, and I couldn’t wait to share it with you.

leen

Isn’t it beautiful?

She also created this new design…

enjoy life script copy

And another monogram in a  beautiful new font…


beautiful monogram copy

If you have never been to Leen’s online shop, you are missing out on a treat.

Here’s her button, give it a click and hop on over there!

Leen The Graphics Queen


DIY Kids’ Beach Tote Bag

March 21, 2011 AT 10:54 pm 15 Comments


I am so excited to share this quick and easy little project with you.

kids tote bag

And I am linking this tutorial to my friend, Beth’s, linky party…


I got my new Fabric Interfacing for my Silhouette machine in the mail a few weeks ago, and I have been anxious to try it.

images

I wanted to try something really simple at first, so I decided to make Eli a little tote bag that he could use at the beach or swimming pool.

I found a picture of a whale at the online Silhouette store, and purchased it for 99 cents.

silhouette


Then I ironed the sewable fabric interfacing to my navy blue material I got at Walmart.

(I got 1/4 yard of a navy blue canvas type material for about $1.50.)


IMG_9606IMG_9605


After the fabric cooled, I pulled off the paper part of the interfacing.


IMG_9609

Then I put the fabric on my cutting mat and loaded it into my Silhouette.


IMG_9612

The Silhouette did its’ job, and Voila!

I had a little whale! ;)


IMG_9613


I bought this white tote bag at Walmart too.  They come in a package of three tote bags for $5.96.

(That’s only $2.00 per tote!)


IMG_9614

I was wanting to add Eli’s name at the bottom of the bag, but didn’t want to use the same navy material.  So I looked around the house for some material I could use, and guess what I found…

IMG_9641

Yep! I cut the back out of one of his shirts he doesn’t wear anymore!

Perfect!

kids beach tote bag

I used the same steps above to make his name.

And then I sewed on a little white button for the whale’s eye.

Eli is super, super excited about his new bag!

kids beach tote bag

And I am excited that it cost me less than $4.00!

Now he has three jealous older brothers that I will be making bags for.

:)

He will love carrying this little bag to the pool full of his toys and towel.

kids beach tote


If you like making little projects similar to this one, you may be interested in this…


Now through March 27th, Silhouette is offering a fabulous deal.

1 Silhouette SD Machine

1 “clean cut” fabric interfacing

1 “sewable” fabric interfacing

1 roll of white flocked heat transfer material

That is over $330.00 worth of materials

for only $229.00!

(You will be saving $100.00!)

Just enter the code “HEART” at checkout to receive your discount.

Click on the button below to order.


Silhouette Electronic Cutting Tool


If you already have Silhouette machine,

you can still get a 25% discount on the fabric interfacing.

Just enter the code, “HEART” when you check out to get the discounted price.


Have a great day!!!

Also linking to…
My Uncommon Slice of Suburbia
eli collage


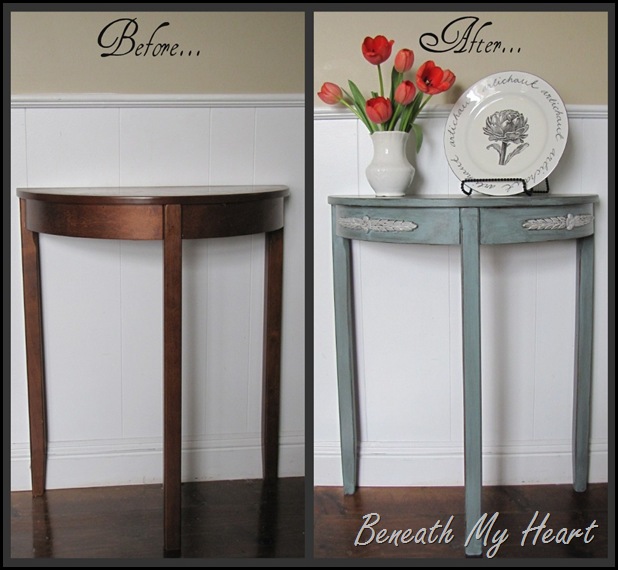
A Table Makeover with my New Favorite Paint Color!

March 20, 2011 AT 11:00 am 41 Comments

Do you have a piece of furniture in your home that you “like”, but you don’t “love”?

Is there a piece of furniture you own that has great lines or may be very functional, but it doesn’t fit in with the rest of the decor in your home?

Well, you don’t have to settle with just “liking” that piece of furniture anymore.

Turn it into something you love!!!

That is exactly what I did.

Today, I am going to share with you a little table makeover I have just completed.


bluetable

I have had this little cherry table for 6 or 7 years.  My mom gave it to me because she wasn’t using it anymore.

IMG_9412

I have used it in several places around the home, but I have never been really happy with it.  It didn’t quite fit in with the rest of my decor.


IMG_9476

So I finally decided to make it look a little more like “me”.

Here are the supplies I used:

IMG_9542

*Valspar Antiquing Glaze

*Minwax Wipe-On Poly

*Sample Valspar paint in Eucalyptus Tree (blue).

*Sample Valspar paint in Light French Gray (Behr’s)

*Minwax Provencial Stain

*Wooden embellishments

I already had all of these supplies on hand, except for the sample size of blue paint.

I bought two wooden embellishments from Lowe’s for about 5 bucks…

(I had already taken one out of the package.)

IMG_9478

First, I sanded a spot on the table where I wanted to attach the wooden embellishments.  This would give the wood glue something to adhere to.

IMG_9481

Then, I put a little Gorilla Glue on the back of each embellishment…

IMG_9485

My hubby helped me nail the decorative piece to the table.  We had to nail it on because of the curve of the table.

IMG_9482

I let those pieces dry, and then I was ready to paint!

IMG_9486

Since the embellishments were plain wood, I used some “Provencial” Mixwax stain that I already had to darken them a bit.  I just used a paper towel to apply the stain.  If I were doing a whole piece of furniture, I would have used a cloth.

IMG_9489

Then I sanded the whole table with a sanding sponge to help the paint adhere to the surface.

IMG_9491

I was so stressed about finding the right color blue for this table.  I was in Lowe’s for a long time looking at all of the paint swatches.  I wanted a grayish/greenish blue.

And guess what…I found it!

It turned out to be exactly what I was looking for.

It is called Eucalyptus Tree.

I got a sample size of it because it was more than enough for this table.

Cost=$3.00

IMG_9546

I just applied the paint with a brush.

IMG_9493

I wanted to be able to see the brush strokes in the paint, and I love leaving a little bit of wood showing too.

IMG_9497

Then I painted the embellishment with the Light French Gray.


IMG_9498

After the entire table was completely dry, I used my sanding sponge to sand around the edges of the table to make it look “worn”.

IMG_9500


IMG_9512

Then I applied the Valspar Antiquing Glaze with a paper towel.  It looks black when going on the table.  Just wipe it on until you get the look you are after.  If it is too dark, just wipe a little off with a damp paper towel.  If it is not dark enough, apply some more.

It’s really up to you!

IMG_9513

The glaze darkened the color of blue to perfection!

I LOVE the look of the antiquing glaze!!!

When the glaze is dry, the last step is to apply the Wipe-On Poly with a lint-free cloth.

And you are finished!  Let the courtship begin!

Here is my new love…


IMG_9523

See how the glaze gives it an “aged” look?

IMG_9530

IMG_9528

I really do love this color of blue.  I am now looking for another piece of furniture in my home to do the same treatment on.


IMG_9537


IMG_9520

Now this piece of furniture looks like “me”, and it adds a touch of color to my home.


IMG_9539

I no longer “like” this piece of furniture…I LOVE it!

One more look at the before and after…

bluetable

What piece of furniture in your home would you like to fall in love with?

Linking to….

Nester’s National Take a Risk Day!

Tuesday Treasures at My Uncommon Slice of Suburbia

Power of Paint Party at Domestically Speaking

Show & Tell Wednesday at Blue Cricket Design

Transformation Thursdays at The Shabby Chic Cottage

Frugal Friday at The Shabby Nest

Furniture Feature Friday at Miss Mustard Seed

Weekend Wrap-Up Party at Tatertots & Jello

Sunday Showcase Party at Under The Table & Dreaming

The Sundae Scoop at I Heart Naptime


content and images copyright © 2009 - traci, beneath my heart

Designed by Chena Designs Development and Hosting by Evenpar Solutions
Web Hosting By RFE Hosting
Counter
Free Counter