
DIY Monogram Pillow Tutorial
Happy Wednesday, ladies!
I hope you are having a great week!
Today, I wanted to show you a little project I just complete for a friend of mine.

She needed it for the bench area of some custom cabinets that Cy built for her a few months ago.

See all those medals above the bench area? Those are all the medals her husband has earned from running marathons! She wanted to use this space as a way to display all his awards.
She gave me the striped material with which to make a bench cushion and a pillow for that space. The material matched some chairs in another part of that room.
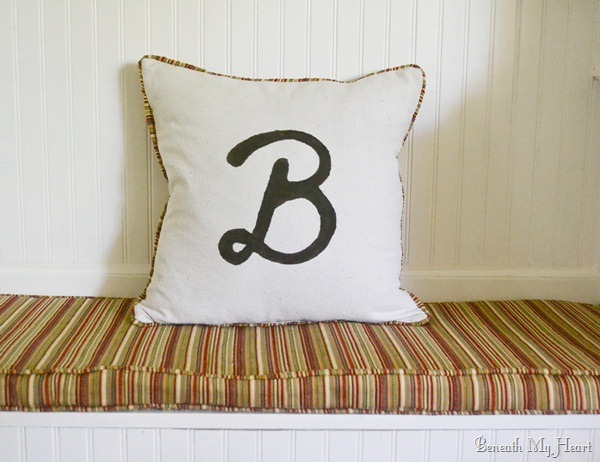
So instead of having a striped pillow on a striped cushion, I decided to use some drop cloth material I had to make her a custom monogrammed pillow.
I used my Silhouette machine to make a stencil of the letter “B”.

Then I used a sponge brush and some brown paint to paint the letter on the drop cloth material.

The pillow form she gave me was 18 x 18 inches. So I cut the drop cloth 19 x 19 inches to allow for a 1/2 seam allowances on all four sides.

Then I laid the drop material on top of the striped material, and cut a 19 x 19 inch piece for the back of the pillow.
For the cording, I just cut and sewed together two inch strips of material. I do not measure during this step at all! I just completely eyeball it.

Then I lay the cording in the middle of the two inch strip and fold it over to sew.

I do not use pins for this step. Most professionals probably do, but I am not a professional. {wink}

You want to use the zipper foot on this step as you sew the cording.
Then I trim the cording about 1/2 inch from the seam.

Next, I pin the cording all around the 19 x 19 inch striped material. You want to put the raw edges together with the cording facing toward the middle of the material. Be sure to pin the cording to the front (right side) of your material, not the back!

After I sewed the cording to the stripped material (using my zipper foot), I then pinned that piece to the drop cloth material, right sides together.

I sewed all around the edges of the material using my zipper foot. Be careful not to sew over the cording that is sitting between these two pieces of material.
After I sewed those two pieces of material together, I turned the pillow cover inside out leaving an opening to slip the pillow form in. (I usually make sure the opening is at the bottom of the pillow to make it less noticeable when I sew it up by hand.)

Once I stuffed the pillow form in, I just slip-stitched the opening at the bottom of the pillow by hand with a needle and thread.
That’s it!
I’m really pleased with how it turned out.

I love making pillows. They are quick and simple. (Didn’t enjoy making that bench cushion quite as much.) ![]()
If you are thinking about trying a sewing project for the first time, I would suggest making a pillow. I know you can do it!

Have you sewn anything lately?
Linking this project to…

I have not sewn anything lately and it’s a cryin’ shame! I’ve got to get on it!
Sharon @ mrs. hines class
beautiful!!! thanks so much for agreat tute!! :)
Teally cute pillows. Any chance you could share the name and source for that fabric (if you know it). It’s really attractive and I could definitely use some for outside cushions. And what about those cabinets…I must have missed that posting! CTD
Beutifully done as always Traci!! I must say, you & Cy make a GREAT team :)
why, yes I have sewn something recently. Just last night I made some curtains for my butler’s pantry. I agree with the above comment: you and Cy do make a great team!
Fitting that you should share this on National Sewing Machine Day!
You did a great job and the tut was very clear. I have problems with my fingers so I always make my pillows with the pocket in the back and you just slip the pillow form into it but in this case it makes the pillow reversible. Love you blog as you already know. God Bless.
This pillow turned out great. Makes me wish I wasn’t so intimidated by the sewing machine that lives on my garage shelf!
Blythe
Hi – love the pillow diy – question though: I have always made my cord covering with bias strips of fabric – how does it do with just the straight strips? It sure would be alot easier to do it the way you did it. (BTW – your hardwood floors look amazing!!!)
Thanks so much
That’s a darling pillow.
OK: I would like to invite you to participate in our linky party: http://www.finecraftguild.com/party/
Would love to share this and see more of your work over time.