
DIY Board and Batten Tutorial (in our laundry room)
I absolutely love board and batten walls, don’t you?
I mean, they make my heart smile when I see them. ;)
There is something so warm and inviting about them.
I have been wanting to put up some board and batten walls somewhere in my home. Anywhere…
My first choice was Adam’s room. Eli will be moving in with him soon which makes for a perfect excuse for a room re-do, right?
And this is my inspiration photo for their room…
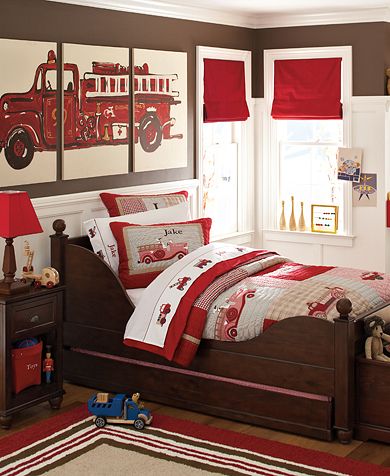
(Pottery Barn)
Why do I show you that when there is no board and batten walls in the picture. Well…it might just be the reason that our laundry room now has brown walls above the board and batten!

I absolutely love it! Brown is the perfect color for a “mud” room, don’t you think?
Several of you have asked me the paint color and it is called Shutter Brown. I got it at Lowe’s and used a Valspar satin finish paint.
Here is a quick DIY tutorial of how my husband installed the board and batten. It is so easy it is ridiculous!
First, he measured about 5 feet up the wall and installed a 1 x 4 around the perimeter of the laundry room. You can put the top 1 x 4 piece at whatever height you desire. We also added a little trim piece to give the top of the wall a “ledge”, but that is not necessary to achieve the look of a board and batten wall.
For our baseboard, we also used a 1 x 4 piece of wood around the perimeter of the room.

Next, we used a tape measure and level to mark lines on the wall every 14 inches apart. We were originally going to run our vertical boards every 12 inches, but they interfered with the electrical outlets. So every 14 inches worked best for us. You do whatever distance you like best. :)

As you can see, we had to draw our pencil lines several times before we found the right distance between boards! In the picture below, we just have the boards fitted in between the two 1 x 4’s, they are not glued on yet.

Since every vertical board will not have a stud behind the drywall to nail into, you need to adhere the vertical boards with “liquid nails”. This stuff is the bomb-diggity!

Put the liquid nails in a glue gun(that is nice and clean like my hubby’s) and squeeze out a strip of the “good stuff” onto the back of the 1 x2 board.


P.S. This is the last week to order one of my Personalized Gingerbread Family Ornaments. I would love to make one for you! Just click on my the picture below, and it will take you to my Etsy shop!

awesome! I love a great room make over! and yours are always so awesome! Do you have a picture of your door that says “welcome” that I could borrow {and credit} for a future post about my new door makeover?
Looks great!
Love it! We’re currently working on board and batten ourselves! :)
It looks soooooo good, Traci! I love the color and your pendant makeover is fabulous.
Absolutely darling!
Great idea and great results.
Like everything about what you have done in this room.
Traci, the Good Lord has sure blessed you with neat ideas and talent to complete these ides.
Always fun to stop by and see what you’re up to.
Have a sweet week and God Bless,
d from homehaven
Love it Traci….what an awesome team the two of you make!
Traci really great DIY . Teamwork made it fab!! I love the effort and caring put into it!
Come and Enter my $200 Giveaway from Fifi Flowers!
xoxo
Karena
Art by Karena
So so beautiful!!! I love the ceiling too!! I just did board and batten in my laundry room, but yours is so great. I wish I had a window in mine :)
Beautiful!
xox
Jen
Very nice Traci! It will be such a charming room! I had a lot of board and batten and beadboard (and on the ceiling too) in my old houses and I really miss it!
The mud room is looking great! Love the color and the light and the tutorial on the walls! I’m hoping after the holidays are over, I can convince my hubby to do that in the hall – it would be so much easier to wipe off little hand prints :)
SO lovely!! If you get the other house, it’s going to be like our own HGTV blog to follow! :)
I agree – perfect color for a mudroom. I bookmarked this post b/c I wouldn’t mind having a mud room that looks exactly. like. this.
I am loving watch the transformation of this room. It looks so good. I never thought brown would look that good on walls … but with the crisp white it is actually so fresh. Awesome job!!
Ya’ll are super talented!! Love it!!
Just beautiful !!! I agree, that color is perfect. I love the the walls, I cant wait to see the rest, Great job!
The paint color you chose is just beautiful with the white and I love the chandelier.
Hi Traci,
Board and batten makes my heart smile too and I really really really want to have some in my house! My hubby doesn’t always get me, but he’d help me do it! :) If only I could decide where I want it.
Just wonderful :-)
Gorgeous! Absolutely gorgeous! Can I come live in your mud room? I love board and batten and beadboard. I think they are my love language. ;)
I think it is so neat that your husband can do this kind of thing for you. What a keeper!
Fabulous find on the light as well. Can’t believe how great it turned out!
I’m working on this EXACT SAME project in our nursery as we speak!!! Well, haven’t gotten to the wood part yet, but I have a pile of wood in the garage, and we’re working on painting the room right now…speaking of which, I better get back to painting, before my hubby comes and finds me reading blogs!
We did bead board in our entryway/mudroom a few years ago and I have loved it. Now I am ready for board and batten and wondering if hubs would be annoyed to replace the bead board…or maybe I will find another spot to use board & batten.
I just ordered my ornament!
I am dying to try board and batten in our dining room-that-I-want-to-make-our-living-room. It looks so easy! Thanks for sharing! And I loooove that brown. May have to get some of that for our bedroom…we want to darken it up in there with brown and I haven’t found one I like yet.
Oh my goodness! The room is really looking amazing!
Can’t wait to gab about it with you at Blissdom…roomie! :-)
Layla
LOVELY work!!!
This is absolutely FANtastic. Thanks sooo much for sharing.
I think I could even pull this off!
So inspirational! I have been wanting to do this in our family room
but can’t even imagine what our contractor would charge for something like this.
Maybe I can talk my husband into helping me with this project!
Thanks again for posting this. Your room looks amazing!
xox
Alison
Thank you so much for posting your handy dandy work – totally inspirational and you can bet your boots I’ll be running to Lowe’s this week to get the same can of paint to ‘amp up’ a pair of icky brass lamps I found for $5 – loooooove LOVE LOVE what you are doing.
HI Traci,
LOVE LOVE LOVE your mud room as much as you do! Thank you so much for the tutorial on the board and batten. How about your ceiling? I would really like to do this in my house. What do you even call it? Beadboard on the ceiling??
Thank you! Robin :-)
I love the brown you used– I’m thinking about B&B for our master bathroom, and really swaying toward dark brown on top. I feel like it’s balanced out so well with white on the board below. Great job, and I’m right there with you on hubby making dreams reality! Mine continues to impress me. :-)
Erin @ The Great Indoors