
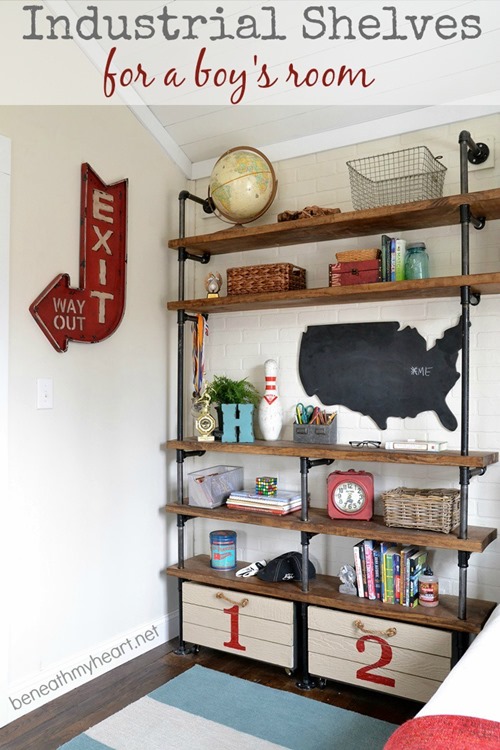
How to Build Industrial Shelves
Today, I am going to show you how to build industrial shelves.

This was a new experience for me, so I just learned as I went along. But first let me show you the inspiration that got my wheels a turnin’ for this project….

Boys Room Shelves @Jessica Kraus on A Beautiful Mess
I had considered doing pallet wood walls, but when I saw that picture last year, I KNEW that I wanted to build something like it that in Jonathan and Luke’s room. Their room is a long, narrow room, and each side of the room is “their space.”
When we were building the walls in their room, {a veeeerrrrry long time ago} we covered one wall on each side with faux brick paneling from Lowe’s.

To help the brick to not look like paneling, we filled the seams with wood filler.

Then we sanded it smooth…

And painted it the same color as the walls, Benjamin Moore, White Dove.

I printed off some of the inspiration pictures I found on my computer, and then began sketching each of the boy’s walls.

Jonathan wanted a place to hang his guitars, so I sketched his wall to look like this…

Then I went to Lowe’s to purchase my supplies. I chose to use 3/4 inch black iron pipes. They come in 1/2 inch and 1 inch sizes as well, and you can also purchase galvanized pipes instead of black, if you want.
These are the main four pieces I used:

They only had galvanized floor flanges, so I had to spray paint mine black.
I began laying the pipes out on the floor to make sure I had all the pieces I needed. Lowe’s didn’t have enough of some of the pieces, but they ordered them for me and arrived within a day or two!

I bought 2 inch thick pieces of wood for my shelves because I love the look of the thick shelves. They come in different lengths. You could save some money by purchasing a thinner wood, if you wanted.
I sanded each piece of wood before using it.

To begin building the wall, I put the bottom row of pipes together and then lined them up where I wanted them on the floor. I used some tape to help me keep them straight and a tape measure to make sure they were the same distance apart.

Then I screwed the flanges to the floor.

I used a 1 and 1/4 inch drill bit to drill holes in the wood where I needed them. Sometimes I used a tape measure to figure out where I needed to drill the holes, and sometimes I placed the wood on top of the pipes and used a marker to draw around the pipe so I could see where to drill the hole. Does that makes sense?

You can see in the picture below how we added the first shelf. You just continue doing the same thing for each shelf.
Pipe…T-ring….6 inch pipe…elbow…shelf….repeat.

Then we created the open space on Jonathan’s shelf by using 18 inch pipes. You can see how we still used the 6 inch pipes and the elbows underneath the shelf.

Since the final pipe on top needed to reach the wall, we used an 8 inch pipe instead of a 6 inch pipe. We attached a flange to that pipe and then screwed it into the wall. On Jonathan’s wall, it was the perfect length, and we were able to drill into the wall perfectly, but for Luke’s wall, we had to add an extra piece of wood to the back of the flange to make it fit perfectly to the wall. {Do not ask me why.} ![]() )
)

After the shelves were built, I stained them with MinWax Provencial and sealed them with MinWax’s wipe on poly in Satin. Be sure to lightly sand in between each coat of poly. I applied two coats.
In the picture below, you can see the sizes of the pipes we used.

Lastly, I added some guitar clips and storage crates. We’ve put some “décor” on the shelves for now, but I am sure we will be changing a lot of it.

Jonathan is thrilled with his wall!! He said he wants to add some more “music” stuff to it, so that is our goal. I think it is a great use of space and makes his room look so “boyish.”

I was trying to figure out how much this wall cost, and I think it was around $300 total. Which is a lot cheaper than most pieces of furniture and makes a much greater impact in the room. 
If you like this post, you might also like this one…
“In accordance with the FTC Guidelines, I am disclosing that I received products from Lowe’s for this project. Although I have a material connection to Lowe’s, any publicly stated opinions of Lowe’s and their products remain my own.”
Love it!
How much did the whole project cost, if you don’t mind me asking?
Close to $300.
How did you do this for $300, when I price out the flanges, elbows, and tee fittings for one shelf its around $50 – that’s without any wood.
Is there any way you can list out the cost of the materials individually?
We just did this project in January of 2023 and it cost us around $500!
Traci – Did you make the holes for the shelves just big enough for the pipe to fit through from the top, so that the flange part held the shelf up? I hope you understand that. Or did you actually screw a flange under each shelf to keep it in place? I just want to make sure that my shelves wouldn’t slide down. Love this idea and totally going to do in our new Media/play room. Also would love if you could give a tutorial for a rolling type coffee table with the big industrial wheels! :) The boys rooms look wonderful – great job!
Carrie, I did not screw a flange under each shelf, but the tee fitting is wider than the pipes, so the shelves kind of sit on the tee fittings. Does that make sense?
All I can say is Wow! Impressive. You definitely earned DIY Diva of the Day. Pinning …
Great job! You always come up with wonderful ideas and I love them. Will the boys have a desk?
God Bless
These turned out absolutely dreamy! I love your accessorizing, especially the guitars. Thanks for the tutorial.
I love this!
Looks AMAZING!!! What would you suggest if wanting to install something like this in a room with carpet? Also, is it pretty sturdy and weight supporting? Looks like the elbows take the majority of the weight, at the wall.
Hi, what I would suggest doing in a room with carpet, or maybe in general, is to add another tee at the bottom in between the floor flange and the first tee. Then a pipe with a floor flange on it attaching to the wall. So instead of a 12 inch pipe at the bottom I would use a 6 inch pipe with a tee (with the pipe coming out of the side of the tee attaching to the wall) then another 6 inch pipe and continuing on according to the plans as originally designed. That way your unit is still sitting on the floor but is attached to the wall at the bottom but not the floor. You will need to buy more tees, floor flanges, and 6 inch pieces of pipe but you won’t have holes in your floor.
I was thinking I”d just use the floor flange over the carpet. What do you think of that?
I think it would be totally fine and it’s what I would probably have done if I had had carpet.
Great shelving unit. I’m also looking to use this design in a room with carpet. Wondering if it would be advisable to just lay another shelf/piece of wood on the carpet, drill in your plates and build up from there? It could still offers the stability once attached to the wall at the top. Does it sound feasible?
Also, what are the depths of the shelves you used? 10″?
Again, awesome work!
This is a wonderful addition to the room. I would love to add something like this at some point to one of our rooms!
Absolutely love the look of these! Great tutorial too Traci!
thank you so much Kim!!! xoxo
This is super cool! My son is turning 13 and his room currently has the track shelving in white. This would definitely be more age related. On my list of projects now. Question for you – the walls are plaster, an issue???
Thanks Lisa
Hi Traci,
The shelves are stunning! May I ask how wide the boards are? I know you said that they are 2 inches thick but what about the width? Thanks so much!
Hi Sarah! Those are 2×12 boards that I used. {But technically, I think they are 11 and 3/4.} Hope that helps!
Did you use pine boards form Lowes or a different type of wood? I love what you did here. Our kids are away at camp and we surprising them by redoing their bedrooms for when they come home.
I bought 6 foot boards and I am hoping to use your exact layout……. Was that a good guess for the length? Also how high did it end up being? I accounted for your 2 inch boards and also the piping, but my ceilings are only 9 feet so I hope I didn’t get carried away! Thanks for an awesome tutorial.
I think 6 feet is a good length. Mine were a little longer I think. But I had a pretty long wall. And my shelves would fit with a 9 foot ceiling, so you should be fine. :)
I wanted to know what type of wood you got from lowes for the shelves?
Could these shelves hold a lot of stuff? What do you think the weight limit would be?
Yep! I would feel comfortable sitting on them. ;)
Wow! Great! Thanks so much. Love the idea!
What is the depth of the wood? Love these!
About 12 inches.
Is there anything securing the 90 degree elbow at the rear of each shelf?
No. :)
I think my comment got lost……. how wide are your shelves and then how tall did they end up being?
This is stunning! To be clear the shelf sits on the tee fitting, you drilled a hole in the shelf just above the tee fitting for the next pipe to fit into and then screw into the tee fitting through the wood shelf? Also is this something a girl could tackle by herself? I’m not to power tool inclined. But I do love this and am wanting to try it out.
Really like these but I know my son who lives out of town and needs shelves would never build these. Any suggestions for similar ones to purchase.
What would be an alternative way to secure the bottom if we have carpet? I was think doing it the same way as on top which is securing the pipes to the wall and also making sure they are firmly pressed down so the bottom legs don’t wiggle/move
What do you think?
Nora- did you try it that way? I am wondering how to secure it differently also! Would ove to Kjow if it worked!
How would you attach the bottom fittings if there is carpet in the room? Thank you!
That is really a great idea! I may use it for my son’s bedroom! Thanks for sharing :)
How tall did this end up being? I only have 8ft ceilings
Did the pipes come precut at those links? I have been on Lowe’s website and I don’t see any that come less than 1.5 ft.
Hi Julie!
I was able to use all the pipe sizes that they already had at Lowe’s, but they are able to cut and thread them the length you need. I just didn’t have to do that. In the store, they have lengths as small as 6 inches, or maybe even smaller. Maybe those are not sold online. I would go to your local Lowe’s to see what lengths they have.
Ha. That was supposed to say “lengths”
And I totally didn’t catch that “links ” error till you pointed it out! 😂 😂😂 had to share. and yes it made me giggle . Lol. I’m usually the one who ends up posting a sentence that autocorrect usually destroys and makes me sound like a complete dingdong or worse!😂 thanks for the laugh! And man isn’t this a n awesome tutorial! I love it! I’m gonna go get lost looking at pricing of materials and see if conduit is cheaper than pvc…. Ya never know. ☺
Several have asked, and no answer has been given. Are there any ideas for those of us with carpet on slab to secure the bottom? Thanks!
If you are trying to do this on a carpeted floor, the solution would be to not use the flanges on the bottom (that attached to the floor in this case of the blogger) and to add a back leg on the bottom shelf only. Attach the back leg to the bottom side of the back shelf via a flange. On the floor end of the back leg pipe, add a 90 pointed toward the front leghen add a 90 pointed toward the back leg. Secure the two 90s with the appropriat length of pipe. This would add the bottom stability you need on each end whereas the flange attached to the wall adds the stability at the top.
The second sentence was supposed to say ” add a 90 pointed toward the front leg and then add a 90 to the front leg pointed toward the back leg….”
Another solution that could solve the problem for those with carpet, add a back leg on the bottom as mentioned above via a flange screwed to the underneath side of the shelf, butt add T’s to the back leith the joint pointed toward the front leg and add a cool industrial locking caster to the bottom “empty” socket of the T. Add the T the front leg with the joint pointed to the back leg and secure the front and back legs together via a pipe to the two Ts. Finish off with the decorative caster. Note: am inexpensive alternative to antique casters is to buy locking casters at a home supply store and tape off the wheel and spray paint the metal part. If the wheel is gray, a large black sharpie will solve the problem much better than spray paint.
Just want to say thanks for sharing you talent and ideas
what are those pipes for in the first purpose ? only to make shelves ?
Those are pipes they use for plumbing. They are found in the plumbing section at Lowe’s.
What would be the best way to secure this to carpet flooring?
One more question, could you please measure the height from the floor to the top of the top shelf. I may have to adjust the height on one or two shelves to make it fit with 7.5′ ceilings.
Hello, I am in love with the bookcase!!! Do you sell them? I want one for my sons room.
No I do not. But you can see how I made them here: http://www.beneathmyheart.net/2014/01/build-industrial-shelves/
Love the project–Does the wood just sit on the pipes or is it secured in some way?
It just sits on the pipes, but the pipes go through holes in the wood, so it is very secure.
Hey, I have a question about the elbows that sit on the underneath part of the shelves. Are they actually attached in any way or are they just there for the shelf to sit on as that kind of support? Thanks
They are not attached in any way. They just add support. Not all shelves will sit perfectly on the elbows, but the joints on the elbow hold the boards in place.
WOW! I have been in such a funk with my sons small bedroom. This inspired my husband and I. We are so doing this. Thank you so much for taking the time to tell us how you completed this project.
I am in the process of designing a unit similar to this and need some advice if you can. I really like the look of the thicker shelves, but using 1/2 inch pipe instead of 3/4 will save me about $100 (My unit is going to be much bigger). Do you think those proportions would look weird? Do you think it will effect the stability of the unit? Any help would be amazing!
Celena,
I think the 1/2 inch pipe will be fine. It shouldn’t effect the stability of the unit. Good luck!
Traci
Hi! I LOVE these. Quick question — did you place your vertical pieces so that when you got to the top you were screwing into a stud? Thanks for the inspiration!!
No. Sometimes I would luckily hit a stud, but sometimes I wouldn’t.
I’d love to know your ideas for building in a carpeted room
Did you use anything to clean the pipes? Also, I’m having trouble getting the pieces to completely screw together, which makes everything extremely hard to level. Any suggestions??
I did not use anything to clean the pipes. It is a little hard to keep things level, I agree. I didn’t tighten all of the fittings completely, and some I did to help level things out. You kind of have to “play” with them. :)
Can i ask where the white pull out shelves are from? i’ve looked at most major stores that sell cabinetry and haven’t been able to find something that is less that 13-14″ deep
I made those, Jackie. The link should be in the post.
LOVE this! Where did you find the storage crates?
I made them!
Awesome! Did you blog about it?
Hi
How wide is the wood you used for the shelves?
Thanks!
Erin
I used 2 x 12’s. (They are actually shy of 12 inches deep.)
Wondering how reconfigureable this might be should the child need different storage? Thinking storage for a toddlers room and then a desk area as he grows?
It would be kind of tedious to reconfigure, but I guess it could be done. I would just create it with the desk to begin with, even though you may not use it as a desk. You could put storage baskets under the desk for toy storage.
You could add what is called a nipple made in the black Iron pipe at any joint to “lengthen.” The most eye pleasing way would be to Take the bottom two shelves apart and add a longer pipe on the bottom section and a shorted on on the next shelf. So if you add 4″ to the bottom, the.next shelf up would lose 4″ or do away with a shelf altogether over time. The possibilities are endless depending on the need and imagination. To avoid buying longer pipe fort eh bottom section, you could always add casters but would still need to reduce a shelf section somewhere by the height of the caster unless you have room to move the until up by that amount. Bear in mind that means removing the flange at the top and reattaching.
If there is a wood subfloor under carpet, I imagine you could mount this just the same as in this blog. Perhaps slightly longer screws.
LOVE LOVE LOVE this shelves
Any suggestions if we can’t screw the flanges to the floor, any other method to secure it?
A solution to the galvanized flange color issue, or if the store does not have a sufficient quantity in Ts or 90s but they do have the correct size you need in galvanized is to buy boiled linseed oil at the home supply store, heat it up and place the galvanized items in for 5 minutes or so. Remove via tongs and let cool. Remember these a metal pieces in boiling oil so use caution and do not touch them until they have had ample cooling time. In no time your galvanized pipe is black!
I LOVE THIS. I’m making a loft room for my son and want to build shelves like these. I will have to build them over a 56 inch wide (but only 2 ft high) chest of drawers. How important is close spacing of the floor supports. Could I get by spacing 56 inches apart on the floor? I could definitely put more flanges on the wall at the top. What do you think?
What are holding the guitars? I have been lookinG for something to hold my sons guitars like that?
Also are the storage crates just basic crates that you added wheels to?
What did you use for the guitar hooks? I would love to find something similar for my kids. thanks. Love your room!
I’m getting ready to build one of these, and I’m curious: how much space ends up being on a shelf? For example: if I use 12″ length of pipe, what does the height of the shelf end up being once it’s assembled?
I hope to use the bottom shelves for LP records, and they need just over 12 1/4″ to fit.
Thank you!
I have purchased all of my supplies to do a similar shelving unit in my office. I was wondering though, did your black pipe have a thick-ish paint-like coating on it with white wording stamped on it? If so, did you paint over it, sand it off or leave it? Thanks so much!
Scratch that question. :) I figured out what to do to get that coating off. Just in case anyone else needs to know: I used steel wool and a little Dawn dish detergent and as little water as possible to scrub most of it off. (I do intend to paint all of my pieces with ORB spray paint so they will all look the same) After I scrubbed all of that black stuff off I made sure to dry all of the pieces inside and out so that they won’t rust. I mean REALLY dry them, I wiped mine with a towel, then a paper towel, then sat them outside on my back porch under the ceiling fan. Once they were dry, I painted them with Rustoleum Oil Rubbed Bronze Spray Paint. Perfect!
I love these and am looking to build one soon. What type of wood did you use and what was the width? Also have the securing to carpet question.
Pondering the carpet conundrum… possible to cut a slit in the carpet where flanges are secured to floor? Pick really long screws and screw through carpet? Don’t use any screws and let the weight of the unit plus the flanges secured to the wall be enough?
Hi, I love this! Wondering the length of the entire project? I know you said you used 2 x 12 in boards, so did you have about 48 ish inches in length? Thanks.
We just built our shelves in the living room par your instructions. We are so pleased. And you made it really easy to do. Still need to stain the wood but it looks great. Thank you!
I see you used 12 foot boards, but is that the actual length of these shelves?
about 10 feet
How wife were your boards?
12 inch deep
My husband and I were looking at the pipes at Lowes and they have writing on them. What did you do to not show the writing, or did yours not have writing? Thank you :)
One more question :) could you email me the other dimensions of your other sons room with the shelves with the bed, that is the one we are going to build? Thanks again!!!!
I don’t want to drill mine into the floor, do you think the weight of the shelves themselves could keep it all in place? Maybe with rubber slip pads underneath?
Just did this-so easy to follow your instructions. I love the Provincial stain color. I painted the pipes aged bronze color to cover up some of the lettering on the pipes. I also made mine a lot more complicated by trying to add a desk on one half and shelves from top to bottom on the other half. I don’t recommend this if you are trying to keep this an easy DIY! If you do try it, just keep in mind the spaced added by the elbows, flanges and the t-joints. Overall the work was worth it and my teenage son loves it!
Libby- I am also adding a desk like you described. How many inches did you allow for the elbows, flanges and t-joints?
Thanks
I think I saw every possible measurement (thanks for the detailed step-by-step) except for shelf depth. 10″?
Thanks for inspiration!
Hi!! This look amazing!! We’re going to attempt this weekend, but we have carpet. Any suggestions on that variation? Also, if you did again, would you stain the boards before or after, like you did originally? Thanks so much!!
Hi LaRae!
Truthfully, I think if you used the flanges on the bottom, you wouldn’t really have to put screws into the carpet, or maybe just put one? You might would be able to just nail them into the floor. Depending on what type of carpet you have. Unless it is super short carpet, I think you could eventually pull the nails out and never notice. But that is my opinion. I can tell you that if my boys had carpet, we would just nail or screw the base pipes right into the carpet. By the time we wanted to take the shelves down, the carpet would probably need to be replace anyway! :) But that is just the way I roll. (And I would stain the boards before installing them.) xoxo
Hello! I just came upon your blog tonight and loving it. I am wanting to do a white brick wall in our bedroom in a house we are decorating and since you have the brick paneling and the real brick white washed too to compare, would you say the paneling looks and feels pretty real?? I was thinking I would to the brick veneers and then white wash or paint straight white but that paneling looks a lot faster! But I would like it to feel “real”. What are your thoughts?! If you could email me I would love it. Thank you!
Hi Jaclyn! The brick paneling gives the “look” of brick, but doesn’t really “look” like brick, ya know? It works great for the boys’ room, but I think you wouldn’t be happy with it in your bedroom. It doesn’t “feel” like real brick. The paneling is a lot faster, but again, it doesn’t look exactly like brick. Lowe’s does have other options that look like brick, but they are not full sized bricks. You could ask them in the tile section and they could help you find it. Hope that helps! :)
Could you tell me what kind of wood you used? Pine?
Hey there! This is gorgeous! Do you think there’s a safe way to do this without drilling into the floor? We live in an apartment and can’t really put holes in the floor :-( thanks!
The poles are so sturdy, I personally don’t think you would even need to screw them into the floor. As long as they are secured to the wall, I think you would be fine.
Since its an apartment I would put a board on the floor and attach to that, also consider using a stud finder to locate the wall studs to secure the wall mounts. Any holes in the wall can easily be filled when you move out.
Beautiful. You have an incredible eye for arrangement of books, guitars and “crap.” This looks awesome!
Thanks for this tutorial! I think this is the wknd we’re going to use it for our pantry. I started in yesterday thinking I was just going to use one of my sample paints from SW and paint a wall in the pantry. Well, one thing led to another (as home projects often go…) and since all the contents of my pantry are on my counter tops and table, I’m thinking we might as well do the shelving the way I want now instead of later. Saves time in the long run but costs $ today…
You said you didn’t clean the pipes. When I bought mine my hands were completely black after touching them. Did you not have this problem?
this is great, thanks! what is the actual distance between each shelf? I was aiming for 17″ to evenly space everything apart, but I see pipes are 18″ and then not sure how that all works with the fittings. My brain refuses to wrap itself around the math. Thanks!!
Hi Traci — What kind of wood is that? Also, what are the width and length of the wood? I am having trouble finding wood that is long and wide enough for my project. Thank you in advance! :)
Hi Traci,
I’m beginning to build a media unit similar to this and I’m wondering why you decided to stain the wood AFTER the shelves were built. Is there a reason why you didn’t paint them outside before you built the shelves? I’m nervous about my family inhaling the stain inside.
Thanks!
Hi Molly! That is just the way we did it. You can certainly stain the wood outside. :)
Good post.
Great guidelines for designing industrial shelves. The shelves are the ideal solution to organize, store stuff in homes, work places and also in industrial firms.
I love this look. Any ideas on how to secure this shelving to carpet? Thank you for sharing.
Eve, did you ever find out an answer for this question? I”ll be using it over carpet also. I’ll keep searching for an answer :-)
Looks like the question was answered above so…nevermind ;-)
Love the industrial look …Great Job!
Question, black iron and galvanized pipe has a tendency to rust. Did you put/coat anything on your pipe fittings?……
I did not, Cara. I didn’t know they had a tendency to rust. I would think they would have to get wet to rust? Maybe?
Yes, your correct, it would have to be wet. I suppose as long as there is no moisture or condensation of any kind, you may be safe. Probably not a good idea to use in the bathroom without painting some type of clear coat. How long have you had yours in place? Should you have any rust issues over time, Id love to know about it……..Again, great job and thanks for the reply!!
Hi Cara!
We’ve had ours built for about 3 years. No rust at all, so far. :)
Hi!
I just built two of these— one smaller than the other. How much weight do you think they hold. I made the smaller a bookcase– 22 inches wide and 96 inches tall. I have books on it and I’m worried it won’t hold. I screwed two flanges at the top- used anchors that say they hold 61 pounds each- 4 screws in each. Thoughts?
Carly, I am not sure unless I saw your shelves for myself, but I am pretty sure they could hold a good amount of weight. I have even caught my boys climbing on ours! :)
I’m sure yours would be fine. :)
Love these shelves! Did you make the storage bins on the lower shelf?
ask for permission to repost this intresting post to my blog(just to make me easy to find and read it), i will give you link back offcourse.
nice sharing
You have my permission to use one or two photos of my project with a link to my blog, but you do not have permission to repost my project in its entirety on your blog.
Thank you.
Do you happen to have a complete materials list?
I would love one too.
I would love a list as well!
Good project. However, I’m tired of old, repeat content. I check your blog every day & am disappointed not to find new material.
Trying to figure total inches in height. How many inches does each tee fitting account for? Example….you attach flange to the floor, screw in 12″ pipe, screw on tee fitting and then screw on another 12″ pipe…..what is the total height? Thank you….I absolutely love your shelves’!!!!!
Yesterday i just ordered a few fittings and pipes to experiment with because I couldn’t find anywhere the dimensions of the tee fittings and the elbows, then today I found your tutorial thanks :-)
I’m building a couple of shelving units which I saw for sale on eBay and I’m saving about £320 overall!!
So yeah, all I have to say is yours is the first blog I read about doing this kind of project and all I can say is BOY DID I GET LUCKY!!! I am taking what I’ve learned through all of your detailed instructions and wonderful pictures, putting my own spin on it (hopefully to curve it around an outside edge wall) and I am feeling pretty confident!
The only question I have is: What type of wood did you buy? I LOVE the 2″….looks intensely cool!!
Thank you so much for sharing.
Very nice!
My wife is a big fan of the industrial look.
But I do fear that if I show her these, I won’t have time to go MTB’ing this weekend :-)
Keep up the good work!
Hi, I was wondering a couple of things:
How thick was the pipe?
How deep were the shelves?
Looks amazing, really impressive.
What kind of wood did you use for the shelves?
Good afternoon from the UK.
Just about to copy your shelves as they are amazing.
Just wondering how you got the boxes underneath to be floating ? Or are they on canisters ?
Many thanks for the blog
Julie
This is the coolest thing in the history of ever! I have THREE boys and I saw a picture of some industrial shelving somewhere on Pinterest but no how to — You are AMAZEBALLS! Love it love it love it! Lucky boys…
Sooo… say the room has carpet and not hardwoods — any suggestions for the bottom? Hmmm….
So, I absolutely LOVE this idea! Very cool! Cool enough that I’d like to try to do something similar with the back wall of my living room. I was thinking They’d be primarily bookshelves, but I may try to sit a flat screen TV in the middle as well.
Question, though: I have a TON of books, so if I did this, all of the shelves would be completely covered. Do you think this would hold up to all that weight? I’m a little worried the pipes might bend or break, or am I completely underestimating the strength of steel?
These shelves are EXTREMELY sturdy and can hold a ton of weight. You’ll be good. :)
Looks Beautiful!
I am going to be doing something like this in my kitchen nook, but I am really wanting to know where you got your white storage crates…. I have been looking EVERYWHERE and am not having any luck.
Thanks!
What kind of wood did you use? Pine?
Hi Traci. My name is Tracy with a “y”. Nice to meet you and thanks for your blog post. I know this blog post is several years old and the last question was nearly 9 months ago but I didn’t see my question above and thought I’d ask. Could you help me understand the far right hand side of the shelving unit? In particular, I’m curious about the far right side – the upper shelf bracket above the guitars and below it – where it doesn’t look like there is continuous pipe from the floor to the ceiling. It looks like the top portion above the guitars is attached at the top of the wall with a flange and then the fittings hang down for several shelves and then just end at an elbow. Am I seeing that right or is the bottom of that section actually also screwed in to the wall with a flange? I’m curious because it seems like the weight of the pipe would drag that section down if it’s only attached in one place at the top. Conversely, is the far right bottom-most pipe just screwed into the floor? How does it stay upright and hold up the weight of the shelf if the back portion isn’t attached to the wall with a flange? Hope these questions make sense. Thank you.
Love this! Where did you find the storage crates?
We made them and put them on wheels to roll in and out. :)
Love love Love!!! Thanks for this! Could you tell me how long the longest shelf is?
Well done!
Looks great!
I am going to be doing something like this in my Podiatry Clinic.
Thank you for sharing Traci!
This is the best tutorial I found so far for this type of project! I live in an apartment (rented) but I recently started working freelance, so need a desk to work from home. I love these ideas for a narrower desk that has plenty of shelving. I don’t want to drill into the floor though (since I’m renting). So for the desk part, I think I want to make the bottom more like a table with pipes at the front and back. Do you think that would be enough support, or would I need to add a supporting pipe across the back pipe legs?
This was a helpful article about industrial shelves. I need to create a storage area. I’ll consider using industrial shelves.