
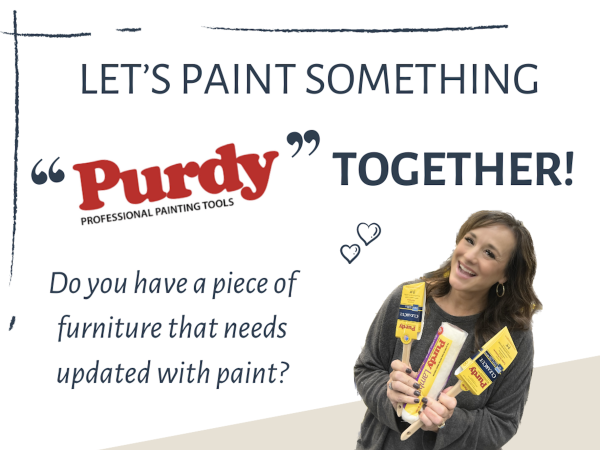
A Step-by-Step Guide: Prepping and Painting Your Furniture
Today I am going to share with you a A Step-by-Step Guide to Prepping and Painting Your Furniture!
*This post is sponsored by Purdy Paint Tools. All opinions and ideas are 100% mine.
I am going to do this by sharing the painting project that I completed with the winner from my Purdy contest. Do you remember when I shared with you last month that I would be going to one of your homes to paint a piece of furniture with you?
Well, I had a lot of wonderful submissions from many of you, and it was fun reading your emails and seeing what piece of furniture you wanted to have painted. I wish I had the time and resources to go to ALL of your homes and paint with you, but sadly I do not. 😢. Maybe someday…*sigh*
After looking through all of the emails, we decided that I would be painting this sideboard buffet with Ms. Elizabeth in Thompson Station, Tennessee! {Isn’t she cute?! 🥰}


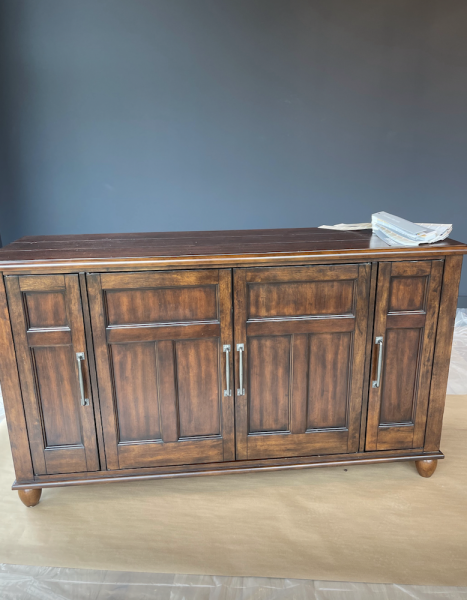
Ms. Elizabeth had recently moved into a newly renovated home, and she was hoping she could use her sideboard buffet in her new dining room. However, she already had too many different wood tones in the floor, ceiling, and future table in her dining room that would compete with the dark wood color of the sideboard. Since she loved her sideboard so much, (it holds a ton of storage,) she knew that painting it would be the best way to still be able to use it in this space.
*Cue me and my Purdy paint tools!😉😂
I was soooo excited about painting this sideboard buffet because I knew it would be beautiful and a great way to demonstrate how to prep and paint furniture!👏🏻
If you have an old or tired-looking piece of furniture t that needs a makeover, painting it can breathe new life into it. In this step-by-step guide I will walk you through the process of prepping and painting your furniture to give it a fresh and stylish look that will enhance any room.
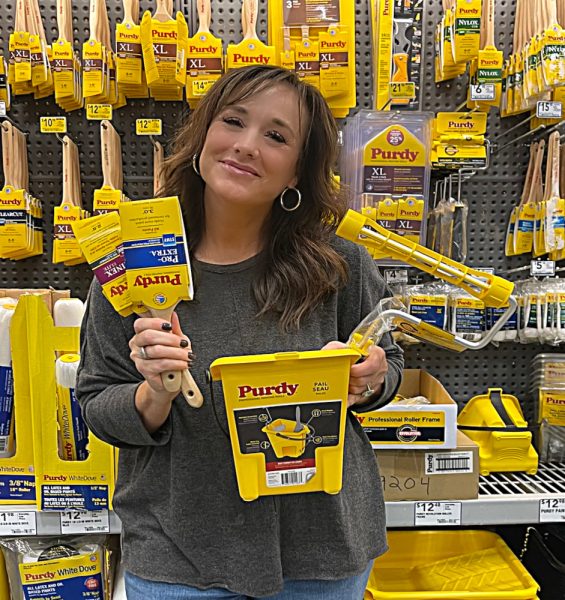
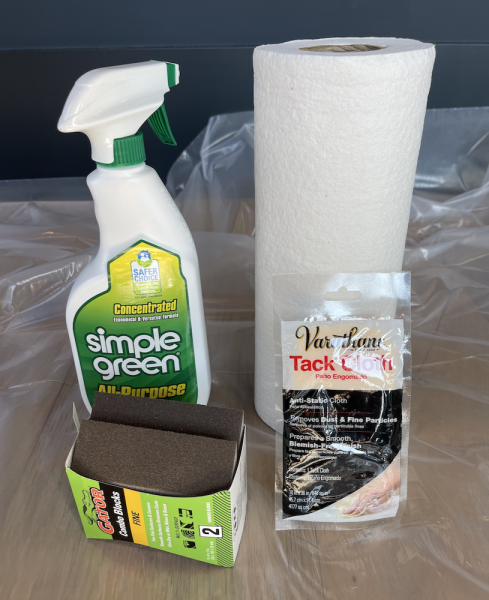
Materials You’ll Need
Before you begin, gather the following materials:
- Purdy Nylox Brush (for latex top coat)
- Purdy White Bristle Brush (for oil based primer)
- Purdy Jumbo Ultra Finish 3/8 nap roller and frame
- Mini Paint trays
- Screwdriver (if the hardware is removable)
- Sandpaper or Sanding Sponge (180-220 grit)
- Cleaner, Paper Towels and/or Tack cloth
- Primer (We used Sherwin Williams oil based primer)
- Paint (We used Sherwin Williams Emerald Urethane paint in “Shiitake”)
- Painter’s tape (if needed)
- Drop cloths or old sheets
- New hardware (optional)
- We used Rub n’ Buff “Gold Leaf” to repurpose the hardware.
Step 1: Clear and Clean the Area
Start by clearing the area around your sideboard buffet. Remove any decorative items, dishes, or other objects on top of or inside the buffet. This will prevent any dust or paint splatters from damaging your belongings.
Step 2: Remove Hardware (If Necessary)
If your sideboard buffet has any knobs, handles, or other hardware, use a screwdriver to remove them. This will make the painting process smoother and ensure that you can paint all the nooks and crannies.
Step 3: Clean the Furniture
Use the product of your choice to clean and remove any buildup or dirt on your furniture.
Elizabeth’s sideboard had been sitting in her garage for a while, so it wasn’t extremely dirty, but definitely needed a good cleaning.
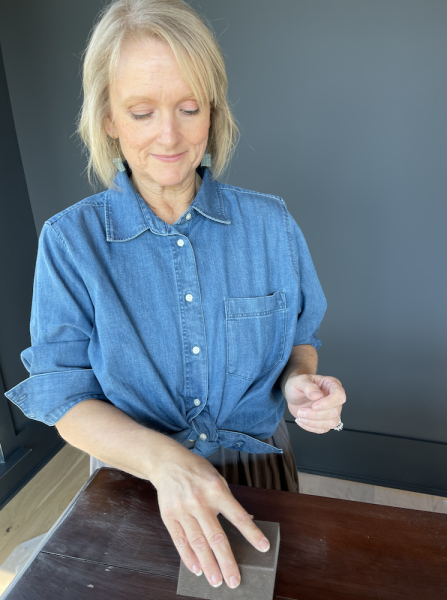
Step 4: Sand the Surface
Using a medium-grit to fine-girt sandpaper or a sanding sponge, lightly sand the entire surface of the furniture. Sanding helps to remove any existing finish, roughen up the surface for better paint adhesion, and smooth out any imperfections.
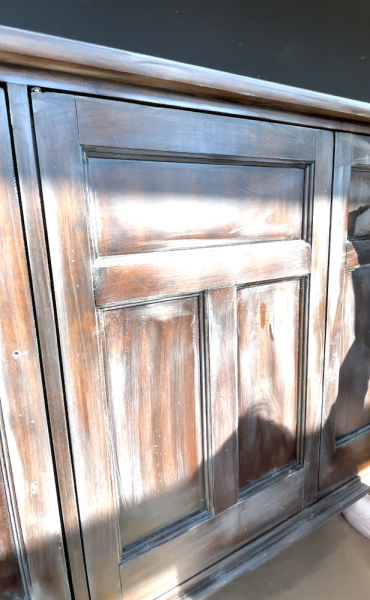
Step 5: Wipe Clean

Use a tack cloth to wipe down the entire buffet, removing any dust or debris created during the sanding process. A clean surface ensures that the paint adheres properly.
You can also clean your furniture one more time with spray cleaner and paper towels, if necessary.
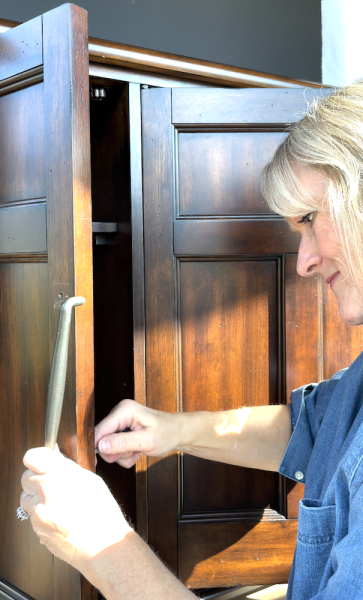
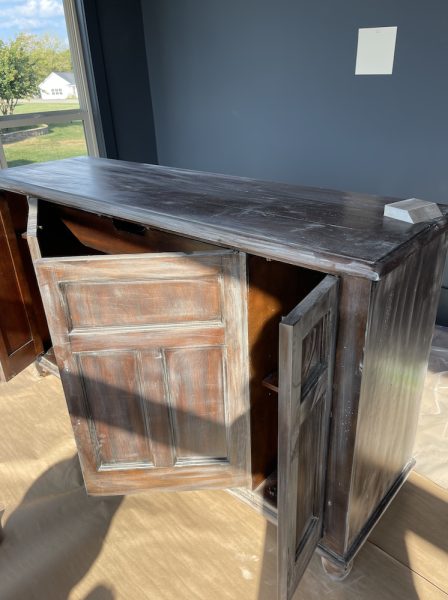
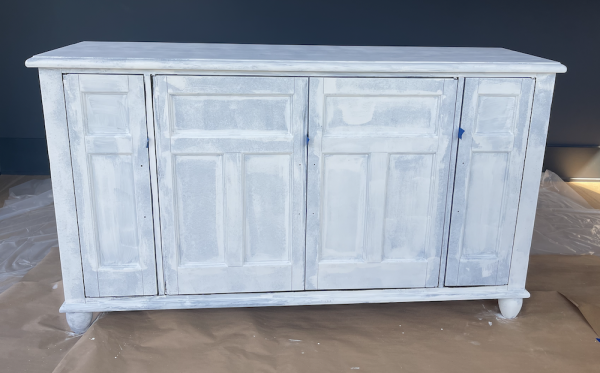
Step 6: Apply Primer
Apply a coat of primer to the buffet. Primer helps the paint adhere better and provides a consistent base color. I used Purdy’s White Bristle angled brush for oil-based paint and stains. This is the perfect brush to use on furniture because it gives an ultra smooth finish.
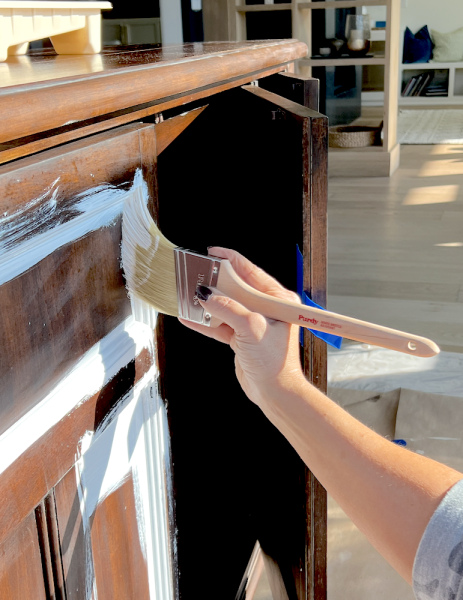
For the smooth surfaces on the sideboard, I used Purdy’s Jumbo Ultra Finish mini roller and frame in a ⅜” nap for an ultra smooth finish!
It’s okay your primer looks splotchy when dry. That’s normal. 👍🏼
Allow the primer to dry completely before moving on to the next step.
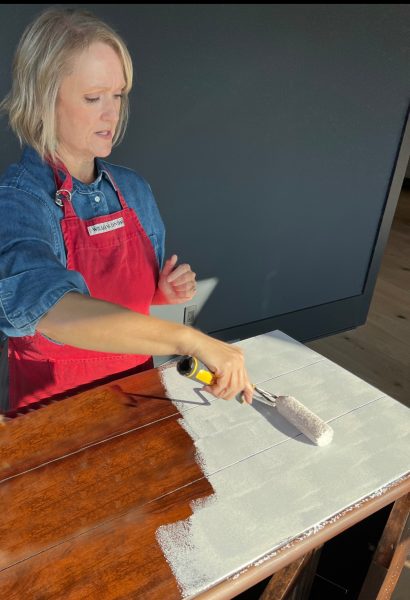
Step 7: Paint
Now comes the fun part! 👏🏻
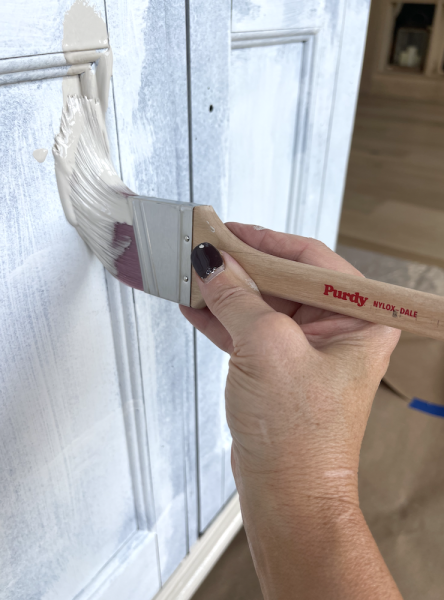
Apply your chosen paint color to the sideboard buffet using Purdy’s Nylox brush for any grooves, angles, or for cutting in. This brush is great with latex paints. I LOVE the way the paint goes on when I use this brush! For the smooth surfaces, used the second Purdy’s Jumbo Ultra Finish ⅜” nap roller in the package for a flawless finish. (You cannot use the same roller you used for the oil based primer.)

My favorite paint to use when I’m painting furniture or cabinets is Sherwin Williams’ Emerald Urenthane. It gives such a perfect finish that looks professional, and it’s very durable!

Step 8: Reattach Hardware (If Necessary)
Once the paint and any topcoat have dried, reattach the hardware using a screwdriver or drill. If you want to update the look further, consider replacing the hardware with new knobs or handles, OR giving it new life with Rub n’ Buff.
We chose the latter and used “Gold Leaf” Rub n’ Buff on the hardware before reattaching it to the sideboard. Elizabeth applied the Rub n’ Buff with a small craft paint brush, and did a great job on this step!

Step 9: Final Touches
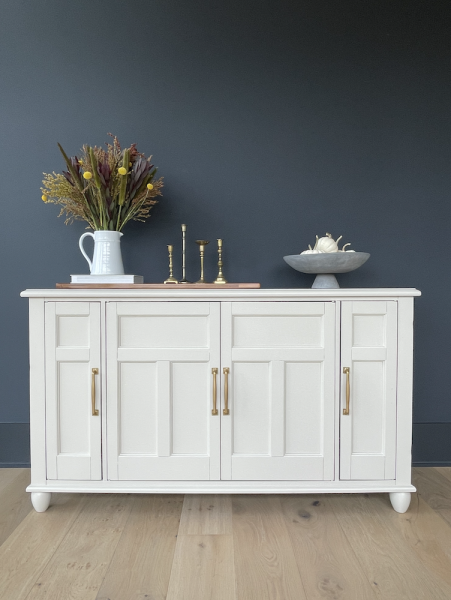
After everything has dried and your sideboard buffet looks stunning, return your decorative items and dishes to their rightful places. Stand back and admire your transformed piece of furniture.

Elizabeth and I were THRILLED with how it turned out! It is absolutely stunning against her “Railings” color matched paint on the walls.
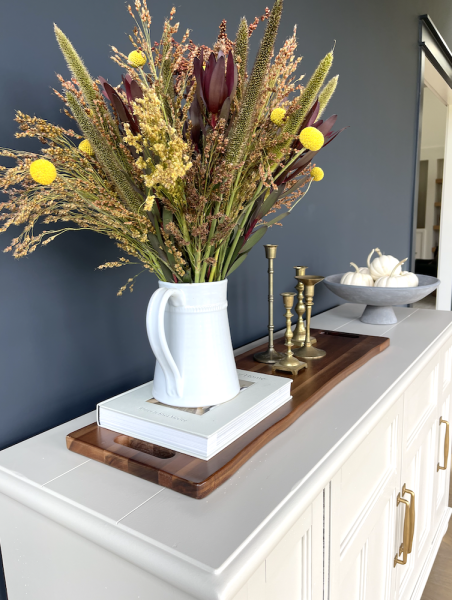
The original sideboard buffet was dark and outdated, and now it looks like a fresh, brand new piece of furniture! I couldn’t get over how professional the finish was this sideboard….it was truly stunning!
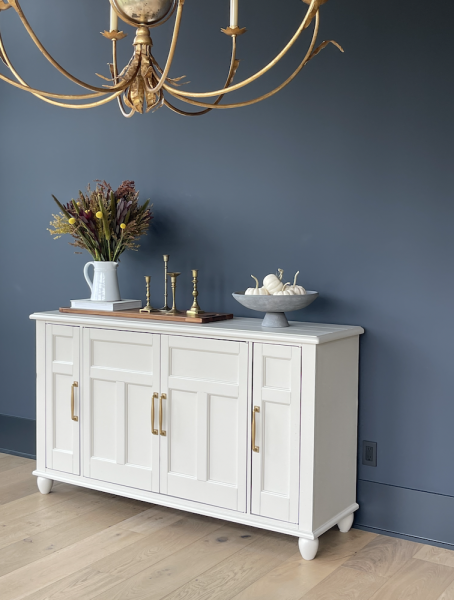
The hardware is now a perfect match to the gorgeous chandelier in her dining room!
I still can’t get over the before and after! It’s hard to believe it’s the same piece of furniture!😳
Thank you, Purdy, for letting me do this project! It was so fun to meet someone from my instagram family in real life and work together on this project! Elizabeth said she now feels confident to paint another piece of furniture that she has been wanting to paint! yay!!! I told her to send me a picture if she does!
I hope this post inspires you to tackle a painting project in your home as well!
Painting a piece of furniture is a rewarding DIY project that can give new life to an old or outdated piece of furniture. With Purdy paint tools and a little patience, you can transform any piece of furniture into a stylish and eye-catching addition to your home decor. Whether you choose a bold color or a classic finish, your freshly painted furniture will be a focal point in any room!
You did a great job Elizabeth! I know you are pleased with yourself and the overall beauty of your sideboard. Of course you did have an establish helper. Credit goes where credit is due. A job well done from both of you and PURDY!
Thanks so much!! Elizabeth was a great helper! I had so much fun working with her. :)
Great job. You are so talented on helping her step by step. So new and fresh looking.
I’m glad you had so much fun in Kentucky. Jonathan so blessed to have so many friends and family show up. So neat.
Thank you, Kathy! Yes, we are so thankful for the amazing people the Lord has put in our lives. :)
Thank you, Traci. That sideboard looks like new factory-finished furniture in the close-up photos! This is a post that I will keep for use in the future.
Thank you so much! Those brushes really do give a factory finish!
Wow!!! You have inspired me!! Now that the piece is white it stands out so much and the doors appear to look like and stand out as Shaker Style cabinets! You make it look so easy. Thank you so much for doing this with “one of us”!.
Thank you, Holly!
Looks wonderful!!
But I do have to say there are so many videos and pop up ads That is hard to read and see.😕
Beautiful!
Thank you, Anita!
Just as you said…a stunning makeover! It’s gorgeous!
Thank you, Susan!
What type of primer did you use?
I used Sherwin William’s stain blocking primer. But you could use Kilz or Zinnser primer as well.