I am so happy to introduce my guest to you today!!
You may have heard me talk about my friend, Richella, from Imparting Grace, on my blog before.

Richella is one of my dearest blog friends. I met her shortly after I started blogging, and we instantly connected. Her precious comments brought me great comfort and encouragement during my mom’s illness and death.
I was so blessed to finally meet Richella in person at Blissdom this past January. She roomed with my sister and I! It is such an amazing feeling when your online friends become your real life friends.

That is Richella in the beautiful teal blouse. Seeing this picture again brings a tear to my eye. I love my blog friends so much and miss them terribly!
(Love you, Chris, Myra, Richella, Sarah, and Rhoda!)
Richella can be summed up in these words: Genuine, Compassionate, and Loving.
And she’s also a lot of fun!
She’s probably going to kill me, but I have to post these pictures of us in the Photo Booth at Blissdom.

She’s my buddy!
Richella’s blog is a treasure to read. If you do not follow her blog, you should. She will bless your heart!
Here are a few of my favorite posts of Richella.
Her New Guest Bedroom:

This next post blew my mind! She used a styrofoam cooler to make this beautiful ottoman. I’m totally serious!! A styrofoam cooler!

I love that her blog contains so many great things…home decor, crafts, English lessons (which I desperately need!), thoughts from her heart, and a whole bunch of spiritual wisdom.
Richella is also a mom of all boys. Three precious red-headed boys to be exact! And one of my very favorite posts of hers is a poem she wrote called, “Thoughts from a Blogging Mother.” It’s a must read if you are a mom and a blogger.

As a side note, I would like to ask all of you to please pray for Richella and her family in the coming week. Her husband, Jack, is having major heart surgery on Tuesday, April 12th, and I know she would covet your prayers. You can read about her husband is a post she just recently wrote, “Hope Matters”.
 If you have never met Richella here in blogland, you are in for a treat!
She is beautiful. Her home is beautiful. But most importantly, her heart is beautiful.
So without further ado, here is Richella….
I’m so excited to be here at Traci’s today. I’ve known Traci now for nearly two years–and that’s a long time in blog years! One of my dreams came true when I got to meet Traci and her sister Cyndi at BlissDom in January. In fact, I got to room with them. Please don’t hate me!
Today I’m really glad to share an easy project that I’ve just completed for my kitchen: a no-sew faux Roman shade. (Try saying that three times fast!) First, I’ll show you my old kitchen window treatment:
That’s also a faux Roman shade, and I’m proud to say that I made it by following the wonderful step-by-step instructions from Sarah at
Thrifty Decor Chick. If you’re interested in making
Roman shades, I highly recommend Sarah’s method. It will give you the look of an authentic Roman shade, and her instructions are easy to follow.
I love my red shade, and I’m going to use it again in the autumn and winter. But I wanted something a little different for spring and summer.
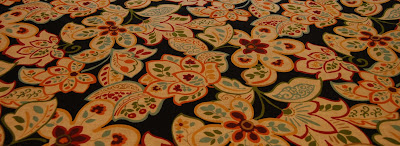
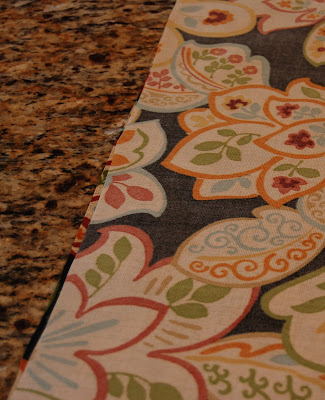
I considered something light-colored, but this is a west-facing window, and I wanted a dark background color to provide good heat-blocking on summer afternoons. So I was tickled when I found this fabric:
This fabric looks cheerful and summery to me. As an added bonus, it’s an outdoor fabric, so it won’t fade. (Note: the fabric is from Not Just Linens in Durham, North Carolina, and it’s called “Dorothy Ebony.”)
I’ve been so busy lately that I didn’t have time even to follow Sarah’s easy tutorial, so I came up with a quick, easy way to make a pretty good copy of a Roman shade. Here are the steps I followed.
Decide on the measurements you need. For this method, you’ll need to end up with a shade that’s the width of the inside of your window. The length of the shade would ideally be the length of your window, but it doesn’t necessarily have to be that long. Simply cut your fabric to the correct width plus an inch on either side and the twice the length you want to end up with. (This is a no-sew method, so you’ll need double the fabric length. If you want to sew a lining fabric to your shade fabric, you’ll just need a single length of fabric and a length of lining.)
Lay your fabric out on a large work surface. You’ve cut your fabric an extra inch wide on each side; now turn the fabric under 1 inch on each side and secure the flaps with fabric glue or with Stitch Witchery. (For my shade, I needed the full width of the fabric plus a little extra, so I simply used glue to secure ribbon to the selvages of my fabric.
Once you have your fabric to the desired width with the sides finished however you like, double the fabric over, right sides together. Glue (or Stitch Witch, or sew if you like) the two cut ends together to create a seam.
Turn the fabric right side out. Now you have a large rectangle of doubled fabric.
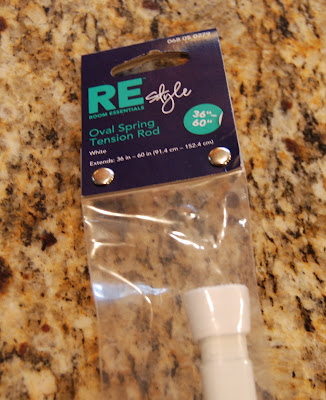
And now for the secret tool that makes this shade possible: the tension rod. These rods are adjustable to any length. Measure the inside of your window frame to find the length you need, and adjust the rod using the manufacturer’s directions. (Note: The insides of my window frames are not very deep, so I used an oval rod.)
Insert the rod into one end of your fabric rectangle, like so:
Hang your fabric rectangle in the top of your window frame:
See? My shade isn’t exactly the right length, but I’m only going to use it as a stationary treatment at the top of my window, so it doesn’t matter that it’s not quite long enough.
Take a second tension rod and hang it a few inches lower than your top rod (mine is about 7 inches lower than the top rod), like so:
Now bring your fabric up to double over the second rod.
Now repeat that process with a third tension rod. Here’s how the shade will look under the folds. (Those cup hooks are there from using Sarah’s method to make the red shade.)
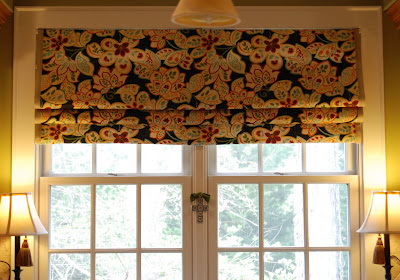
You’ll have to fiddle with it to get the folds just the length you like, but it doesn’t take long. And here’s what you’ll have:
A fun, faux Roman shade that’s so quick and easy to create that you may want to make one for each different season!

I’m so grateful to Traci for the chance to meet all of you. I’d love to have you visit me at
Imparting Grace!
Thanks for sharing such a beautiful and simple project with us, Richella! You are the best!


What a clever idea! I love the fabric choice! Thanks for a wonderful tutorial!
WOW, great directions! Thank you so much for sharing!
1. What a gorgeous poem.
2. I love the curtain!! I am totally going to do this in my kitchen window (which also faces west and is HOT in the summertime). How does it look from the outside? Can you see the rods?
3. Thanks for sharing! So excited to start reading your blog.
Richella IS great, Tracey! I’m always happy when I see a comment from her on my blog. This is a great tutorial and I love that she used tension rods to get the look. I can’t tell you how many of these things I have in my basement storage! Some of my windows I have no choice but to use tension rods.
Adore Richella!!!!!! Love this amazing roman shade! Great job girl! :)
Traci, I love that you had Richella as a guest today. Richella is fabulous lady! I read her blog regularly. :)
I love the new shade, Richella. The fabric is beautiful!
Hooray for Richella! I was lucky enough to meet her at Blissdom and loved her instantly. Thanks for highlighting her today, Traci.
As a completely non-crafty type person, I LOVE this idea. You make it look so easy, Richella. I’m going to tuck this away for the future. Thanks!
Ooooh, I LOVE that fabric and love this project! I may just use it for my kitchen window. I have a bunch of wooden dowels…do you think they would work instead of tension rods?? And I am loving that ribbon on the edges AND that I still don’t have to sew to do this! :) Fantastic, Richella!
You two are so much fun, what a GREAT tutorial, beats the socks off mine! Your idea is so much easier Richella, love the fabric too.
:)
xo
Kate
What a great idea!! I’ve been looking for an easy tutorial for Roman shades! Yay! Off to the fabric store I go!!
I found making the faux roman shade with the three tension rods, so much easier than doing it the other way! My husband actually came up with the idea for me when I was struggling using the tea cup hooks. Its a great idea Richella! I’ve had so many compliments on my window treatment! Love it!
Okay, here’s a secret I almost don’t want to share with ya’ll today!!!! But I will cuz I’m nice. I was at my local Hancock Fabrics yesterday (and yes, I checked, they have them in Kentucky) and they are having a sale called a Clean Sweep (I think that is what they called it)!!!! Tons and tons of fabrics are a DOLLAR a yard. One buck!!! I went back to where the upholstery fabric was and, get this, . . . wait for it . . . upholstery fabrics for TWO DOLLARS per yard. I bought a gorgeous fabric for a shade for my bathroom that was $40 per yard on sale for $2 per yard!!!!! I bought 4 yards which was more than enough!!!! Eight smackeroos instead of $160? What’s not to love!!! The clincher here is that when it is gone, it is gone! They will tell you if more is available at another store. Wooo Hooo! There are some very beautiful fabrics there just patiently waiting for you to adopt them!!!
What a great idea! I never would have known that this treatment didn’t involve complicated sewing.
S
H
E
is
S
M
A
R
T
!!
And all those other things you said about her, too!!
Will go read about her hubby and start praying, too!
Blessings as you make your home!
~Leslie
Thank you for featuring her today!
I LOVE this Richella! We’re moving into a house at the end of the summer that has a similar window and I am tagging this so I can try it out. Thanks! Great guest post, Traci! :)
Hey Traci–
I don’t deserve all those nice things you said about me, but I’ll tell you the truth: I’m so grateful you said them!! You are so kind. I am blessed to have you as my friend.
I do love my new Roman shade, and the tension rods are holding quite well. I have thought of a couple of things I want to do in my kitchen to go with the new shade, but those projects are going to have to wait until Jack gets out of the hospital. Maybe when he’s at home convalescing I can do some crafty stuff! :)
I love you, Traci!
Richella is a sweet friend from college. It has been so good to find her in the blogging world, too. Such a great idea for a quick window treatment!
Judy :)
I thought this technique of using tension rods to hang the faux Roman shade was beyond brilliant so I bookmarked it to try at a later date. Well, today was the day I finally had a chance to make it and it turned out great! I actually sewed a pocket to slip the top rod through because my fabric was a bit pricey and I didn’t want to spend the extra money to double it. I also braced the tension rods between the cabinets on either side of my window to give the illusion of a larger/taller window since my kitchen window is on the smallish side. This was a fun, easy project that looks like a million bucks and I want to share it with my readers so I’ll be posting about my new faux Roman shade soon and linking back here for the tutorial. Thanks for the wonderful inspiration! :)