
Step by Step Guide to Painting Furniture
Step by Step Guide to Painting Furniture

*This project is Sponsored by Purdy . All opinions and ideas are 100% mine.
Today, I am going to share with you the simple steps I took to paint this piece of furniture.

This dresser used to be my mom’s before she passed. She used it in the “grand kids’ room.” I used it in our boys’ room for a while, but since we’ve moved to Tennessee, it has sat in the garage because it doesn’t really go with my decor in this house. But I knew a coat of paint and new hardware could make this piece look brand new and would get it out of the garage and back into the house! :) (And believe me, my mom would want me to paint this dresser. She used to paint furniture all the time, and it is where I got my creative spirit.)
Here are the steps I followed to paint my dresser:
Step 1 – Gather Painting Tools
To begin my painting project, I gathered the tools I needed to get the job done right!

- Purdy Clearcut 1.5” Angular Brush
- Purdy Revolution Jumbo Mini Roller Frame
- Purdy Ultra Finish Jumbo Mini Roller Cover
Other supplies:
- Paint
- Palm Sander with 180 grit sanding discs or 180 grit sanding sponge
- Tack cloths
- Cleaner
- Screwdriver
- Drill
- New hardware
For our paint, we used Valspar’s Cabinet and Furniture Paint and had it tinted Sherwin Williams’ “NAVAL.”
Step 2 – Remove the Hardware
Next, I removed the old knobs from the dresser. There was one missing, so I knew I was going to have to replace them eventually. Most hardware can easily be removed with a screwdriver.

Step 3 – Clean the Furniture
Before you start the painting the process, you need to clean the furniture really well. I love to use a “magic eraser” to get the piece extra clean.

Step 4 – Filling Wood Imperfections
If you have any imperfections in the wood, you can use Minwax wood filler to fill them. Once the filler is dry, lightly sand it smooth. I skipped this step because I love the imperfections in my piece! :)
Step 5 – Sanding the Piece
Once the furniture is clean and dry, it’s time to sand. This is a very important part of the process because it determines the quality of finish you get when you paint.
I used my palm sander with 180 grit sanding discs to sand my furniture. You could also use a sanding sponge if you prefer. You do not need to use a lot of pressure when you sand, but you want to just lightly scuff off any dirt and debris. Sanding will also help the paint to adhere better to the furniture.
Step 6 – Wipe of Dust with Tack Cloth
Once you are finished sanding, use a tack cloth to remove the dust.

You want to make sure to remove all dust particles before painting. If not, the dust particles will get stuck in the paint and ruin your finish.

Step 7 – Time to Paint!
If your paint does not include a primer, you will want to first paint a layer of primer on your furniture before painting. However, the paint I used had a primer included, so I skipped the priming step.
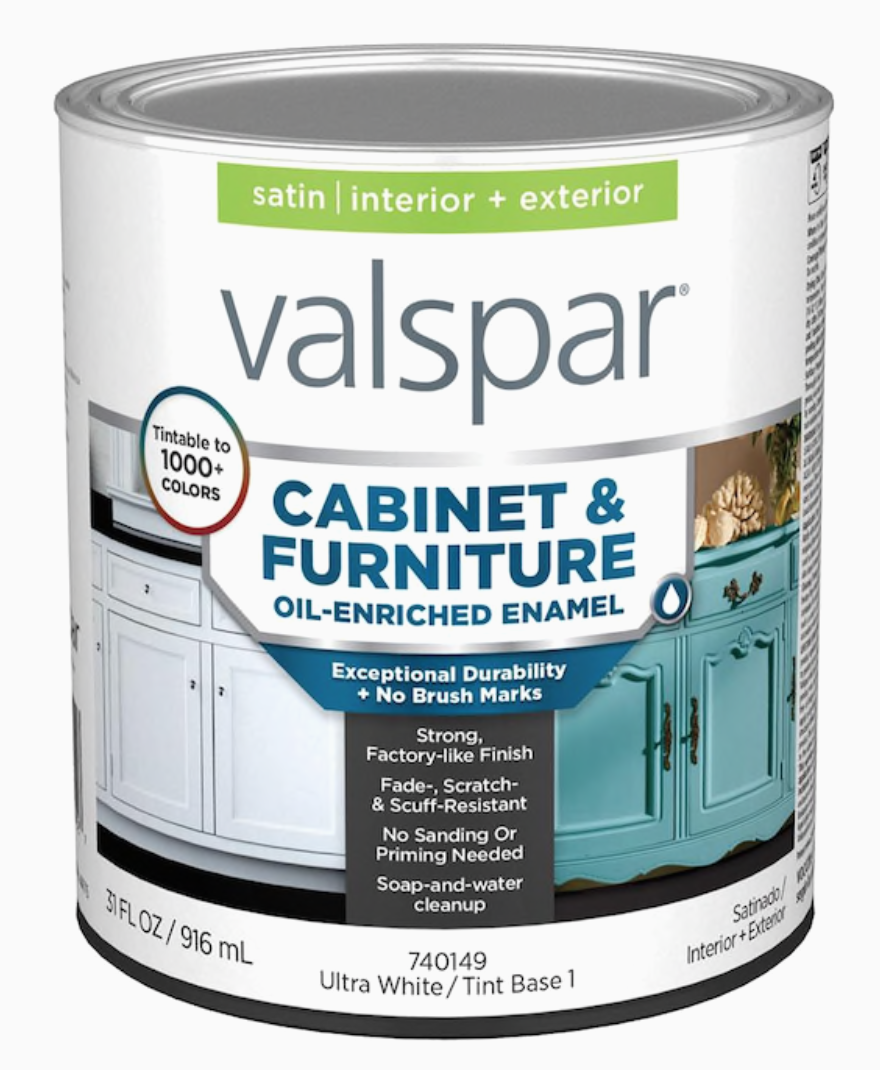
I used Valspar’s Cabinet and Furniture paint in Satin and chose the color NAVAL by Sherwin Williams.
When painting, I always like to use my Purdy Clearcut® Angular Brush to paint any non-flat surfaces. The Purdy Clearcut® works well with latex paints and primers for precision work on furniture or trim work. The dresser I was painting had several different trim pieces that my Clearcut worked perfectly on. I also used the brush on the feet of my dresser.

For the flat surfaces of my dresser, I used Purdy’s Ultra Finish Jumbo Mini Roller Cover. This roller distributes paint evenly creating an ultra smooth finish.
The Purdy Revolution Jumbo Mini Roller Frame is durable and provides smooth rolling. Its lightweight design and comfort grip handle help to reduce arm fatigue. Designed for hard-to-reach areas and small spaces, the Jumbo Mini Roller Frame is available in 12″ and 22″ lengths.

When painting, you want to apply a light coat each time. Do not apply your paint too thick.
Step 8 – Lightly Sand between Coats of Paint
I let my paint dry for about 4 hours (according to the can,) before lighting sanding it again with my palm sander. I used the 180 grit sanding discs for this step as well. This step ensures that your surface is very smooth and without imperfections before applying another coat of paint.

Be sure to use another tack cloth to remove any dust before applying your second coat of paint.
Step 9 – Apply Second Coat of Paint
This step is the same as step 7. Again, I used my Purdy Clearcut® Angular Brush and Ultra Finish Jumbo Mini Roller Cover roller to apply the second coat of paint.

Depending on the coverage, you may or may not want to apply a third coat. If you do, I suggest waiting 4-6 hours between the second and third coats as well. I only had to do two coats of paint on my dresser, but I let it dry overnight before adding the hardware.
Step 10 – Attach Hardware
For my dresser, I bought cup pulls instead of knobs. Because of that, we had to drill an extra hole to attach them to my dresser. Attaching hardware is something I can do, but I am not ashamed to admit that my husband is much quicker and more precise when doing it. He’s had a lot more practice at it than I have!

So he used a level to measure and mark where to drill the extra hole. After drilling the new hole, he attached the new hardware.

Within minutes, he had all ten cup pulls installed!
I am thrilled with how it turned out!!! It’s unrecognizable!

Can you believe this is what it use to look like?…
Now it looks like a brand new dresser, and I am so glad that I can use it in my home now.

I really LOVE this Naval color, and I’m wondering what else I could paint this color? hmm…

Have you ever painted with this color?
Do you have a piece of furniture that needs to be painted?
Hopefully I have given you the steps to follow and the tools you need to help you get it done. Check out the video below to see my paint the dresser step by step!
For more Purdy inspiration, or to find Purdy Paint Tools near you, click here.
Such a difference, love Naval, good job.
I love how this dresser turned out!
This was the inspiration I needed. I have a long dresser that I removed the mirror from and I’m currently using as a sideboard. I will use the same brand and color of paint you used. I also prefer to use Purdy paint brushes. The steps you demonstrated were so informative and will be easy to follow. Thanks for the inspiration. This piece will be used in my Vintage Rental Showroom. Have a great 4th of July.
Gorgous! What room is it in? I love the black window frame.
Sherry H
This is just gorgeous! I absolutely love this color!!!
Can you provide details on the type and color of paint? Thanks!
The paint color is Sherwin Williams, NAVAL. I used Valspar’s Cabinet and Furniture paint in satin.
This is a favorite color of mine! I had an accent wall in the bedroom of my old apt painted SW Naval. It’s such a beautiful color I do recommend using it elsewhere in your home! 😁
This is an amazing change for the piece!
xo
Pat
Love the color, looks modern and fresh.
I love how paint can transform a piece to have a whole new identity within the home. The paint color is beautiful and looks flawless with the supplies you used from Purdy. Love the drawer pulls too. Thank you for sharing and inspiring us!
Happy 4th!
Thank you, Mickey!!
Turned out SO nice!! What paint sheen did you use? Satin?
Yes, it was satin. Thank you!
You make everything look so easy. Beautiful job!
I love that color. “On Sutton Place”, Ann, has it on her front door. I’m considering it for my front door too.
Awesome!! As always you knock it out of the park!! I love the look!!
Wow!!!’ Great job. Looks great. Love the color. What room is it in? I need to save this post. I’ve never painted furniture…. Not creative at all. You make it look easy. Thanks.
Would you use the same steps to paint kitchen cabinets?