
How to Build a Newel Post
Today, I want to show you how we built our on newel post for our new staircase.

If you have followed my blog for long, you know that I love to add old house character and charm to our newer home.
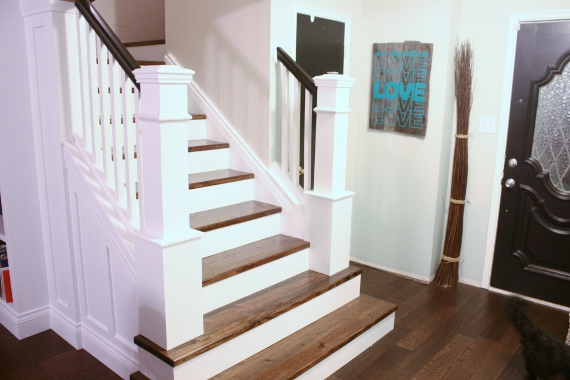
We have been building a two story addition to our home over the past few years, and I knew that I wanted a thick, chunky newel post for our new staircase.
Like this one…

I would have loved to have scored an antique newel post, but I couldn’t find one in our budget. So I showed some pictures of ones that I liked to my husband, Cy, and he built one for me! ![]()

Here are the steps he took to build it.
He started with a 4×4 post that we already had in our barn. {As you can see, he cut into the first step to build the newel post. I would describe how to do that, but every set of steps is different, and you may or may not want your newel post coming out of your first step.}

He added a 2×4 to one side {although he said you wouldn’t have to do that.}

Next, he wrapped the 4×4 with 1×8 pieces of poplar board. Make sure the pieces are level.

Here is what it looked like before he added the final 1×8 poplar board…


Next we added a lot of trim work to get the look we wanted. You can take a lot of liberty in how much trim you use, what type of trim you use, and where you use it.
It is a preference thing.
We trimmed the middle of the newel post with 1/4 inch by 2 inch poplar trim pieces. Then we added a trim piece on top of that. Next, we placed a square 1/2 inch piece of birch plywood to the top and trimmed it with round trim.

Cy always added wood glue to the trim pieces before he nailed them with a finish nailer.

For the top, we bought a fence post cap from Lowe’s.

We originally planned to use the whole cap, but it looked a little weird when we placed it on top of our newel post. So Cy took the bottom of the fence post cap off {see above} and just used the top for our newel post.
I liked it much better that way.

The bottom of the newel post is made of 1×12 pine boards and some decorative trim.
Before painting, we made sure to fill all the nail holes with wood filler and sand them smooth.
We also filled any gaps between each wood piece with white paintable caulk. This is a VERY important step to give it that finished look.
I noticed when looking at this next picture, that we added another piece of small trim underneath the square piece of wood. As we were building it, we could tell something was missing. That extra piece of trim really finished it off.

Here is a view of the top…

The bottom…

I love my new “old” newel post! It’s exactly what I was wanting.

We still have a few other things to do to our steps before they are completely finished. Just detail stuff.

I’ve always loved the look of a staircase in a home. Won’t it be fun to decorate next Christmas?! ![]()
If you like this project, I would love for you to share it. Thanks!

****************************
I’m linking to…

.
Two of my sweet blog friends, Sandra from Sawdust Girl and Cassity from Remodelaholic, have also built their own newel posts. To see each of their projects, click on the pictures below.

*****************************
****************************
If you like this post, you may also like to check out these…

*******************************

************************************

Great job! I guess we really lucked out. We went to a local historic salvage place and scored a newel post that looks almost identical to the post that should have been there but was ripped out … and it was only $25! http://www.addhousewife.com/2013/02/treasure-hunting.html and it looks almost identical in style to yours.
Just GORGEOUS Traci!! Wow, I’m so excited for how this is all coming together for you! Beautiful!
Wow. Fabulous!
Well done. you make it look simple, but what a gift for your husband to be able to create that.
What a great addition to the stairwell! Can you share details re how the post was attached to floor?thanks!
Gorgeous! Wish we had a staircase just to make a newel post. :)
I love this! I just realized last night that our post won’t match once we install darker hard wood floors, but this will look so much better than just painting the post that is there now!!
Cy really has a gift, doesn’t he? You have such great taste, and he has a way of being able to translate it into your home. Beautiful job y’all!
Traci- it is SO wonderful you guys did a wonderful job! Love this!
LOVE your new newel post. Love love love love love. Did you get that? :-)
Got it! ;) xoxo
That is beautiful! It makes such an impact on those stairs…LOVE IT!
Thanks, Sonya!
That looks fantastic! Makes me wish I had stairs. Lol
VA VA VOOM!!!!!!!!! Your house is really blossoming, sweet T! :-D
Thanks, Lay! We love how it is coming together. Now get your bootie up here and style it! {hee.hee.}
Great Job!!! At first I thought I could never do that to my stairs in my house because mine are not open like yours. And then you showed the example from “Sawdust Girl” and that is exactly how my staircase ends. It is enclosed. When you come in our front door, that is where our stairs are. That would look so great on our stairs and we could do it on both sides. I am going to save this example in my house project book. Since we are going to stay where we are for now we have decided to do some improvements around here. I really like this idea!!
BUT…….CAN I BORROW CY??????? I’ll feed him! LOL!
Have a great week!!
Hugs,
Marilyn C.
That’s awesome, Marilyn! I am so glad you might be able to do a project like this. :)
I sure do wish you could borrow Cy. I would come with him, so you would have to feed me too.
How far are we from each other?
beautiful! Love it and he makes it look so easy, haha.
Jeanne
Staged to Perfection
What a beautiful job he did!!!
You are blessed to have such a handy husband!
By the way, how is his new business going?
Hi Marilyn!
Cy’s business is going really well. Thank you for asking! He is super busy, which is great.
So far, so good! :)
Traci
This is really beautiful. Thanks for sharing. How is the new business going?
Hey Shirley!
His business is going well, but he is SUPER busy and tired every day. :)
But we are thankful for all the work he is getting. It’s better to be busy than not, right?
Thanks for asking!
Traci
Cy did such a great job on that newel post!! Your stairs are looking FABULOUS!!
Great job! If I had also stairs in my house it would be perfect to implement this idea!
Um, I’m just super impressed that I finally know how to spell “newel” post. Always wondered about that. :)
Traci, your staircase looks beautiful. I noticed that the stain got on your walls when the treads were finished, did you have to do something special to the walls for the paint to turn out so nice
in that area? I about drive myself crazy when painting trying to trim without getting paint where it shouldn’t be so any tips you have would be helpful!
Carol,
We just put painter’s tape on the stairs before we painted the wall, and it gave us a crisp line. Frog tape is my favorite painter’s tape.
Hope that helps. :)
Traci
What a great idea! I love how that turned out!!!
The stairs and that post looks awesome! What a great job you did. Thanks for sharing the instructions. I can ask my husband to do the same and he can follow your instructions. Thanks!
I am trying this out, but I have a question about the box construction. Is it a square or a rectangle? From the way that your husband has it “boxed” the length of the box is longer than the width. The way I calculated it, seemed to indicate that the sides of the box were 8 3/4″ by 7 1/4″ Did he rip some of the 1×8 shorter to compensate for the length? Does that make sense?
Hello, this is perfect. I’m inspried to try this myself. My question is how much you spent on material to build it compared to buying a solid newel. Thank you
This is great! Thank you for your simple explanation on how to get it done! You are truly inspirational!
Niki
PS, what kind of floor is in the room the stairs are in?Can you tell me the stain? Is it hardwood or engineered wood?
How did you stabilize the 2×4 post? Is it anchored to the floor?
Do you have an estimate on how much $ it cost you to build this post? Thanks for the tutorial, I think it is exactly what we need!