
5 Paint Tips for Your Next Home Project!
*This post is sponsored by Purdy. All opinions and ideas are 100% mine.
Whether you are painting a piece of furniture, a door, a wall, or kitchen cabinets like me, today I am going to share 5 painting tips to help you on your next home project!
My home project was to paint these cabinets that I found at the Habitat for Humanity ReStore nearby.

They were beautiful maple cabinets, but the wood color was not the look I was going for in my kitchen. Plus, we had some electrical wires that needed to be hidden above the cabinets, so Cy built a custom soffit box to hide them. To make the soffit and upper cabinets match, I decided to paint them all white.
The base cabinets would be painted black to match the base cabinets in the rest of the kitchen.
Before I painted my cabinets, I had to chose the correct tools for the project, which leads me to the first tip…
TIP ONE: CHOOSE A QUALITY ANGLED BRUSH FOR CUTTING IN AND FOR NON-FLAT SURFACES.
For my kitchen cabinets, I needed to paint the small trim pieces around the glass inserts. Many people spend hours adding painter’s tape to their projects before painting. However, if you use a quality brush like Purdy’s Clear Cut, painter’s tape is not needed!
I have always loathed painter’s tape, which is why I always paint with Purdy’s Clear Cut brush! Check out this selection of Clear Cut brushes…
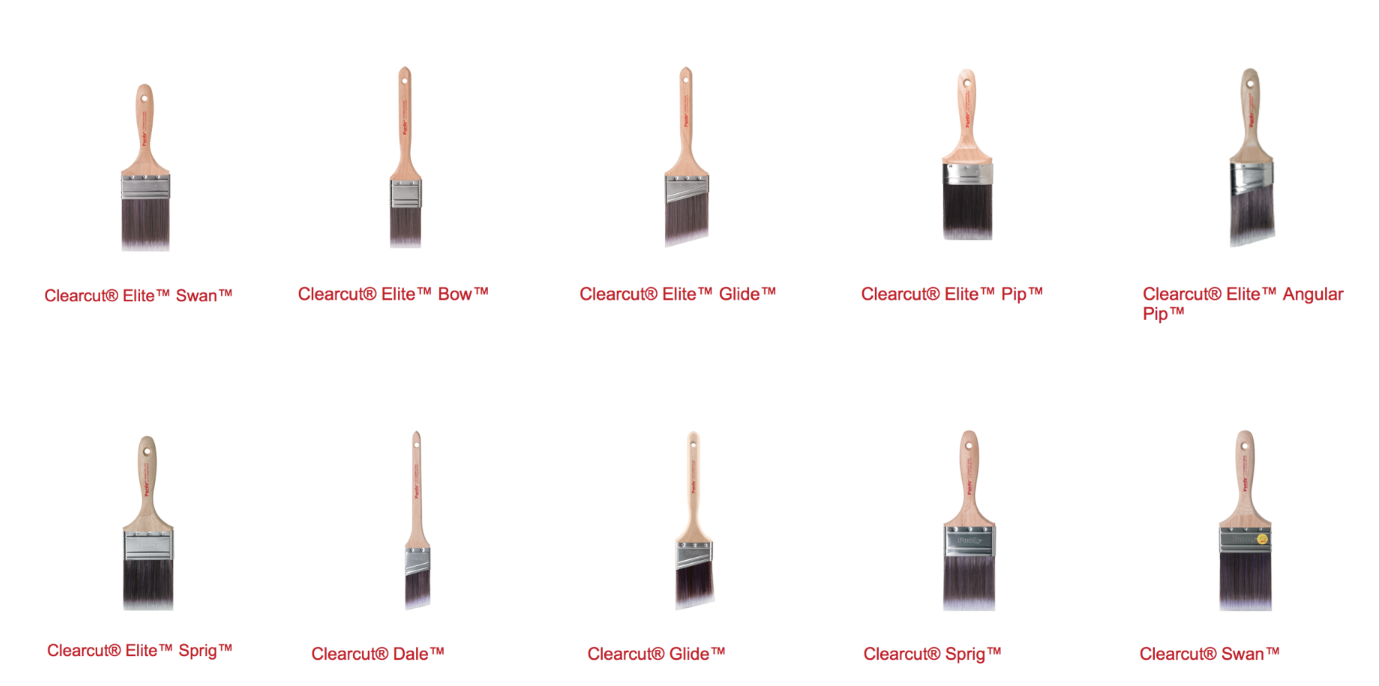
For my upper cabinets, I used the Clearcut Dale because it is a smaller angled brush that made it easier for me to paint the trim around the glass with NO PAINTER’S TAPE! :)


For my lower cabinets, I used the Clearcut Glide. It is a larger angled brush and made painting the large groves in the cabinet doors much easier.

*If you’re painting larger surfaces of a cabinet, the Nylox would be another good choice!
TIP TWO: CHOOSE A ROLLER COVER WITH THE CORRECT PILE.
The texture of the project you are working on will determine the type of roller cover you will use.
For my cabinets, I wanted a VERY smooth surface, so I chose a roller cover with a very small nap (seen below.)
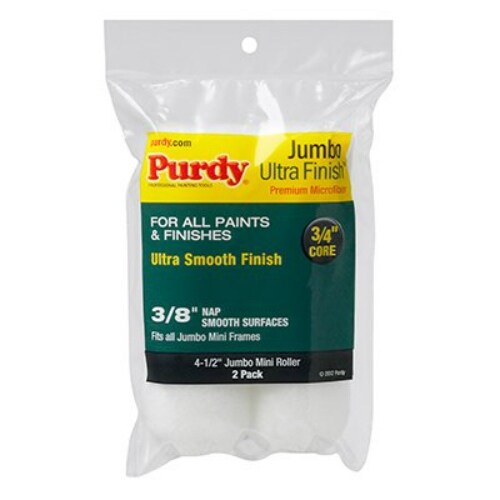

If you need a smooth finish in your kitchen, bath, or utility room, use 1/4 to 3/8 inch roller covers with a low pile such as the White Dove and Parrot™ paint roller covers.
However, if you are painting a textured surface, you should use a higher pile. Purdy makes roller covers with a 1/4 inch pile all the way up to 1 1/4 inch pile.
Also, be sure to check the packaging to see if you roller can be used with water-based, oil-based, or either type of paint.

TIP THREE: WAIT ABOUT TWO HOURS BETWEEN EACH COAT.
Usually, you can apply a second coat after about two hours of dry time. However, if it is humid where you are painting, or if you use a heavily tinted paint, it could take longer.

I applied three to four coats of paint on the top cabinets, but the base cabinets only required two.
I LOVE the way they look now!

(And you may have noticed that I went ahead and painted the dingy white door black as well!)
After painting, it is always important to clean your brushes well, so they will last a long time and for future projects!
TIP FOUR: CLEAN YOUR BRUSHES WELL.
Be sure to clean paint brushes immediately after you use them. Do not soak brushes in solvent or water because this can damage the bristles.

For oil-based paints, varnishes, lacquers and shellacs:
Make sure you follow the manufacturer’s instructions to select the proper cleaning solvent. Pour the solvent into a container and dip the paint brush in it. Dip your paint brush in the container several times while you work the thinner through the bristles. Spin the paint brush into a waste area to remove excess thinner, and then repeat with a clean container and thinner.
For water-based (latex) paints:
The best cleaning solution is a mixture of warm water and mild soap. Dip your paint brush into the soapy mixture, working the cleaner through the brush bristles. I recommend using a paint brush comb to clean the center of the brush and remove any residue near the ferrule’s edge.
Here is the one I used: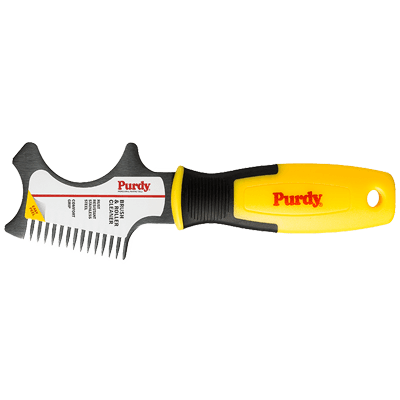 Rinse with clean water and repeat the process if necessary. Be sure to use a clean container with clean soap water each time. For stubborn water-based paints, try mineral spirits or lacquer thinner, followed by warm soapy water and a clear water rinse.
Spin paint brush with hands to remove excess solvent or water.
TIP FIVE: STORE YOUR PURDY BRUSH IN THE ORIGINAL KEEPER.
To get the paint brush back to its original shape, once dry, place it in the original ‘keeper’ which is the packaging that it arrives in. (If your synthetic or natural bristle brush has endured extremely hard use, you may need to steam them in boiling water to help reshape them.)
If possible, store brushes by hanging them. Do not store a paint brush on its tip because it will cause the bristles to “curl.”

I hope you enjoyed these tips and find them helpful for your next home painting project!

I’m still blown away with the power of paint each time I complete a home painting project of my own! I was able to give these second-hand cabinets a brand new look in just a couple days of work, and I love them!

Now I need to find some new hardware for my freshly painted cabinets, and when I do, I will share it with you here!

The cabinets turned out great and I agree quality brushes like those make the job a lot easier! Plus they last so much longer than a cheap brush :)
Beautiful
THEY LOOK GREAT!!!
Your cabinets look soooo good!! I had no idea you were supposed to put the brushes back in the packaging after cleaning them!! Thanks for that tip! I learned something new today!!
Your cabinets turned out absolutely beautiful!!! Love the colors you chose. Very professional looking. I’m sure you’re very proud of them!!
Oh they look fantastic!!! You always do such great work!! Dad always said to use a toothbrush to brush off the paint that collects near the ferule. Gosh, I haven’t painted anything in so long….. Thanks for the beautiful inspiration!!!
Traci, you did a fabulous job of painting your cabinets! 👏🏻👍🏻 They look beautiful, the black door compliments them very well. You have such great taste in design and decorating. 😃
Your cabinets look great! What brand and what type of paint did you use? Water base? Oil base?
Lots of good information that I will be needing soon. The cabinets look beautiful, great job.
I always use Purdy products,they are the best. Your cabinets look great.
I love Purdy paint brushes! I thought they were all the same until I picked one up a while ago and boy what a difference. I’ve never been able to cut in neatly with a brush without making a mess except with a angled Purdy brush!
I LOVE how your cabinets turned out👏!!! So beautiful! I just bought a Purdy brush and roller for my painting project! I hope my cabinets turn out as good as yours!!!!
Beautiful project! Thanks for the tips about the brushes.
Great job! I love the black and white! The door looks fantastic too. I’ve learned a lot about the brushes too although I’ve always thought that Purdy was the best. Do you mind sharing the type of paint you used, any primer, etc.?
Enjoy your weekend!
xo
Pat
This is so helpful Traci. The do so many projects a around my home and next up is my kitchen cabs. I screenshot your tutorial so I can refer back once I get started. Thank you!!
Such an excellent job!
I agree with the above request. Can you please share what primer, and paint as well as colors? I would love to paint my kitchen cabinets that have the dark red wood color. It makes my small kitchen feel even smaller You and your family are such an inspiration to us all.
The cabinets look terrific and the door looks fantastic. I can’t wait to see a “whole” kitchen photo now. :)
Great tips! I love the contrast of the black and white by the way.
Wow, your cabinets are so pretty. Good job around the glass without tape. Waiting patiently for another Youtube video.
Love your work! We too hate painter’s tape. We just painted several rooms and used Purdy products because you have mentioned them before. Thanks for the tips!
The cabinets and your door looks great. I love how you did the black and white. Looks so updated. I hadn’t heard of Purdy brushes etc. before you have told about them. I now will tell my husband for his next project. You are so talented.
Those look ah-maxing Great job and choice of colors. We also us Purdy brushes. Thanks for the tips.
Your cabinets look beautiful! I would also love to know what paint you used, as well as any tips on painting kitchen cabinets. Thank you for sharing your precious family and inspiring projects with us!
I love the cabinets! I would like to know the source for the wood countertop, please.